Not at all Boots / Brian!
The more nostalgia the better. That’s a great story and a wonderful photo - in fact, I believe I may have seen it before (although quite a while ago). Which one are you?
Not at all Boots / Brian!
The more nostalgia the better. That’s a great story and a wonderful photo - in fact, I believe I may have seen it before (although quite a while ago). Which one are you?
I had a feeling I may have shown it before and bored the arse of people; clearly age does indeed weary one(!)
I’m the skinny one in the middle; I can only just recognise myself - such a long time ago - yet so fresh in my memory. I can still smell the pines and the earthy smell of the leaf litter of the track (and the diesel of the passing traffic of course). To my then, what? Twenty-three/four year-old senses, it was literally fantastic. Funny how an image (ie the 1944 one) can stimulate one to that extent.
Perhaps it was just my imagination but it didn’t take much to summon up those black and white images and convert to the then, present; the muffled conversations, the breath in the frosty air, the odd barked (German) order, doubtless the coffee and baccy smell of the soldiers’ breath, the ticking over of the engines, albeit the tinny sound of the Schwimmwagen, probably some radio crackle from the 250, I mean just “Wow”. And I stood there and soaked it all up.
I was lucky during that posting, though in fairness, sometimes you have to make your own; I’m just glad that we just had sufficient oomph to get out of the garrison that Saturday.
Later that day, we tracked down (pun intended) the King Tiger at La Gleize, but that’s another story.
Anyway, a bit of a distraction from your build I’m afraid(!)
Spectacular detailing and finishing on the building Tim, it looks so real. The 250 is building up really nicely as well, the PE in this case has added a great amount realism … very very nice indeed.
The group is here: Redirecting...
There is also this group. Much smaller, but a good community that some historians like Timo and illustrators post in as well as some modelers: Redirecting...
Both are great resources (but sometimes only deepen the mystery and questions)
Brian I think many of us who have served in historic places feel the same way. I felt that way very much when I was stationed in Germany. We did our live fire on ranges that at one time were used by the German Army, I think the same for our maneuver areas as well. I found a bunch videos of the barracks I was stationed at on you tube; I believe it was from 60s on through ‘94 when it was closed and given back to the German government. I’m trying to find the black and white video of the place being used by the German Army but can’t seem to locate it. I watched it a few weeks ago and thought I saved it. Oh well
Well, I suppose I was incredibly lucky; I mean, I’ve met the Chief of Staff of the Panzer Lehr Division. I mean, what the hell?
I was so very lucky to have attended a handful of battlefield tours when the participants were still alive and present, apart from my own amateur dabblings. But those very amateur efforts were very rewarding, almost because of their innocence; we were in the proximity, so we just went. As I mentioned above, one could taste the history. It didn’t matter whether it was a Flak Command bunker a km down the road from my first posting, or years later, an air defence bunker in Soest, it was there and it was tangible.
I’ve only just realised, of the 3 hoods shown in the above photo, I’m the only one still alive.
It is a solemn realization when you reach that point in life when you stop going to weddings and start going to funerals.
I was stationed in Baumholder which was used by the Wehrmacht as a training area. One day in the motor pool, I noticed that in the bays where we performed maintenance on our vehicles there were rings attached to the walls. When I asked about what those were for, one of our mechanics who was from out west responded, “Believe it or not, these bays used to be stalls and those rings are for tying up horses.” Given the huge reliance on horses by the Wehrmacht, despite the images of their being completely mechanized, that makes total sense. Along with why that activity was known as “motor stables”.
We had those rings at Ferris barracks in Erlangen as well.
Guys, I have enjoyed reading the nostalgic chat above. Sorry for being so quiet that you had to fill the gap! Although I may have been quiet, I have not been idle…
Opened-topped vehicles are almost always a challenge because there is so much detail and nowhere to hide.
The 250 Late / Neu / Ausf B (from now on referred to as the ‘late 250’) is especially difficult for a number of reasons…
From a practical perspective, it is small but also crowded and very exposed. It is also only possible to add the detail before you join the upper and lower halves together. This leads to problems further down the line (especially if, like me, you opted for the Aber photoetch upper body).
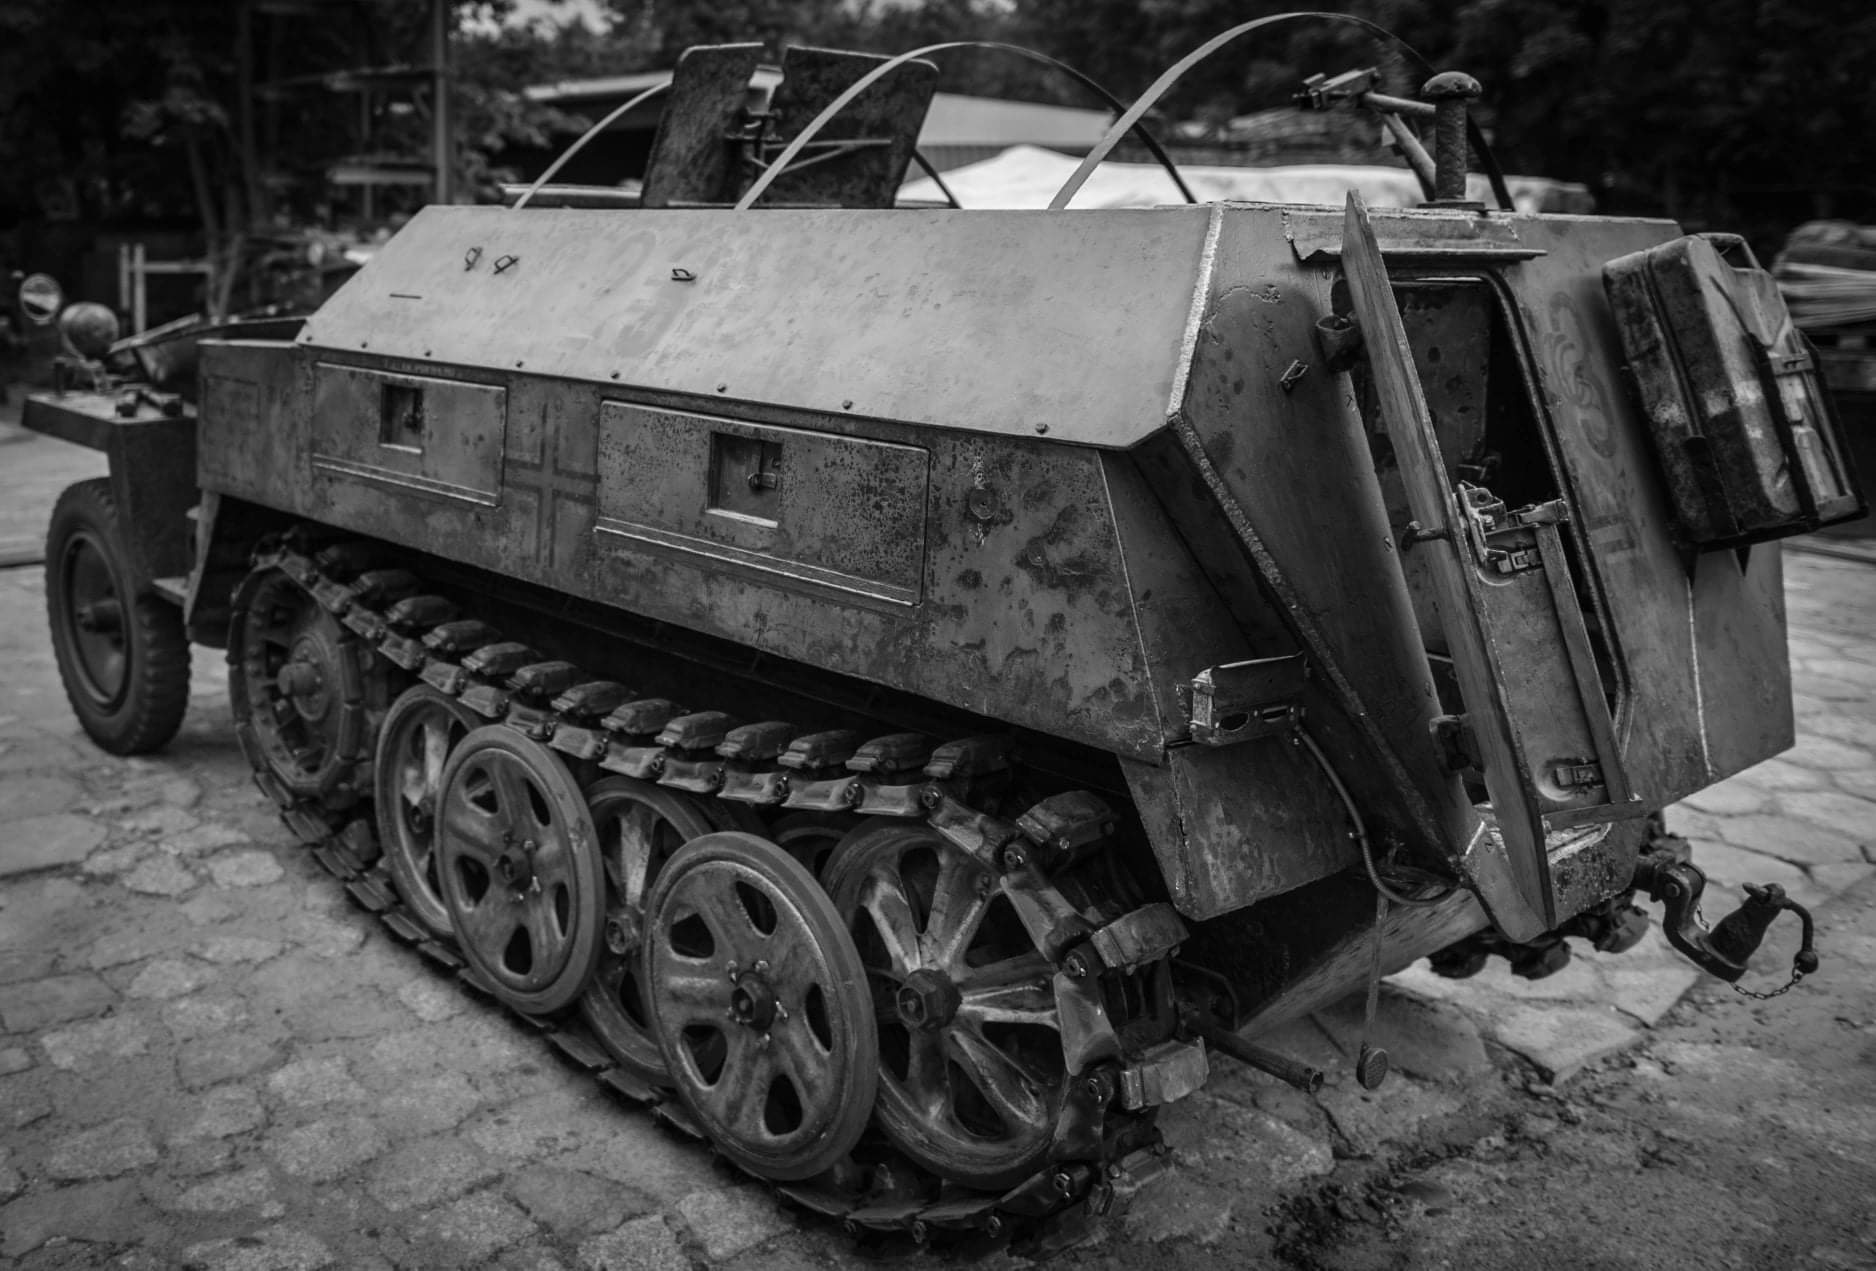
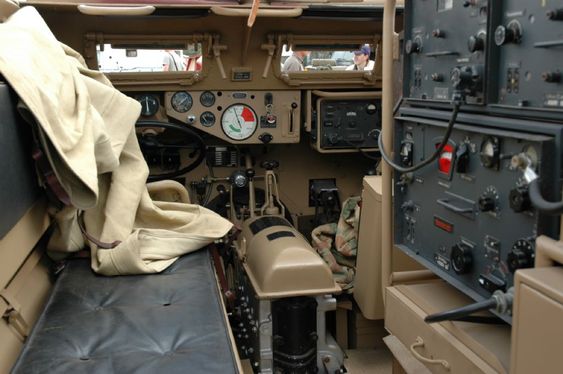
The other big challenge - surprisingly - is the lack of reliable information about what the interior actually looks like. For a vehicle that was built in the 3,000+ range there are remarkably few surviving examples of the late 250/1 variant and those that I have found on line are often heavily restored. For some reason the most photographed examples are the 250/3 (radio command version).
This is useful for the driver and co-drivers’ positions, but offers less for those who want to build the more common 250/1 version.
There are a lot of fine factory interior shots of the early (Ausf A / ‘Alt’) versions of the 250 taken by the Germans during manufacture, but none for the later model. Perhaps they didn’t bother keeping these sorts of meticulous records later in the war (they had other things to think about) - or the archives are now lost.
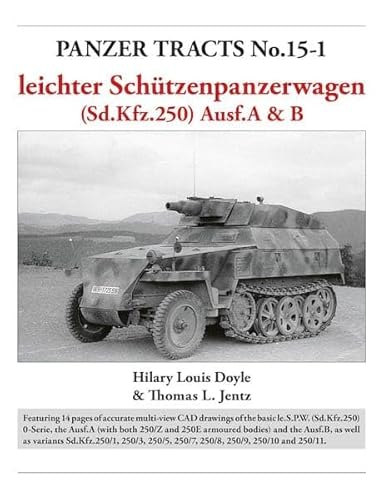
I had hoped to find all I needed in these two books:
Fortunately, the first has just been re-printed for the first time in ages, the second is OOP, but can be found second-hand.
Despite their shortcomings, I strongly recommend both. They each have a lot of excellent photos and, as you would expect, the Doyle/Jentz book has fine scale drawings of most variants. But - and it’s a big but - they both leave the interior of the late 250 as something of a mystery.
I think it’s quite telling that the Doyle/Jentz book has a plan view of the late 250/3 with interior, for example, but the plan view of the 250/1 has an empty interior. Knowing the authors, I suspect this is because they were not prepared to speculate where they lacked enough first-hand source material.
Anyway, I don’t want to get too bogged down in the technical stuff - this is supposed to be a diorama blog after all. I just want to defend my interpretation of the inside of one of these halftracks. In the end, what I put together was based on the original Dragon kit, a mixture of the Aber and Royal Model photoetch sets (which often overlap, but sometimes differ), the above-mentioned books and images I found on line. Chief amongst the latter were pictures of the well-known Panzerfarm late 250/1 that was dredged up from a river surprisingly intact.
Of course, if anyone has any better sources then here is the place to post them!
So here goes…
The first point I feel I should make is that not all Dragon late 250 kits are born equal: the kit has gone through several upgrades. There is also the more recent Das Werk kit, although this seems to be a repackaging of the Dragon offering. Some interior details differ and there are also changes to the outer stowage boxes (the later versions have seperate locker doors for example). Mine was an early kit of the 250/8 (with the short-barrelled 7.5 cm gun), but since this came with all the original parts it was fine to use.
Also here’s a tip I pass on from bitter experience: if you are going to spend an age super-detailing the interior of a kit do not build most of the exterior first. I lost count of the amount of pieces that either broke (or simply fell) off whilst I wrestled with the insides…
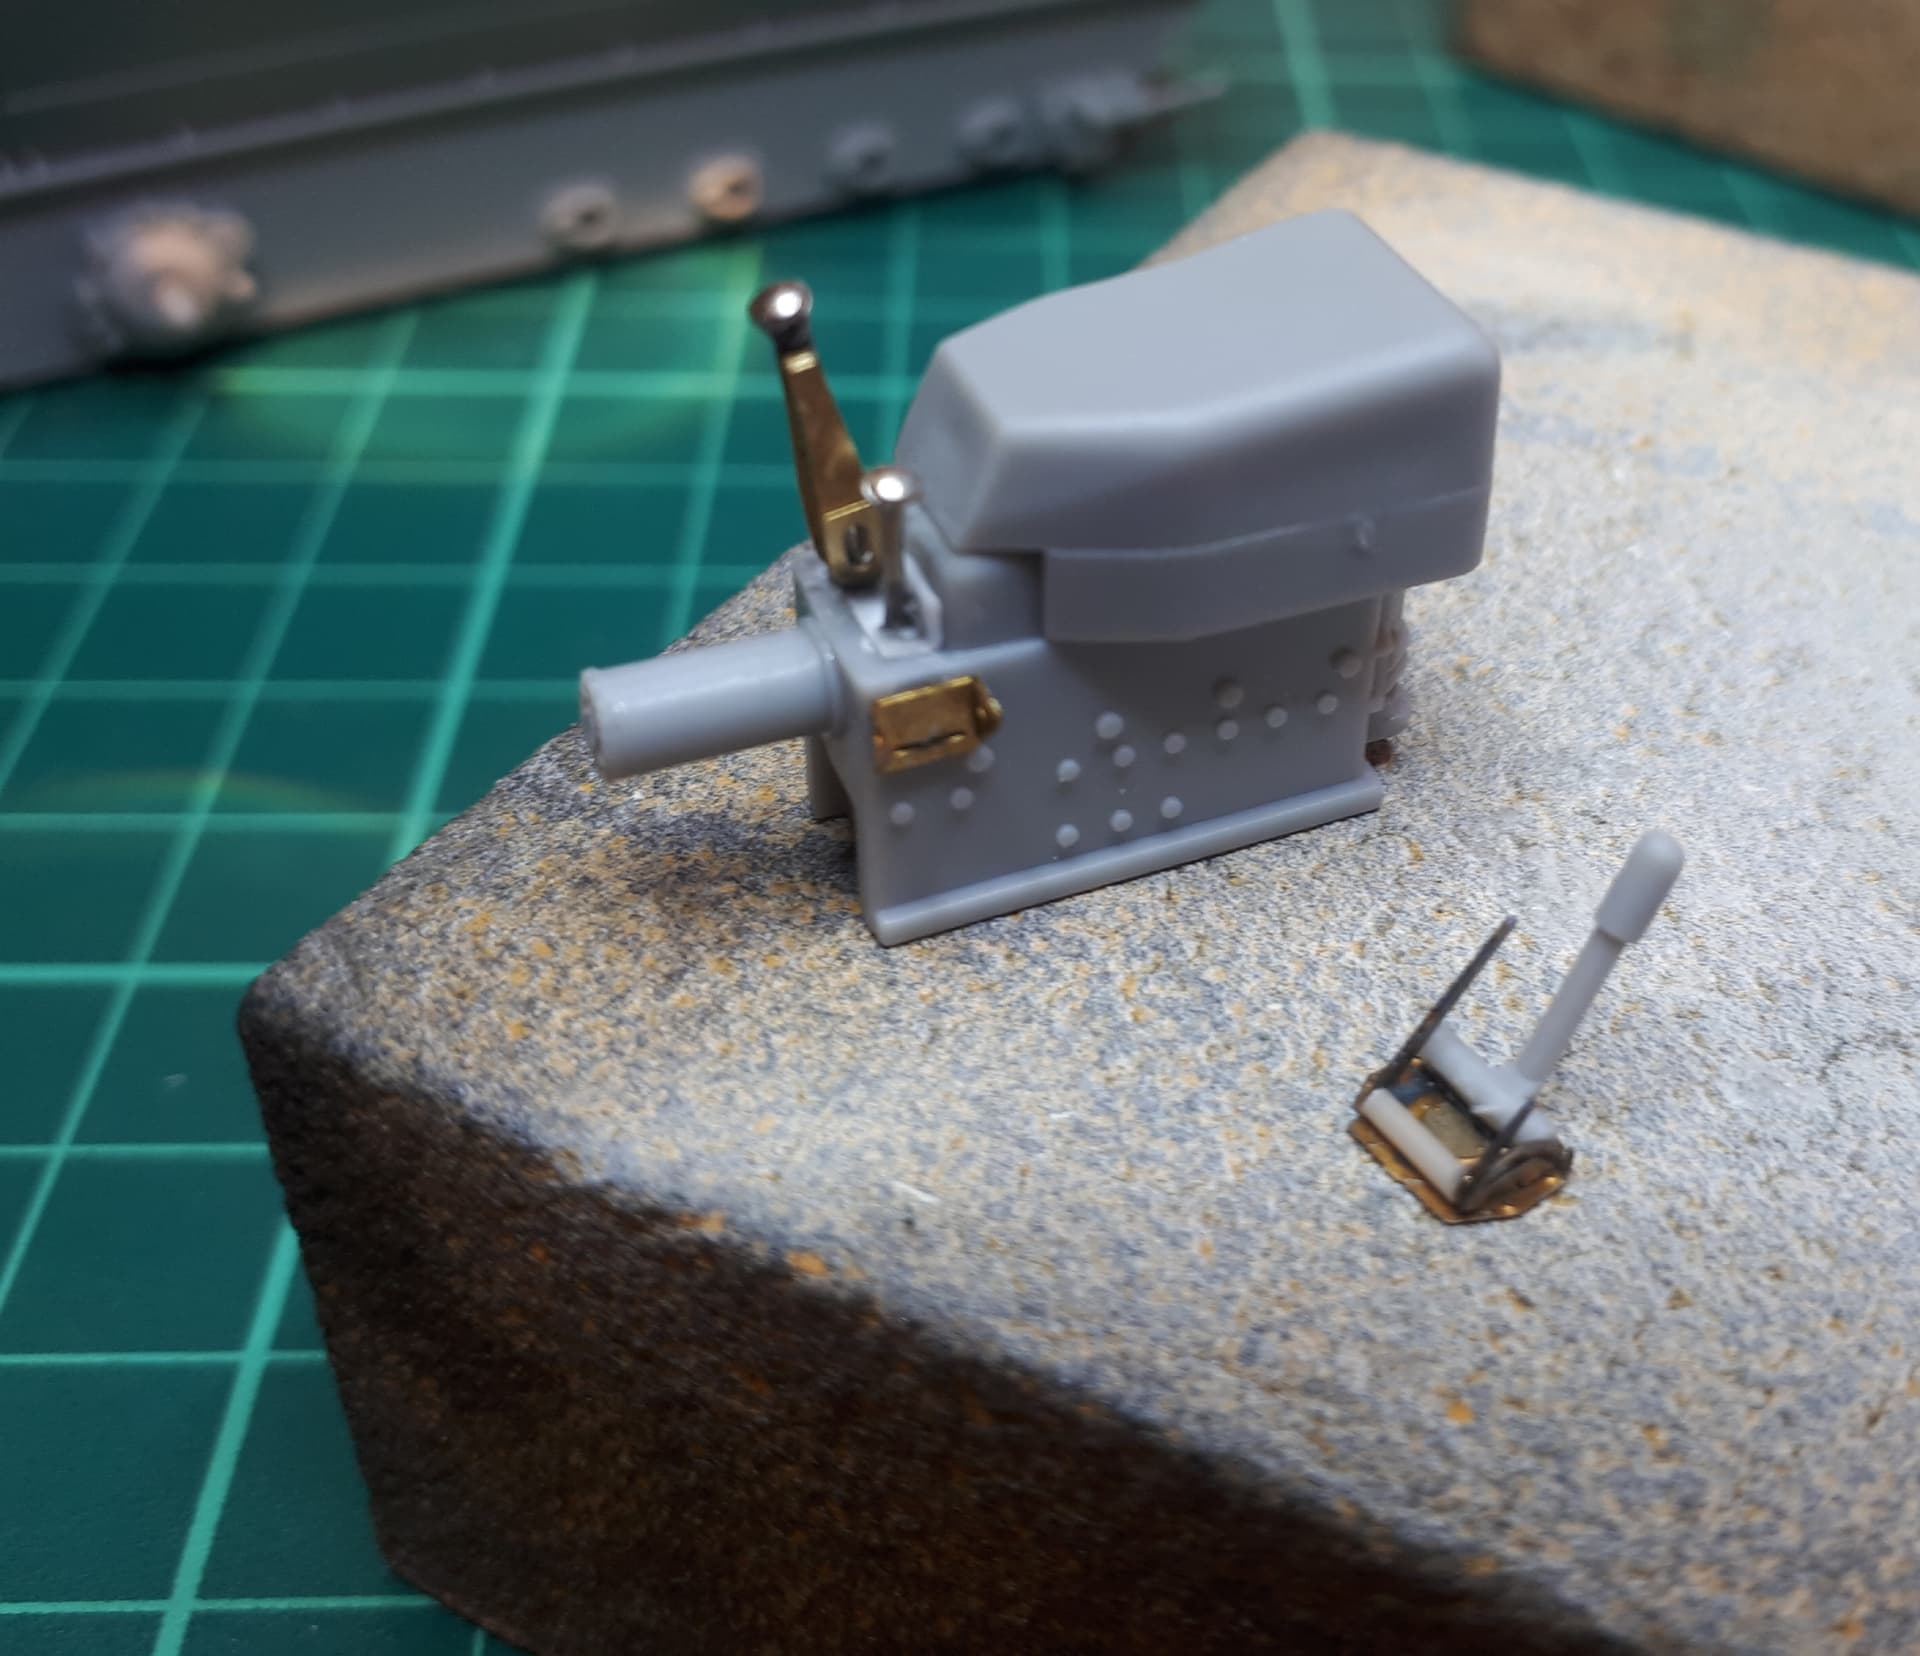
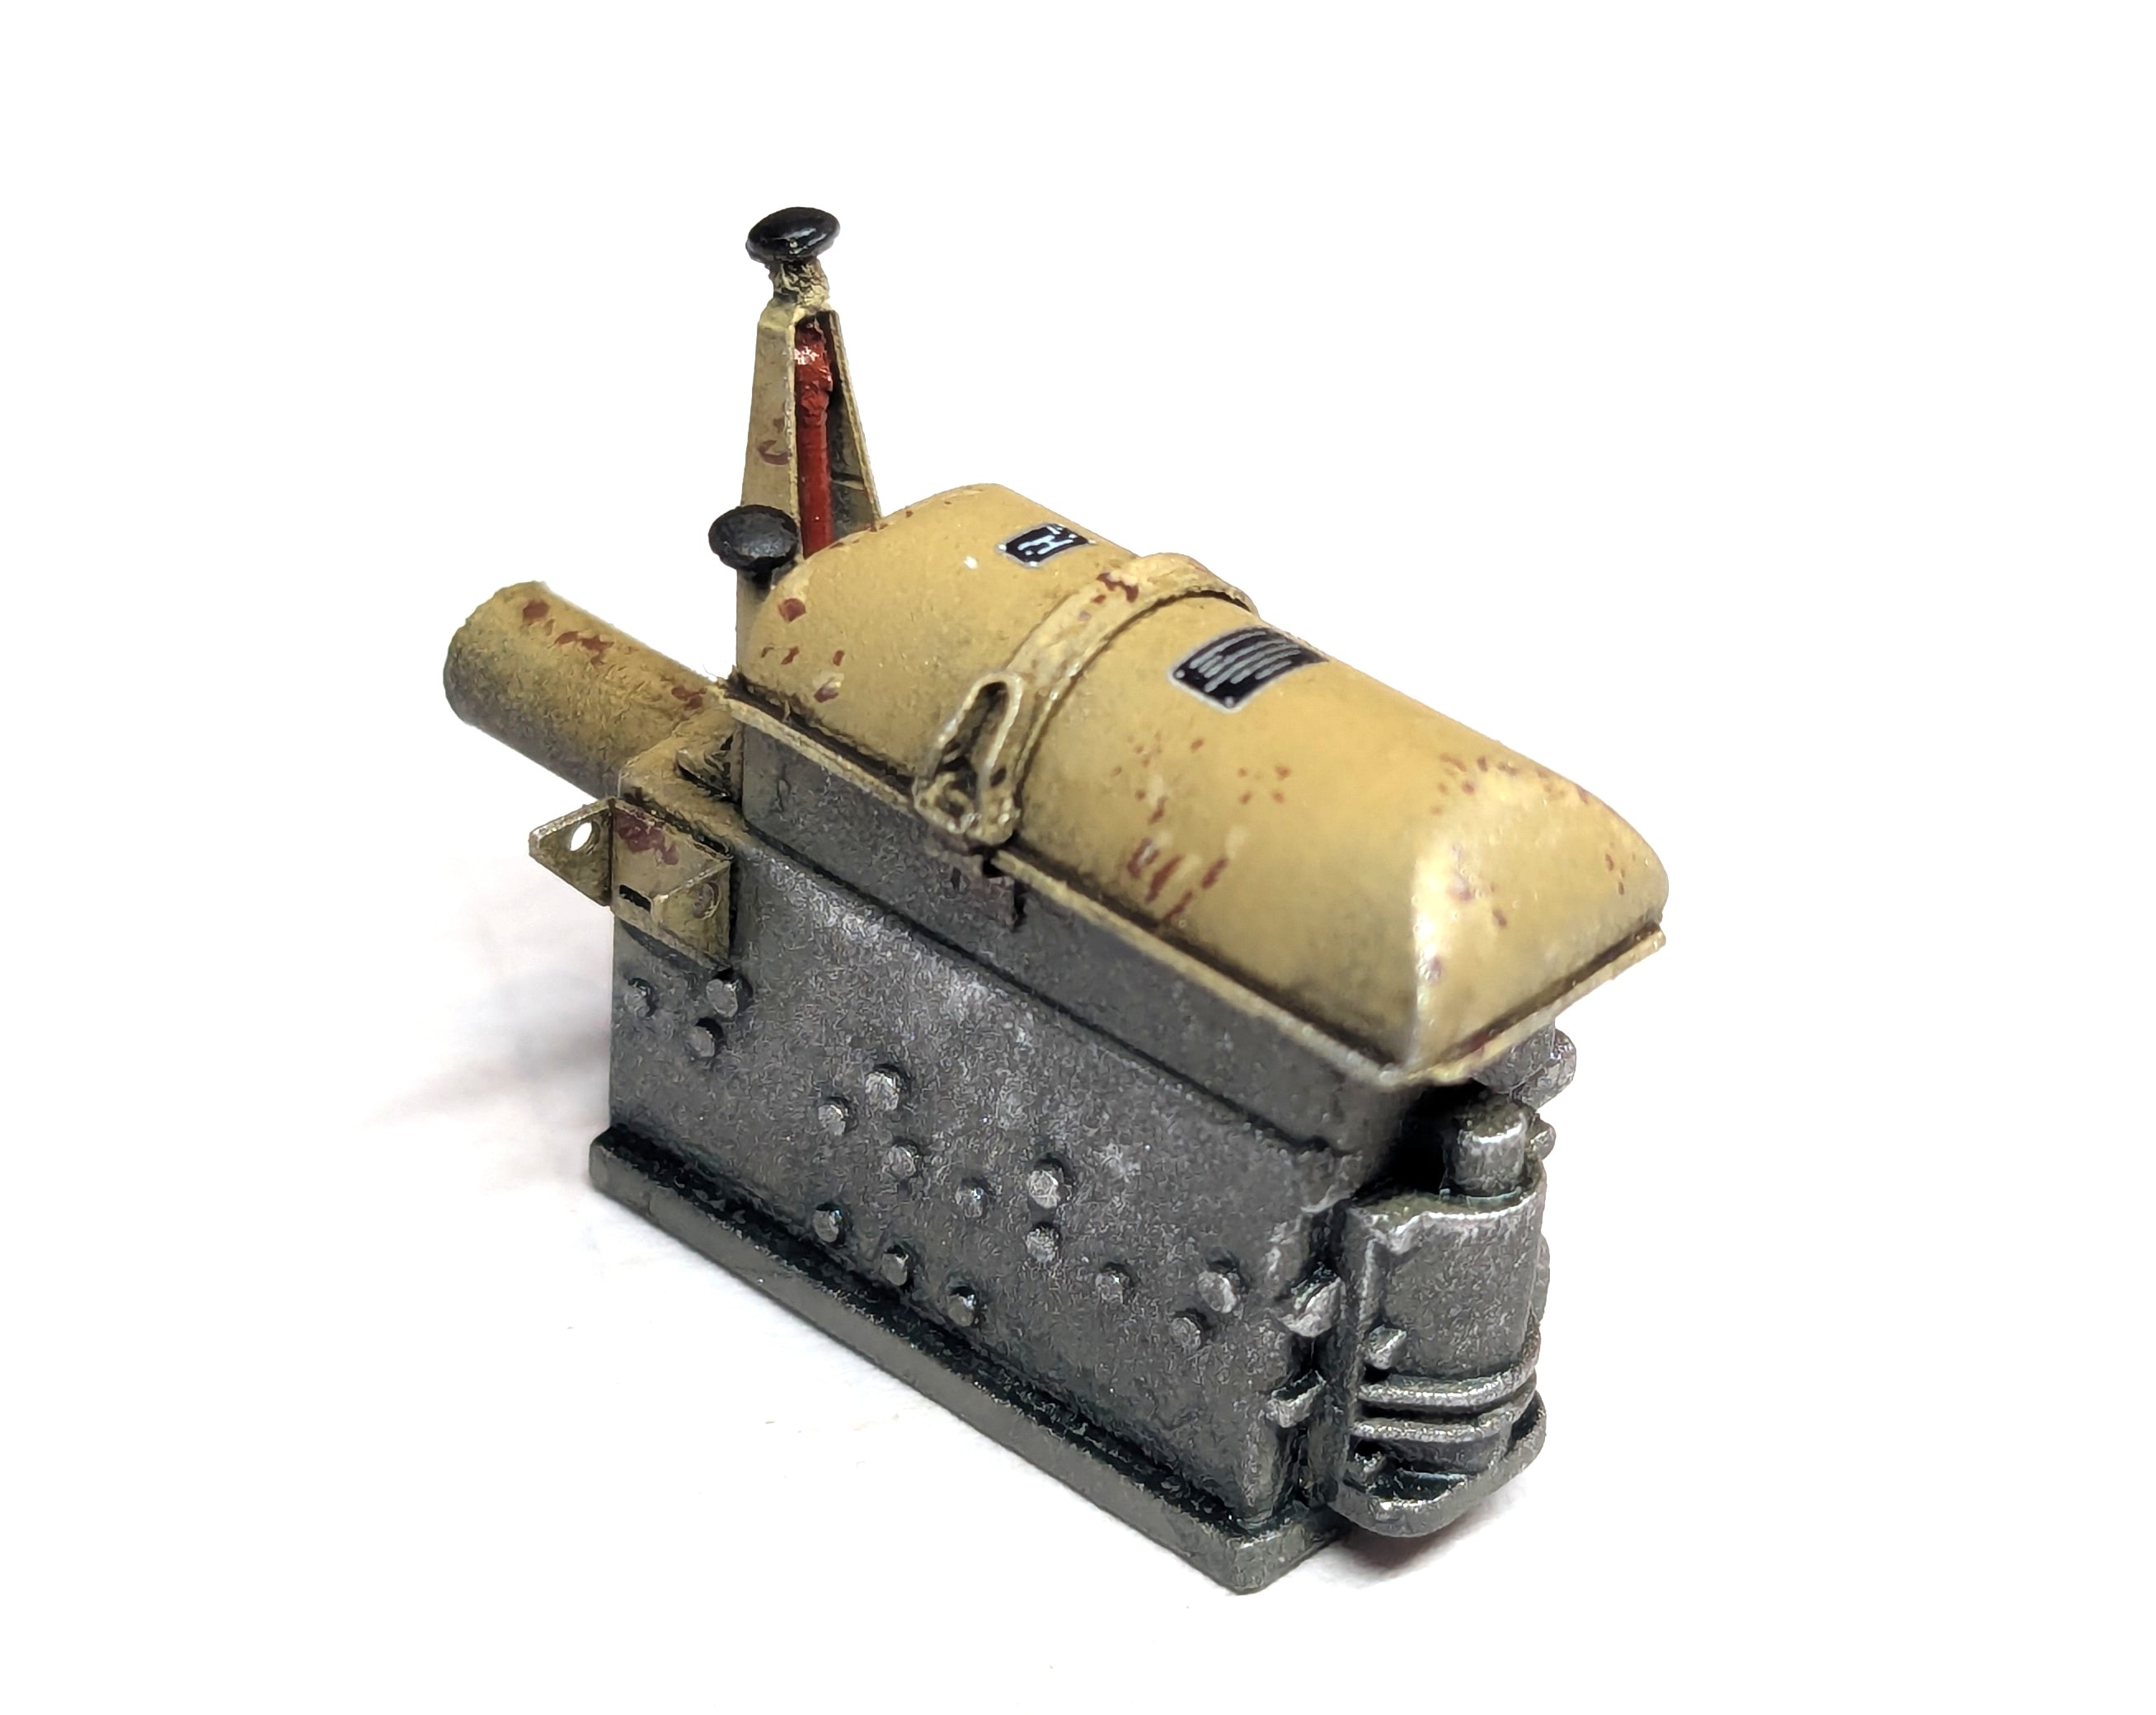
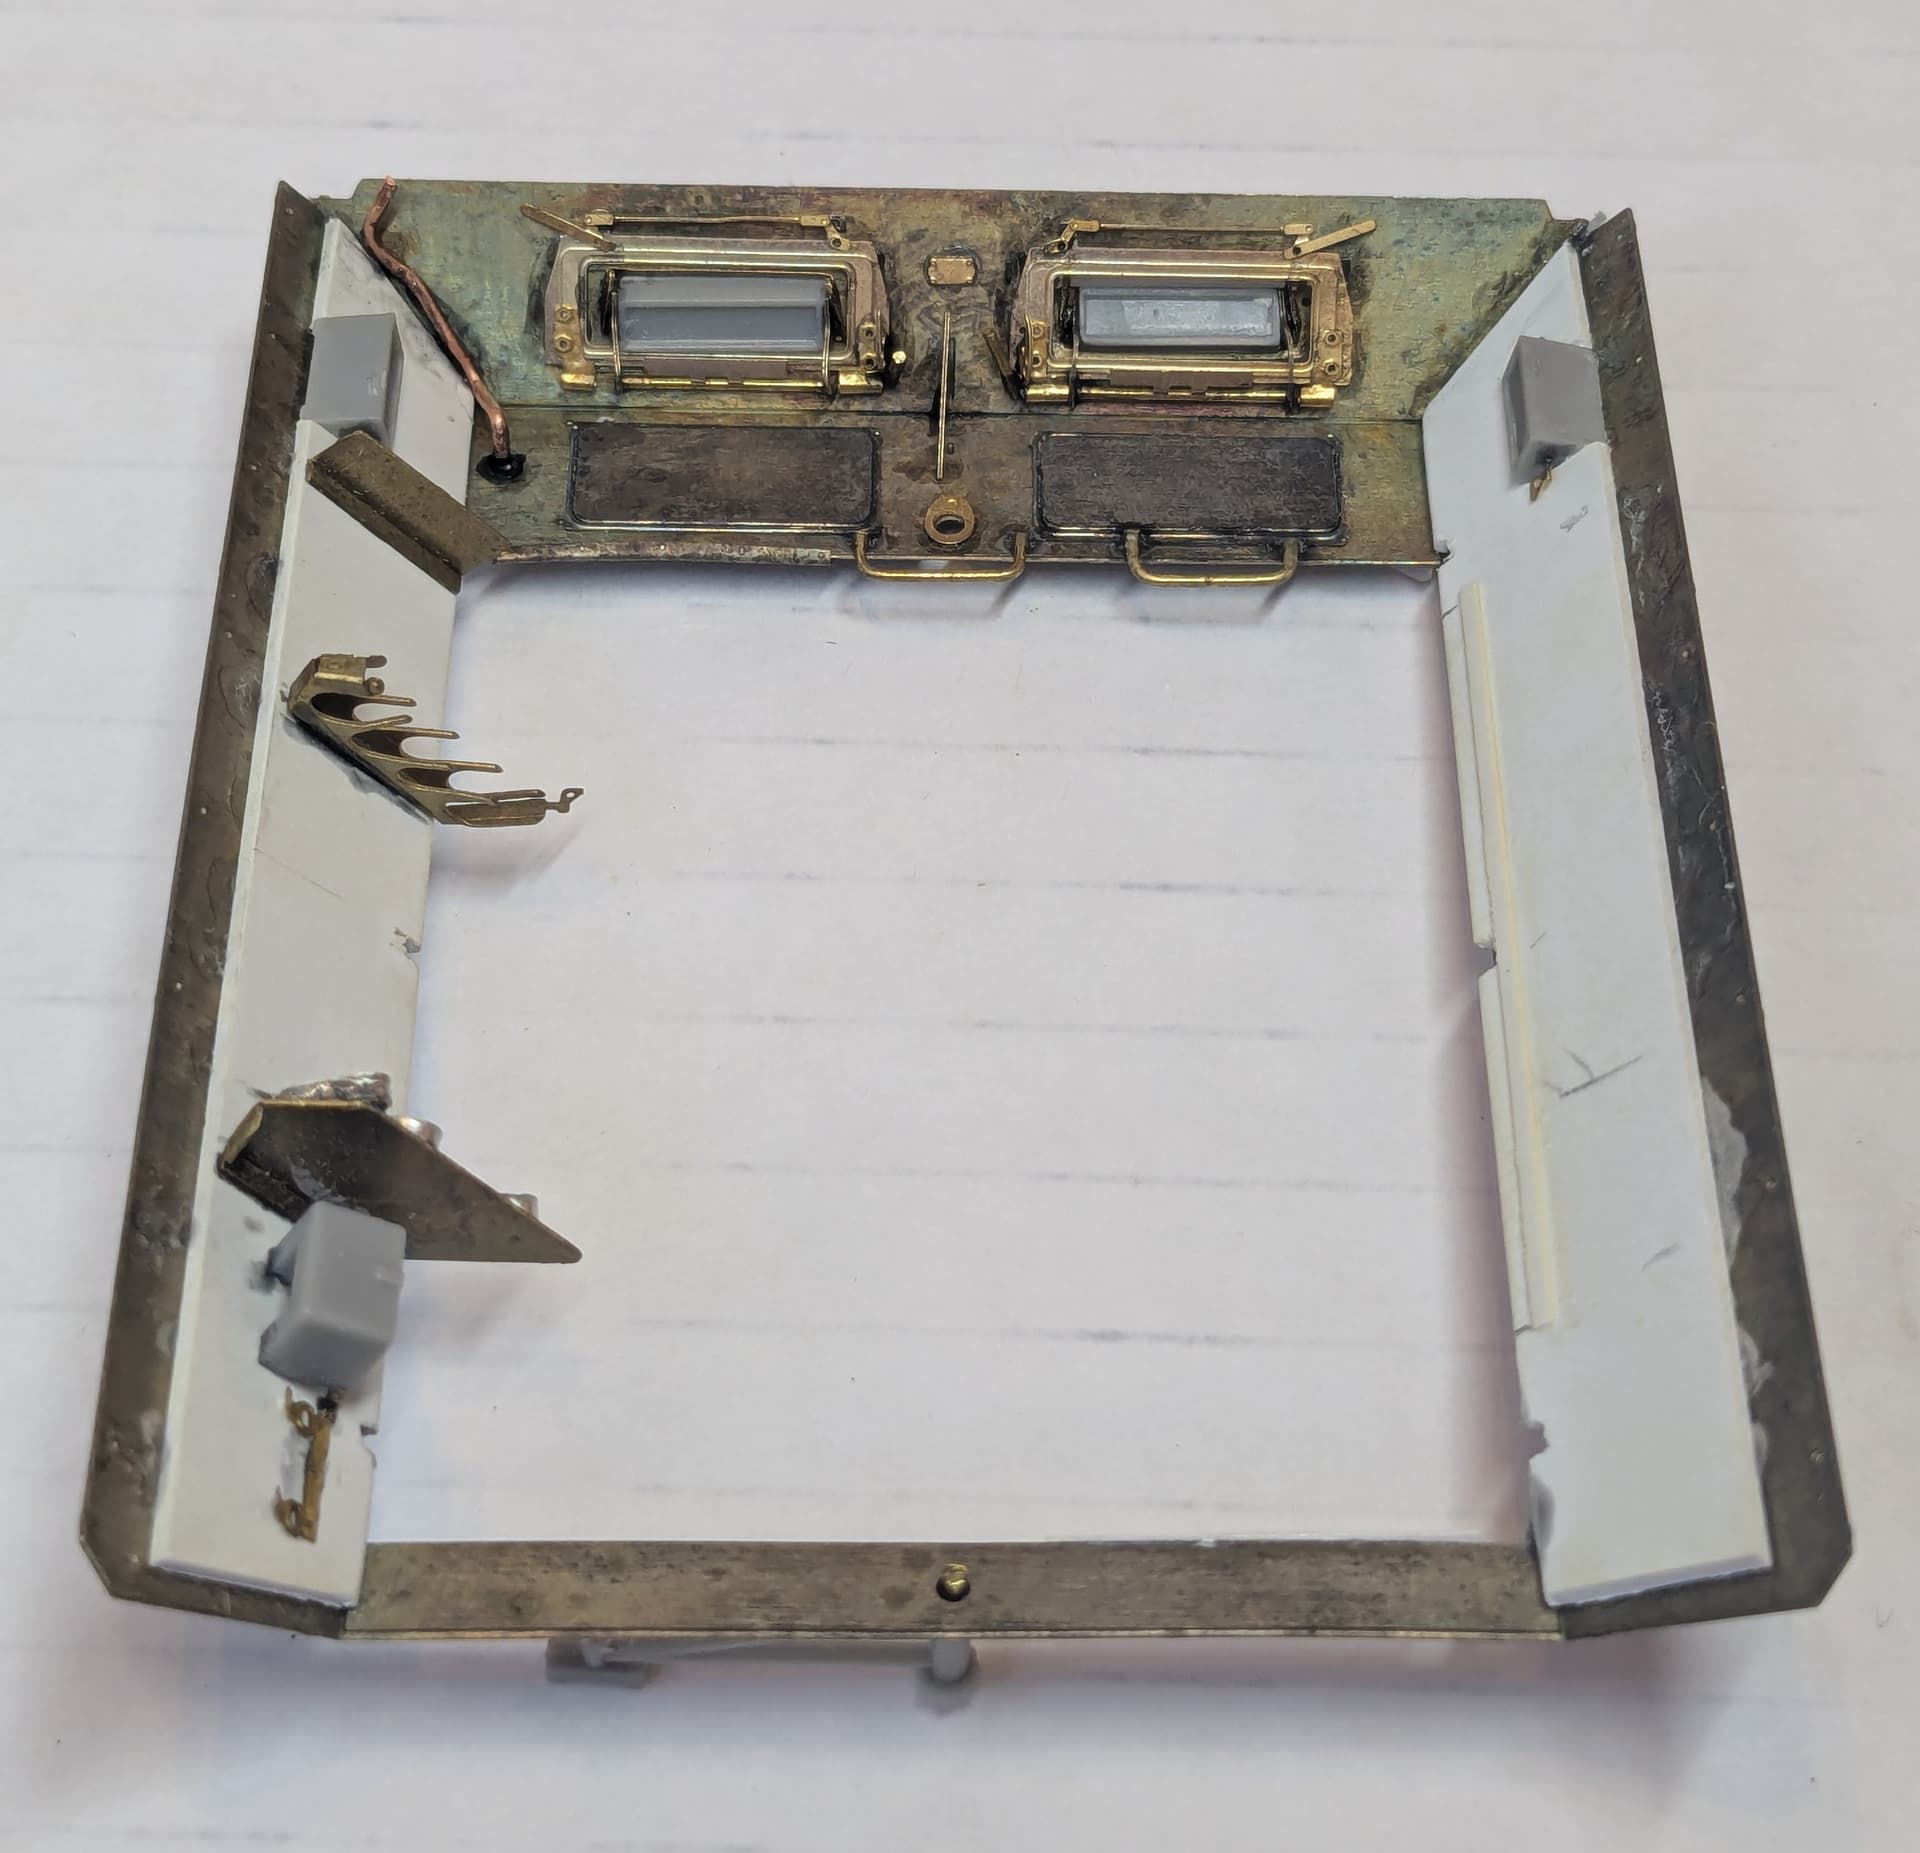
The first mystery I encountered was the transmission:
The actual transmission block (the lower part shown here) is actually missing from the early Dragon kits completely. In mine it came in a separate bag with an additional instruction sheet! But what about the upper part? I actually remembered this from an old Tamiya ‘Hanomag’ 251 I built as a boy. I always assumed it was a sort of ‘saddle seat’ for the MG gunner to sit on, but it’s actually too far forward for this to have worked. Was it an armrest for the driver and co-driver? If so, it seems to be more of an obstruction than a benefit. So I have no idea…
However, several images of restored late 250s show a simplified transmission cover (see the 250/3 above). I have yet to find any original image of this cover, but it turns up so frequently on surviving examples that it seems to be authentic (although late 250 production began in June 1943, so its possible that the changes overlapped).
Here’s another in a 250/3:
So I went with it…
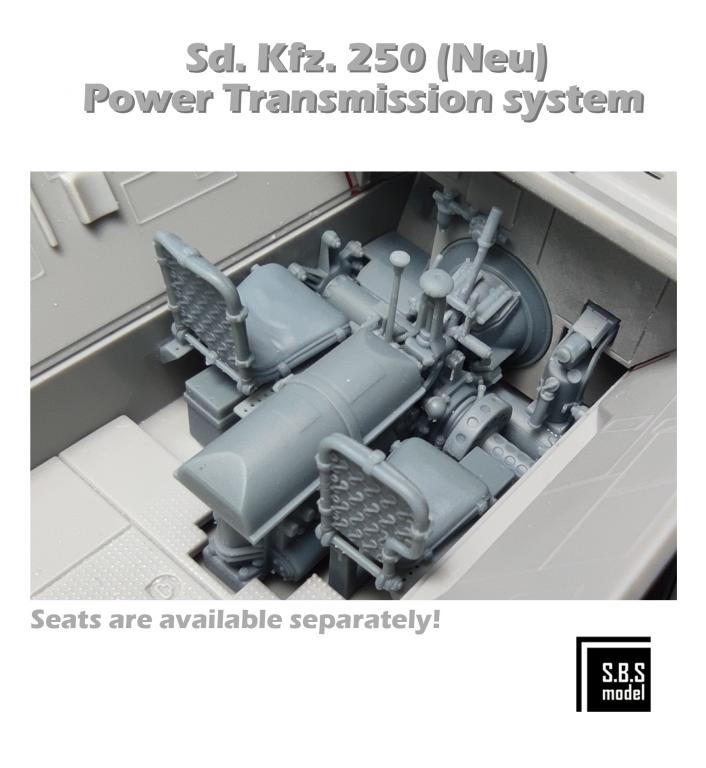
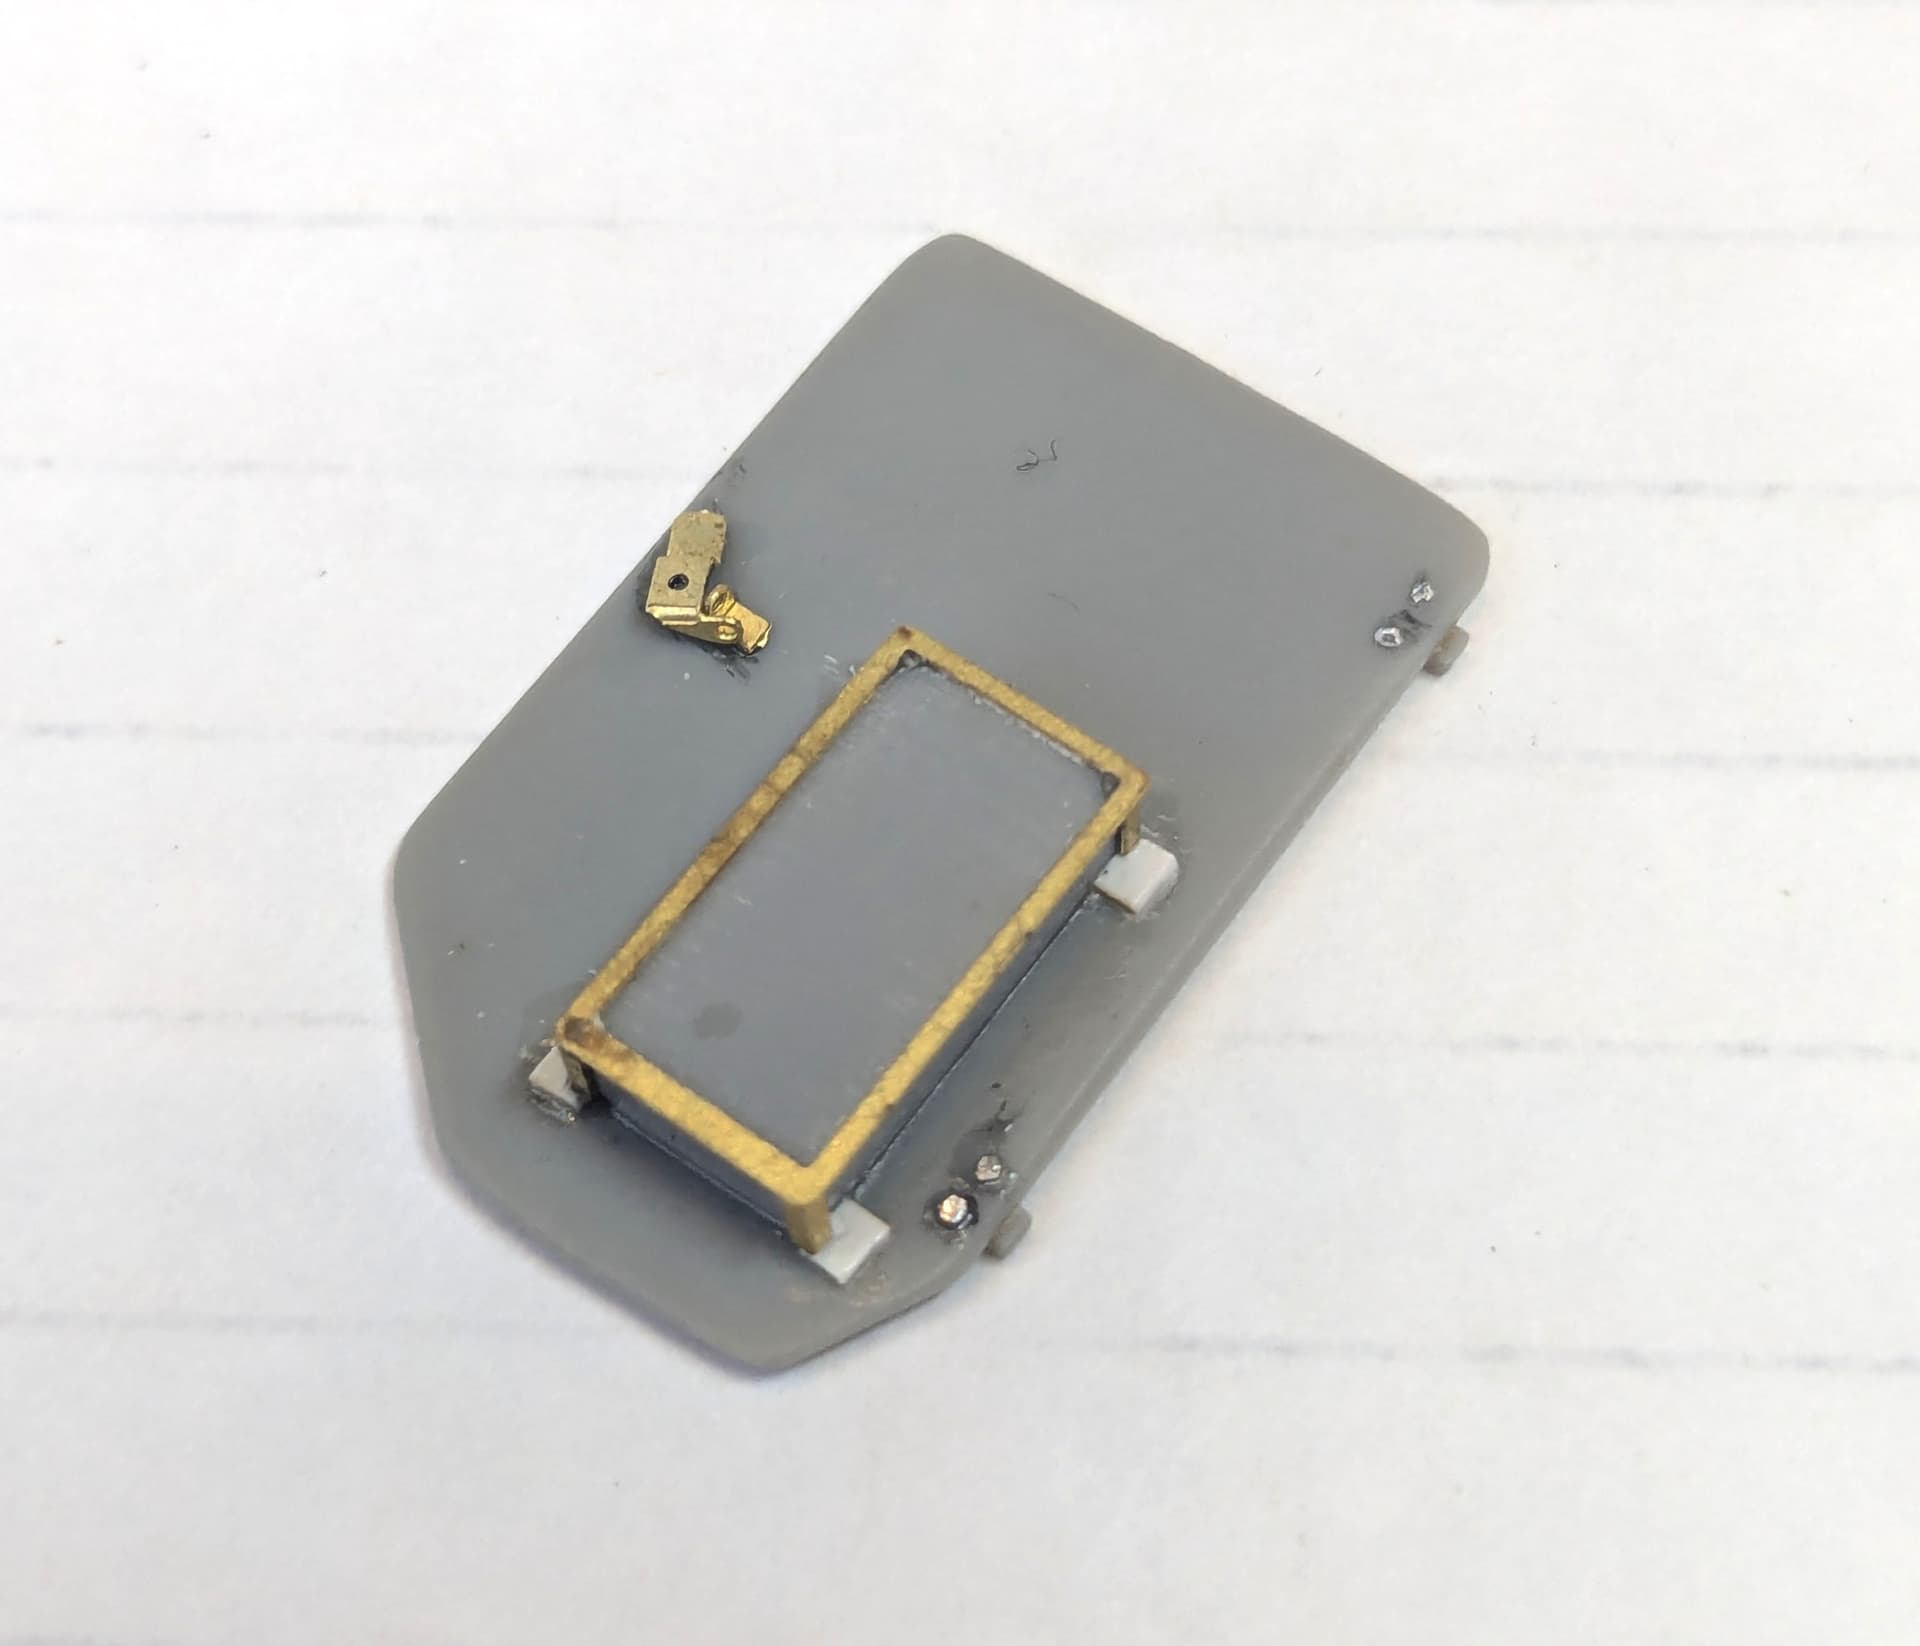
Mine was scratchbuilt using part of an old Italeri US gas canister and other bits and pieces, but there is now an aftermarket alternative that I would have used had I known about it at the time, because it also deals with other issues concerning the drivers’ compartment, including the seats:
Anyway, more to come…
You’re right Tim, we do woffle on, possibly to the detriment of the greater good.
Exquisite work on your model though - just love it.
I’m assuming you plan to populate the model, and at the risk of heresy, a fair bit will, I’m sure, be obscured by any figures, therefore, you don’t necessarily need to cram in every last detail; of course, I know you will, you’re a modeller, but I’m sure you get where I’m coming from - not least as I’m far lazier than you(!)
Tim your work is outstanding. The details of your build are excellent and the beautiful finish is a feast for the eyes!
A riveting (well it seemed an OK adjective at the time) episode Tim, great work as always. From your researches it sounds like nobody out there’s going to point the voodoo stick at you to say you’re wrong. But you always have the option of strategically draping a blanket (it is winter after all) or winter camo smock carelessly over anything you have serious doubts about. It’s worked for me more than once ![]()
…or use the canvas roof on metal hoops to cover as much speculation as necessary ![]() Great scratching Tim F
Great scratching Tim F ![]() Beute copy of LIFE is nice.
Beute copy of LIFE is nice. ![]()
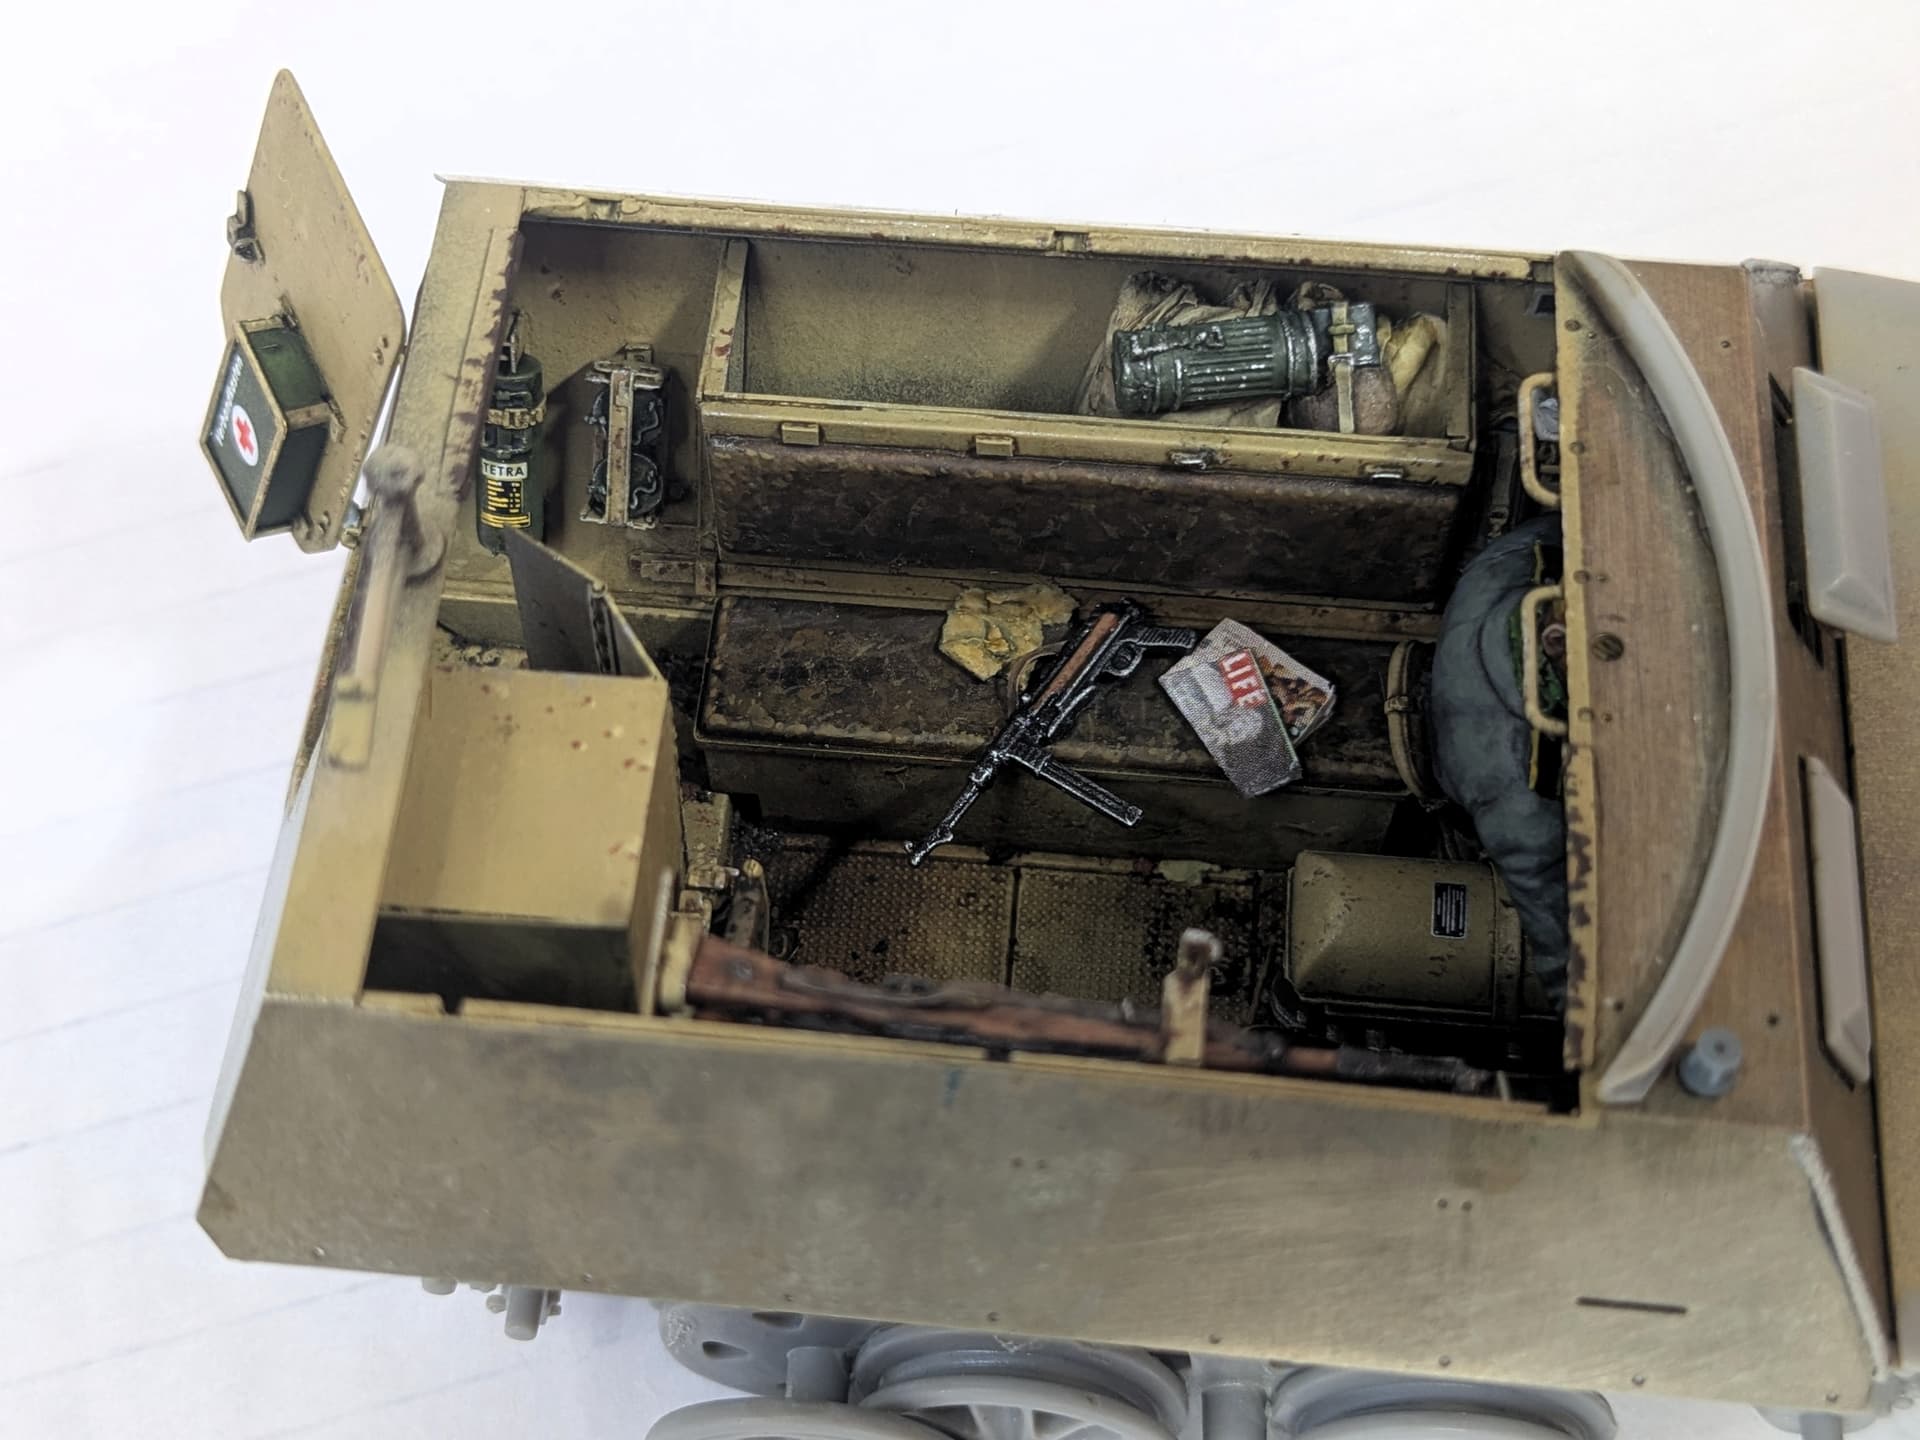
Beautiful looking interior Tim- the patina of the metal and the general dirt, grime and wear & tear you have done in there makes for an authentic look. Plus the fig makes you appreciate just how cramped it is.
Thanks guys… I appreciate all the kind comments.
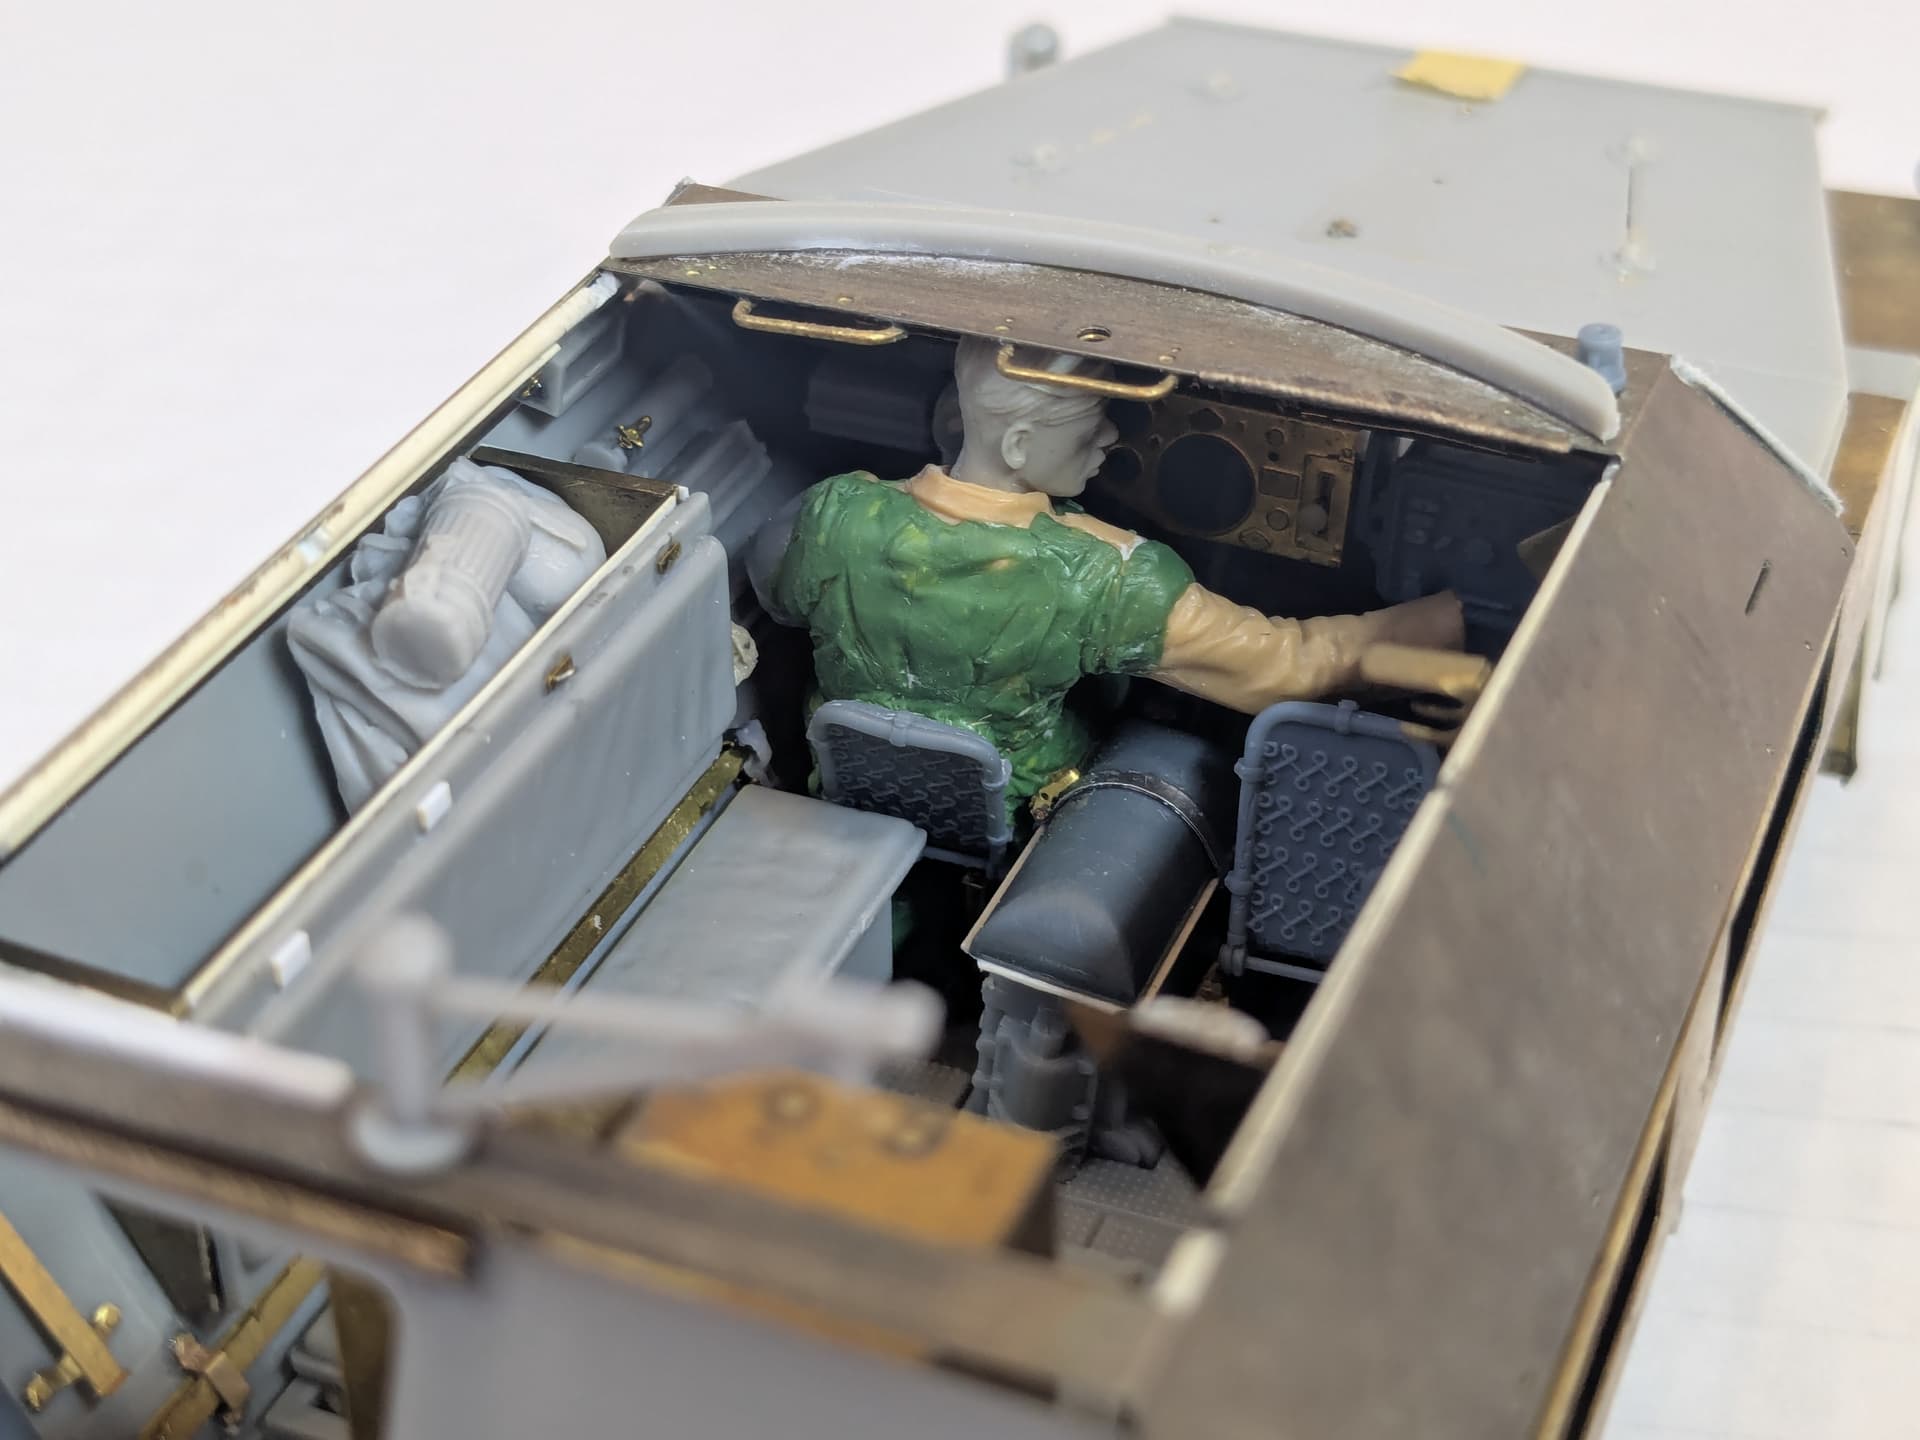
Now on with the cramped circus…
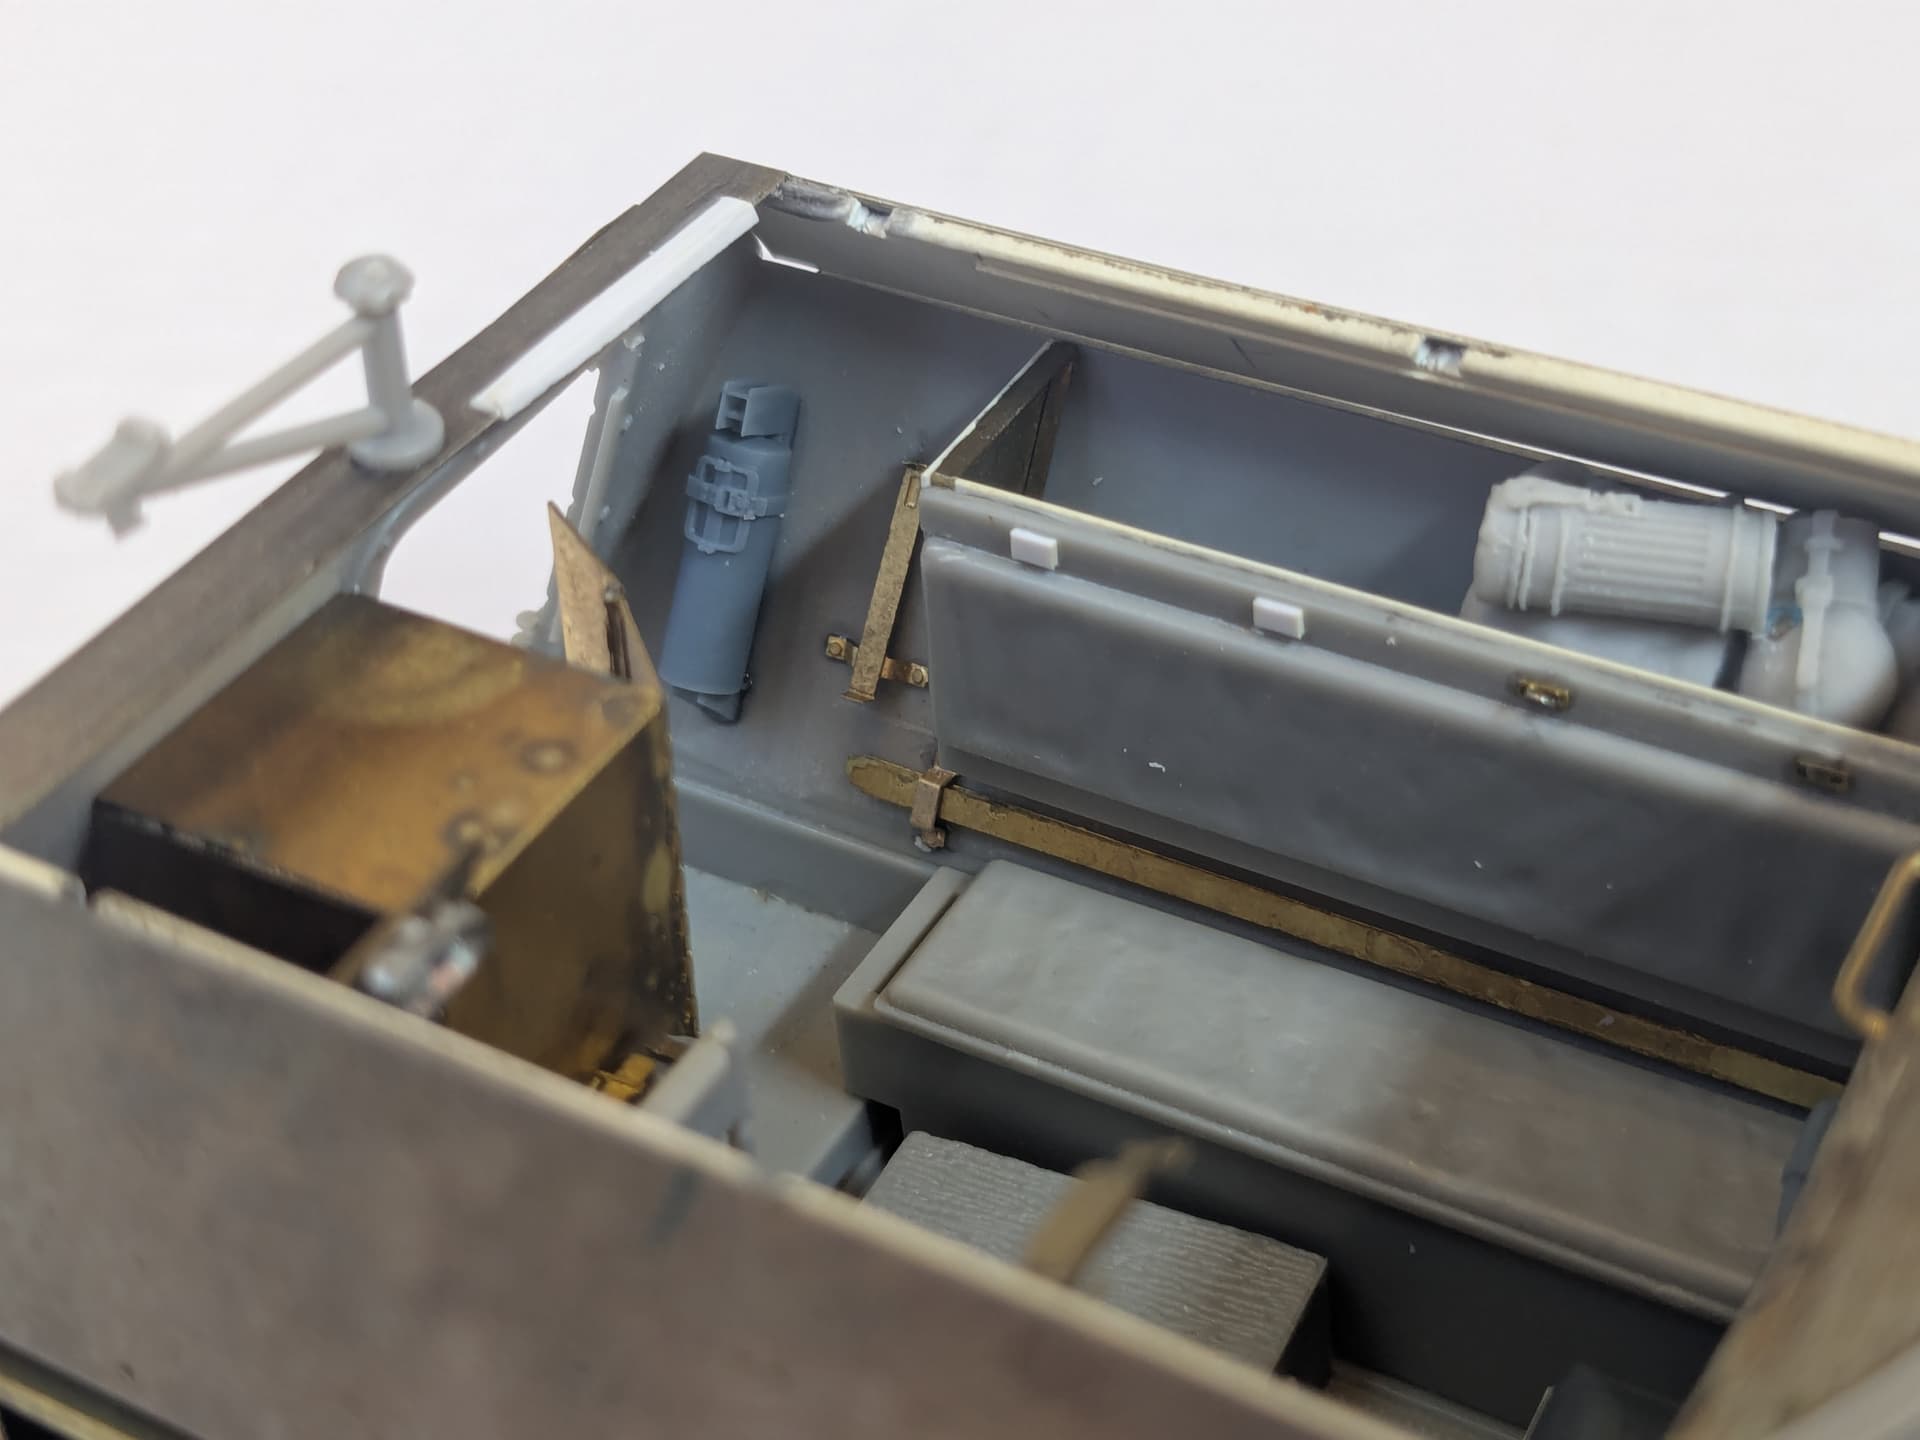
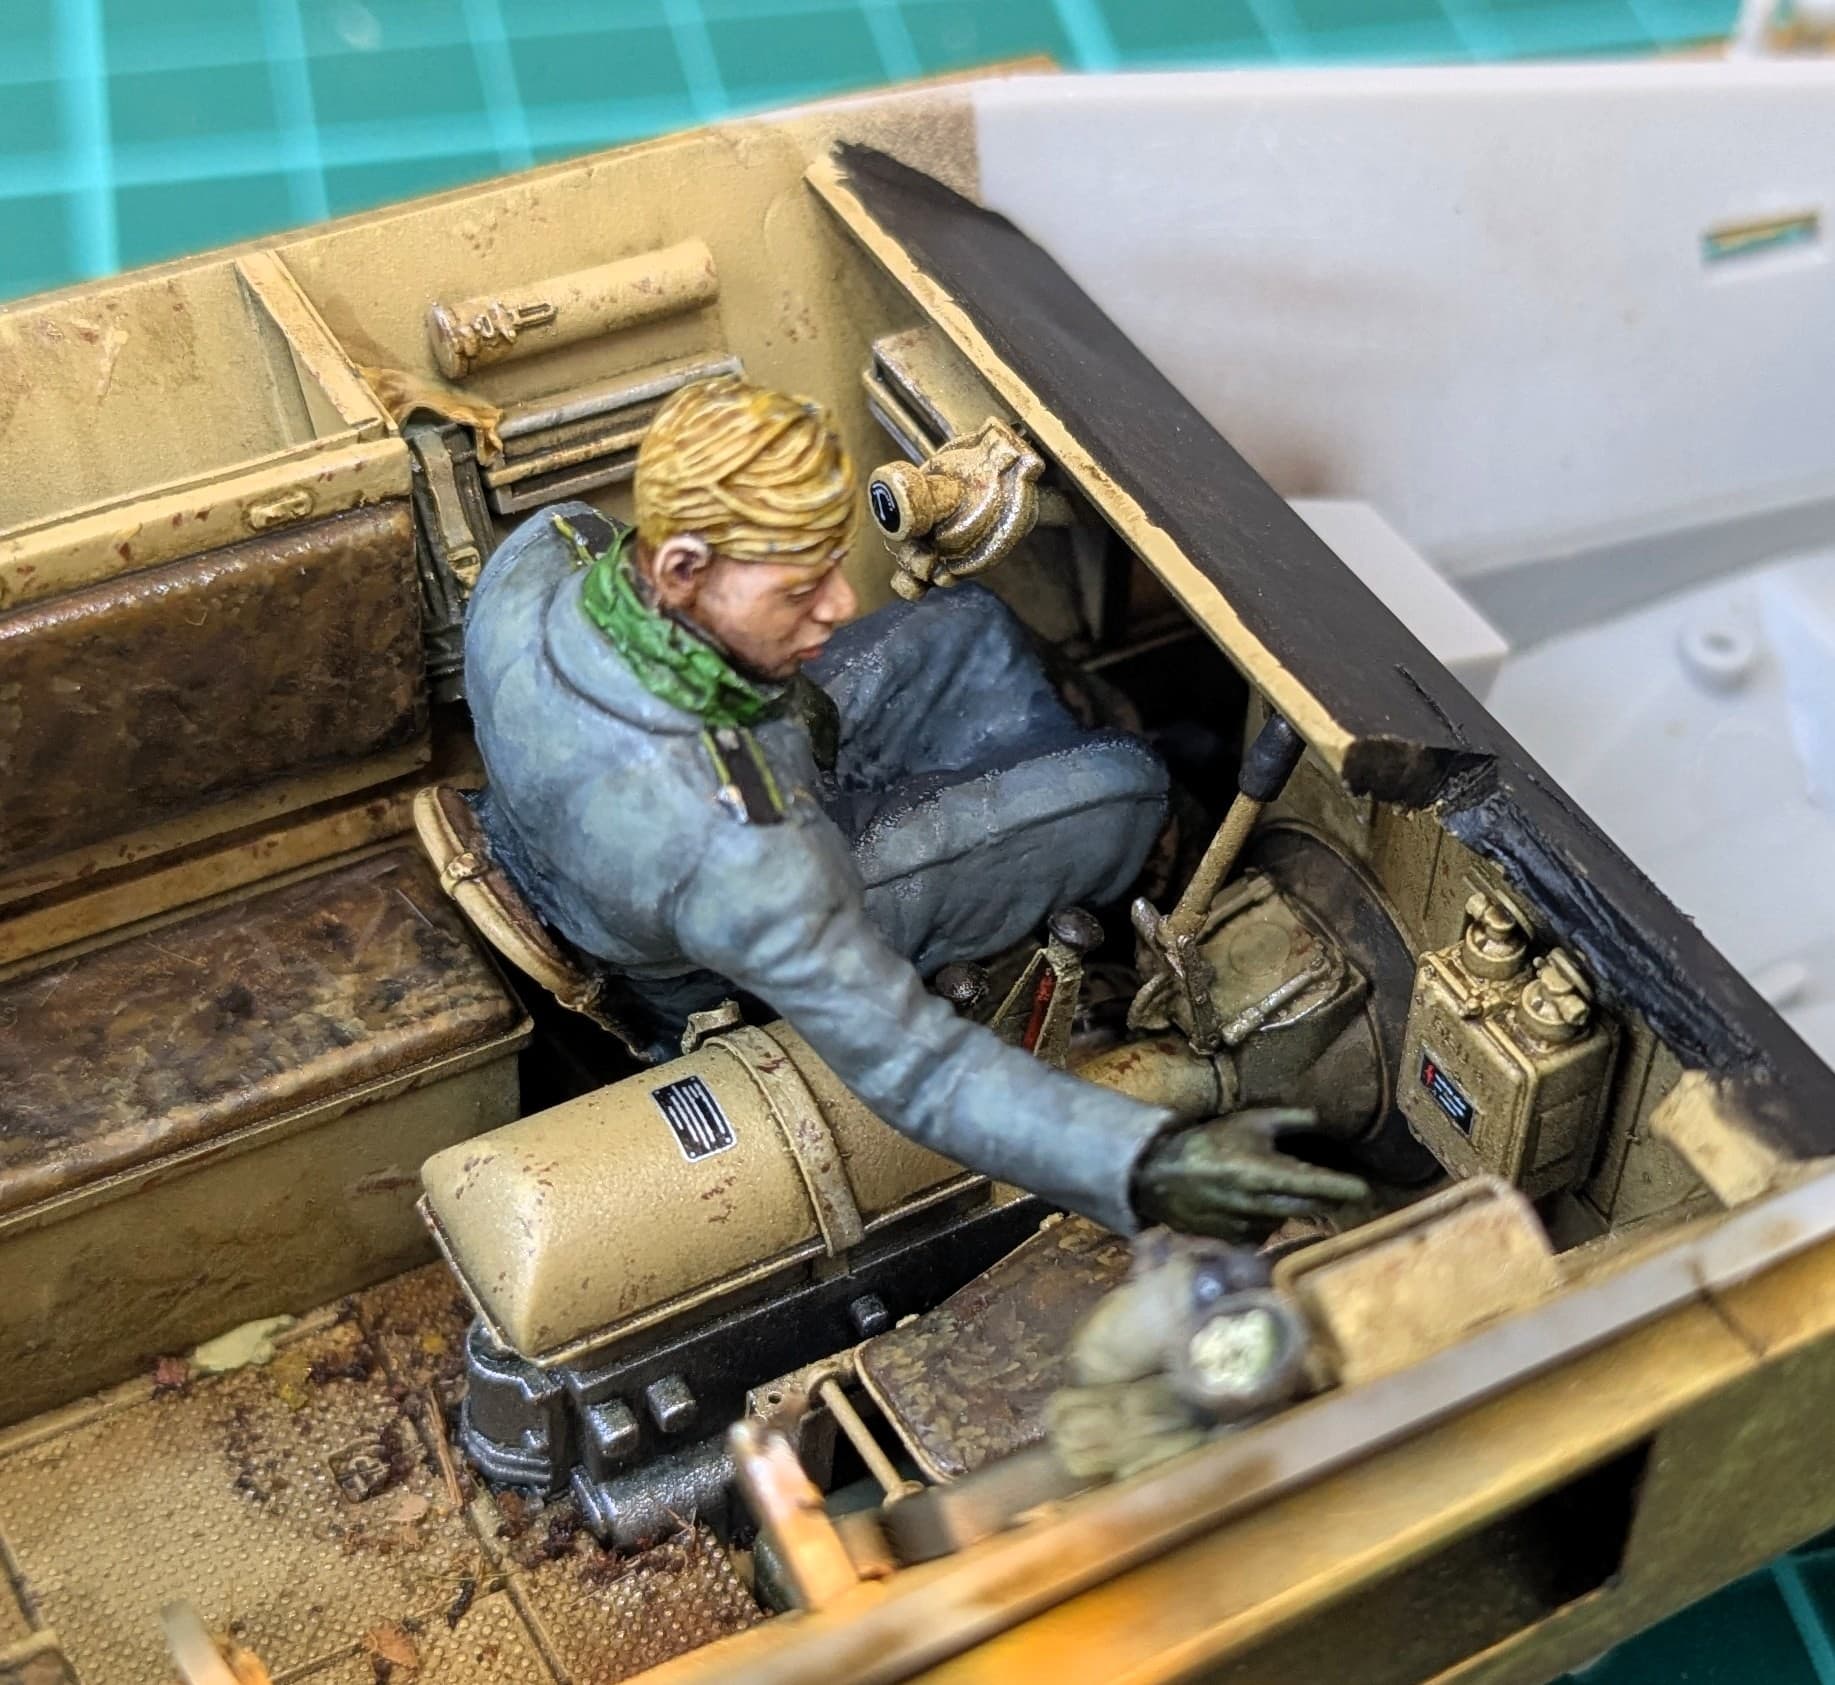
The shots above show the interior in its almost completed state.
The photoetch is a mixture of the best (or easiest) from Aber and Royal Model. Some of the resin stowage comes from the RM set, but others from Black Dog. The seats are SBS (they also come with the transmission set I showed above).
Where I could avoid unnecessary work, I did so. So there are only two tie-down loops on the stowage bin (there will be a cover over the rest) and the rear MG mount will be almost totally hidden beneath a partial canopy (so John, yes I had thought of that!).
The interior detail on the front visors is about as insane as Aber get - and in the end I simplifed even that. In fact, the Dragon kit does a pretty good job in replicating this in styrene and it is so hard to see on the finished model that, if I did it again, I would probably settle for that.
One advantage of the Aber metal upper superstructure is apparent here: on the real vehicle the side armour was beefed up with internal plates to add thickness. This means that you get a nice sharp edge and a transition between the thinner and thicker plates that simply does not come across on the plastic kit.
The rear door was sanded down to more of a scale thickness and the missing bolt detail replaced. The frame for the first aid box and the nice door latch details came from the Aber set.
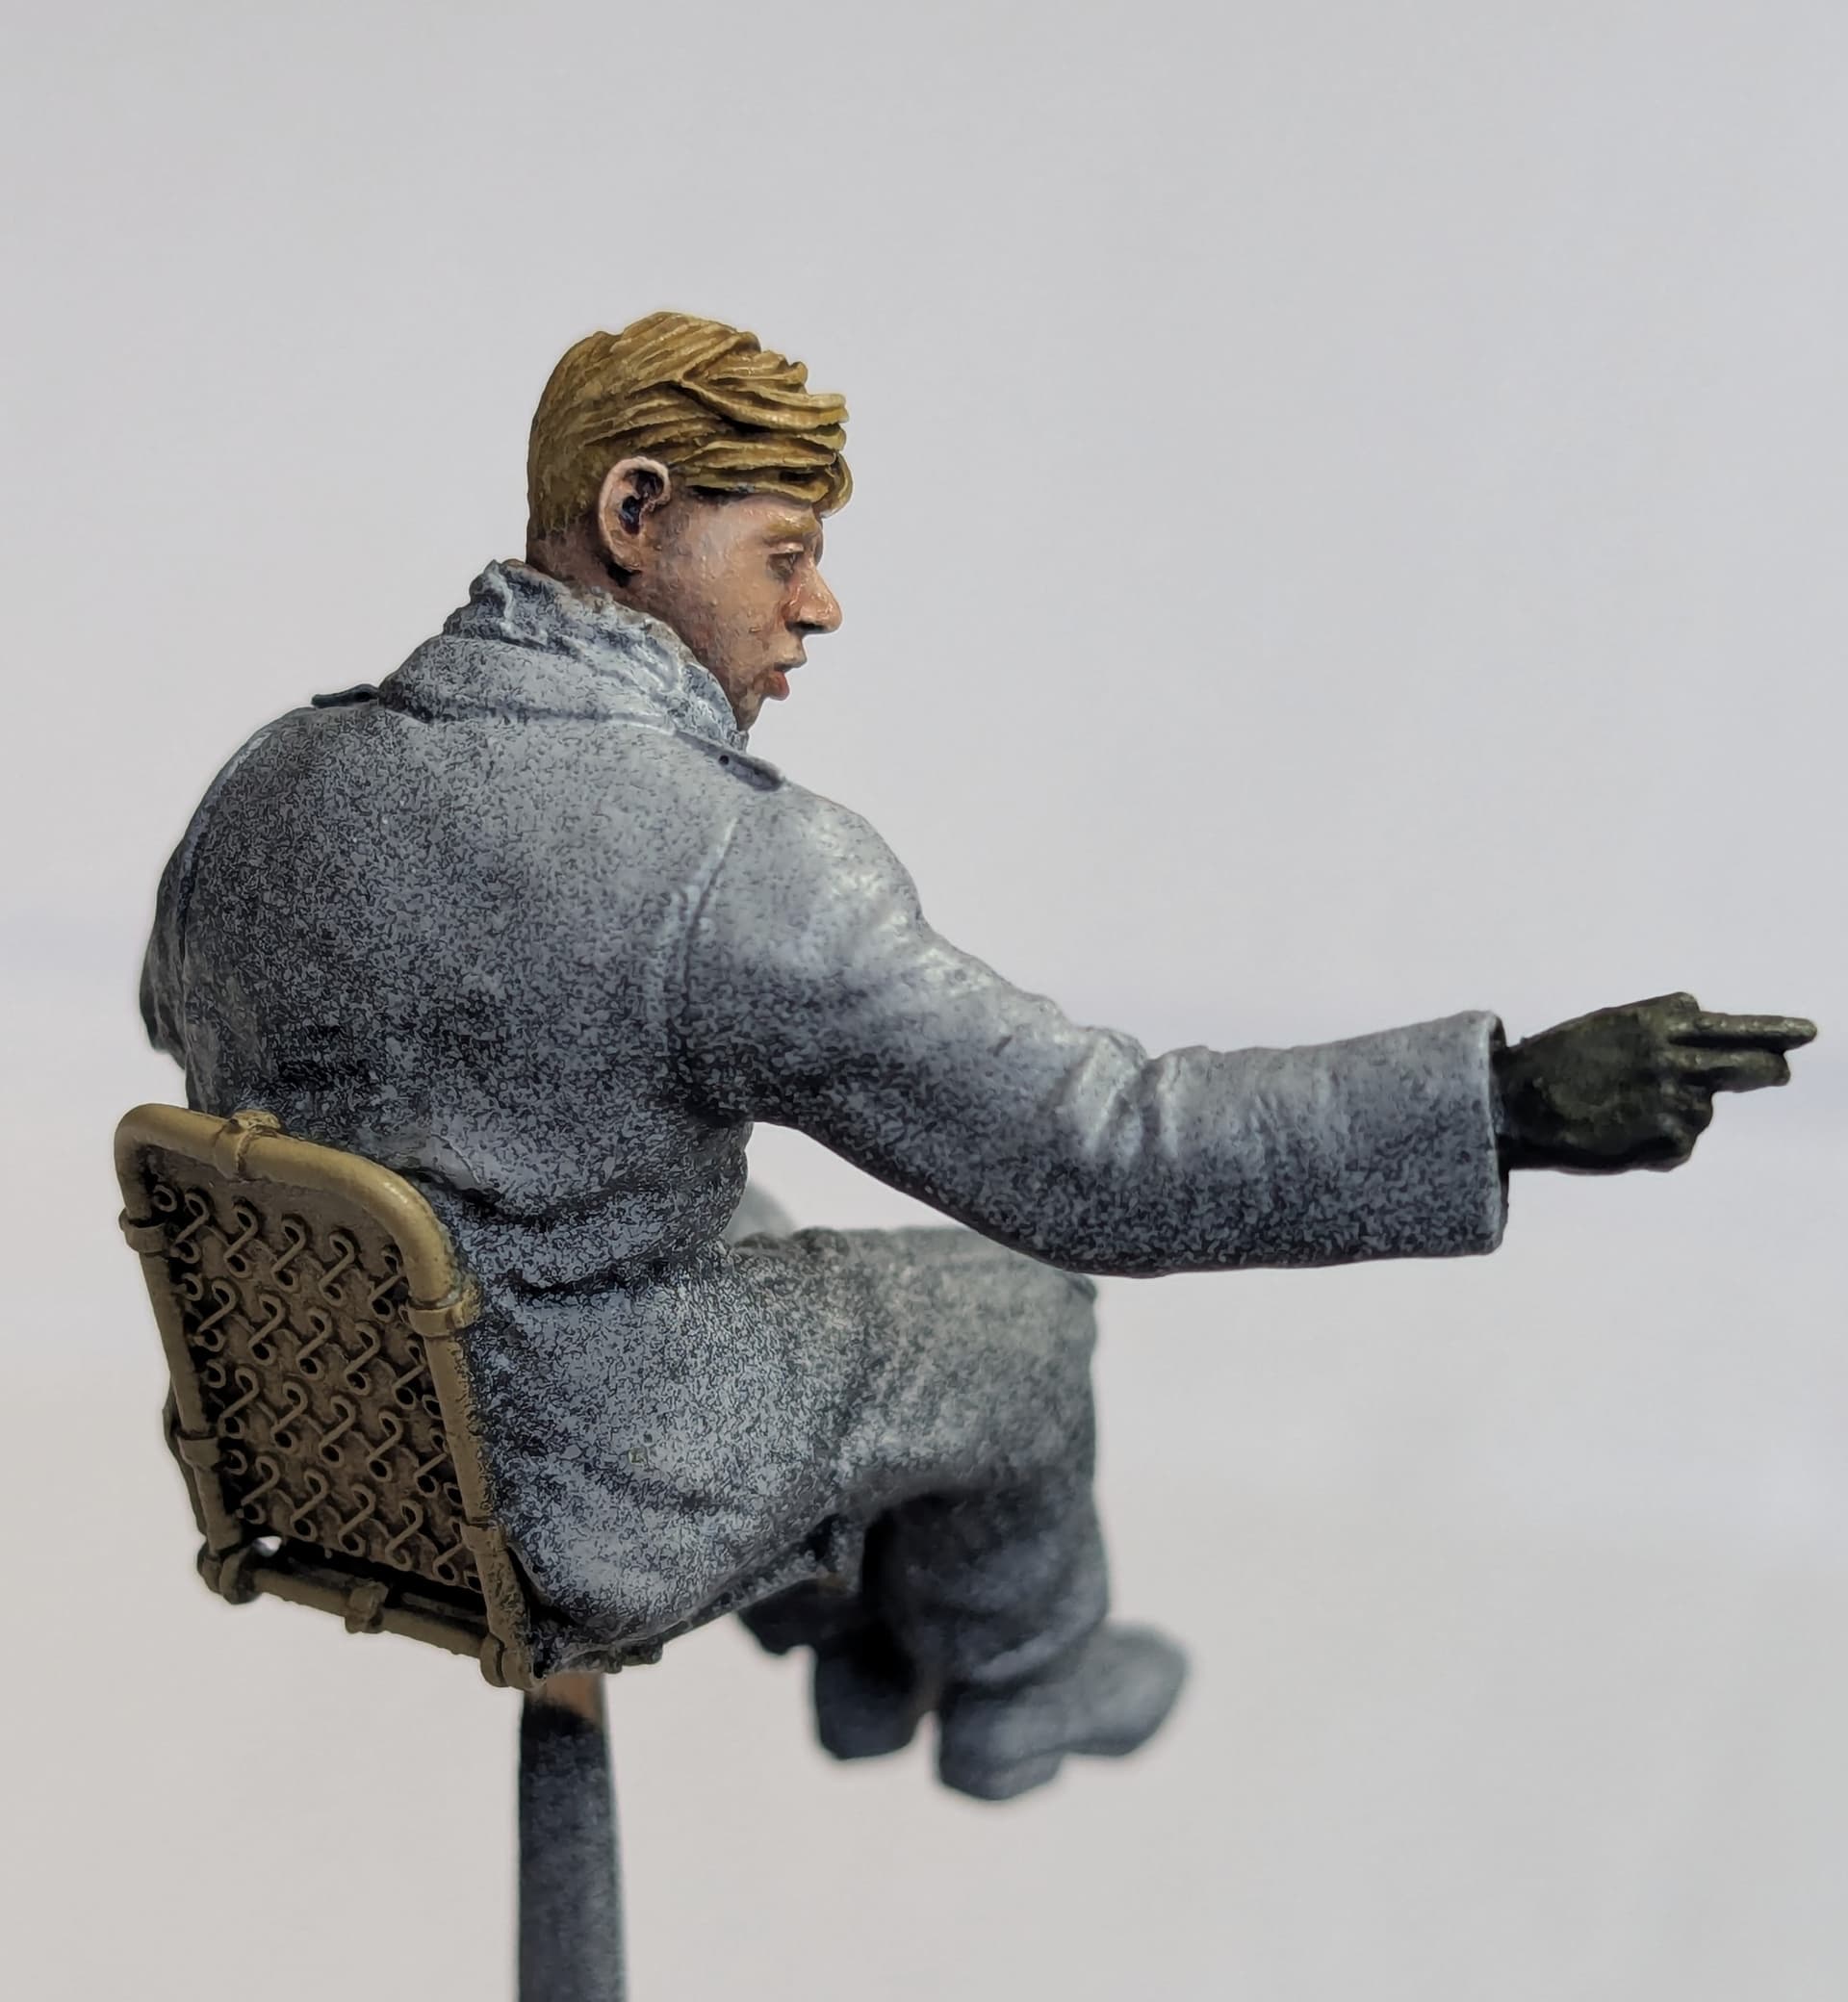
I am glad that I decided to add the driver at this stage, because he was a real pain to fit. The figure is a mix of various parts from the spares box, plus a Hornet head. I then sculpted a greatcoat from a mixture of Green Stuff and Magic Sculpt.
I went for a particularly youthful look, because many of the soldiers in this campaign were only 17 or 18 and contemporary photos suggest that it was often the youngest who were chosen to be the drivers.
I have learnt the hard way that the only way to really get a figure to sit properly is to attach him to the chair at an early stage and then work around that. I like to think that I got away with it this time!
More to come…
Absolutely fantastic! Details of the interior are excellent and so is the driver figure!
Spectacular! I get frustrated working with PE. I need another five sets of hands to place, hold and glue! But it looks so much better.
Great work. I’m working on Takom’s 250 and trying to figure out how to cover over their poor representation of the MG storage and tripod mounts.
Tarps I think!
Great job on that ammo cabinet Tim, even if it might be partially obscured by the cabin canopy ![]()