Painting question re interior kits

OK I’m building the RFM Panzer iv J. Interior kit. I’ve been painting as I go along. But I’m now at the stage where I need to start actually gluing stuff down. I have a stack of sub assemblies. I’ve got all the interior painted. (Airbrush using Mig Ammo). I’m at the point now where do I start the exterior and paint it all at once. Or do I do a bloody lot of masking and do the exterior bit by bit as I did the interior?

What do you guys do? I prefer to do it all bit by bit as I go. But masking and getting out the compressor, airgun, cleaner, paint … every time is a pain. But there is a real headache masking it all now. The below image is way before I painted and built more sub assemblies.

So. Do the exterior now bit by bit or wait until it’s all closed up and do it all at the end? In out and around those fenders?

1 Like

You should not need to do a lot of masking if you are careful, use a visit card leaning on the edge of the interior to avoid overspray and work in sections. This is what I did for my 1/48 T-34 and worked fine:

image

1 Like

Hi, i’ve got this kit in my stash, but am currently working on the RFM Panther G with full interior.

I’ve found the only way to do it is painstakingly paint each sub-assembly before gluing it into position. In other words, i’m painting and assembling on a stage by stage basis. It can be a pain because as you’ve no doubt discovered, RFM fit is almost interference and any paint on contact edges can mean the part won’t fit!

As for the exterior, I opted to retain the clear plastic upper hull and turret (why wouldn’t you if you’ve bought a kit with full interior?). I toyed with the idea of using a camoflage scheme but it is just way, way to complicated to do this for individual components like cupolas/vents etc. I therefore decided to just give any exterior components a dunkelgelb finish and some light chipping before attaching them - in keeping with the ‘show model’ philosophy - that is, the important thing is to have the interior visible and its not so important to have a kit representative of a theatre of war.

Thanks Khouli. I looked at the clear parts. Considered using them and applying paint in areas that didn’t give a view of the interior. A hybrid. But then when I looked the clear parts have the hatches moulded in. Thus no opened hatches. Bummer.
I think I agree with you and think the build will be a painting PITA. Great kit. But a lot of planing is needed and you need to almost memorize the instructions to know what is involved with each step.
My version will be a fictitious Panzer IV J sent to Nth Africa with a simple desert scheme.

I’ve found that I spent (and still spend) many hours reviewing the instructions and planning the build. To the point where I downloaded a PDF of the instructions available on RFM website to my work desktop and read it in my breaks!

I’ve also managed to find a good ‘blogg’ on here by someone who actually built the Panther kit with a good narrative regarding instruction anomalies and tips on build sequences that don’t necessarily follow the instruction stages. There might be one available for the Mk IV but i havent found one yet.

Forgot to say, you may find ABER 35 A79 very useful, as the kit parts for the Panther were lacking in detail (poor show considering how highly visible the radios are through the hull roof.)

I generally build and complete the model from the inside out, so I pretty much complete the interior, assemble the exterior, mask the openings (done as I progress with the exterior), then finish the exterior as if it was a normal, no interior kit. The remove the masks over the openings and do any final touchups.

There are exceptions, but that’s my general approach.

An example of a regular exception for me is to paint the base color around the openings of the exterior parts before closing up the interior. This way, when I mask those openings, I don’t have to worry as much about touchups for the areas under the masks.

Another common exception for me is to finish the interiors of the hatches, base color the hatch openings before closing up the interior. I then use the hatches to mask the openings.

Really, I try to figure out my finishing strategy as I go, so I occasionally will mask openings from the inside leaving “handles” or other methods to remove the masks though the openings later. These masks would be added before closing up the interior. Other openings might be simple and easy to mask by closing then up with sponge foam “plugs.”

Sometimes the masks don’t actually have to completely close the opening. They can sometimes just be “walls” or “dams” that can be carefully sprayed around.

In so far as having to clean my airbrush a lot, I just roll with it. Practice makes for a smooth and easy process, so I don’t even really think about that much. I do mentally try to “organize” airbrushing sessions so that I’m efficient with color sequences and part masking, but really, practice and experience mean that I only need a few moments to clean up. It does help, though, that I have two separate work areas, one for construction and one for painting. That way I don’t have to clean up the entire work area just to take a few minutes to airbrush a couple of colors on a few small parts.

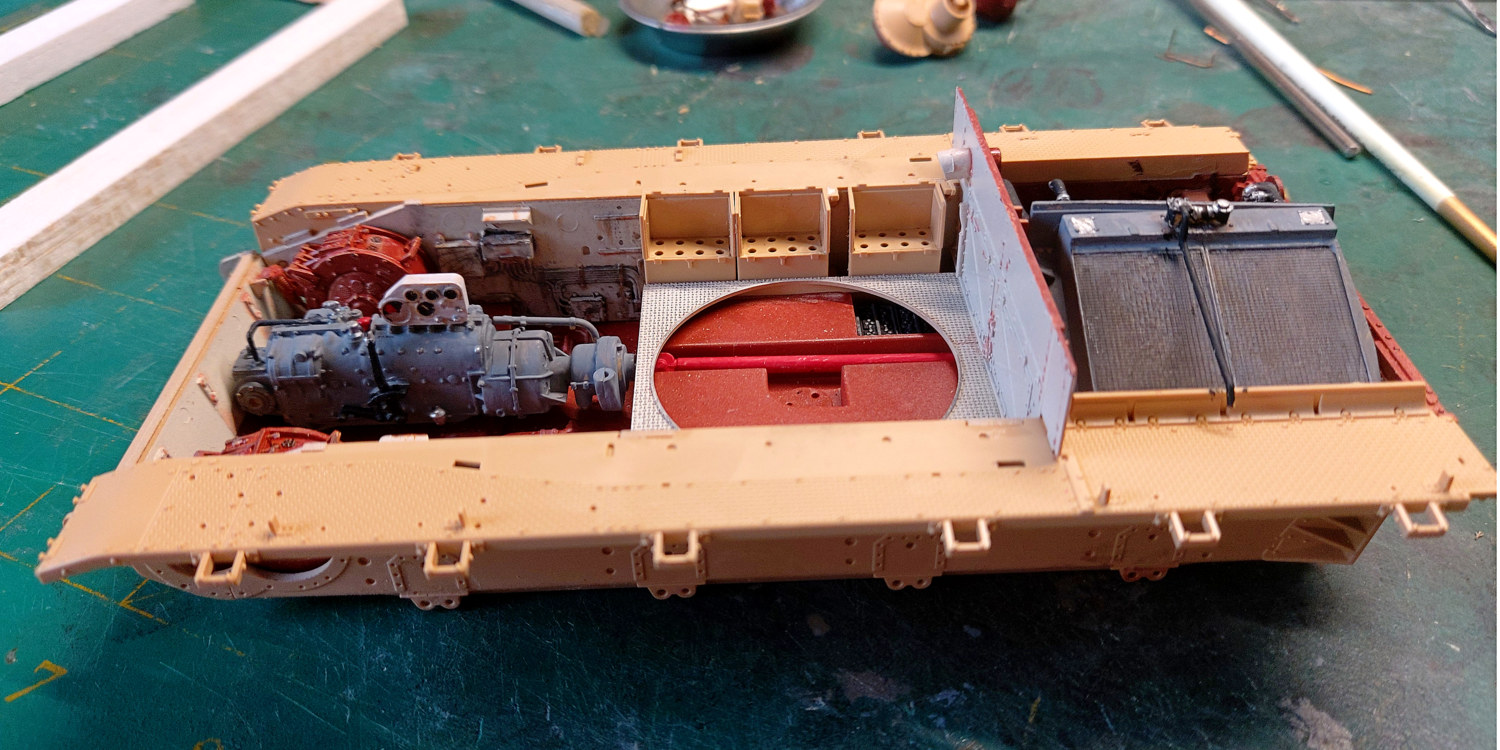
The interior of this Bronco Lloyd Carrier was completely finished and then masked using tape “walls” or “dams” before the exterior was carefully painted. The suspension parts are still loose and only dry-fitted in this photo. They were finished separately, then added after the hull sides and bottom were painted.

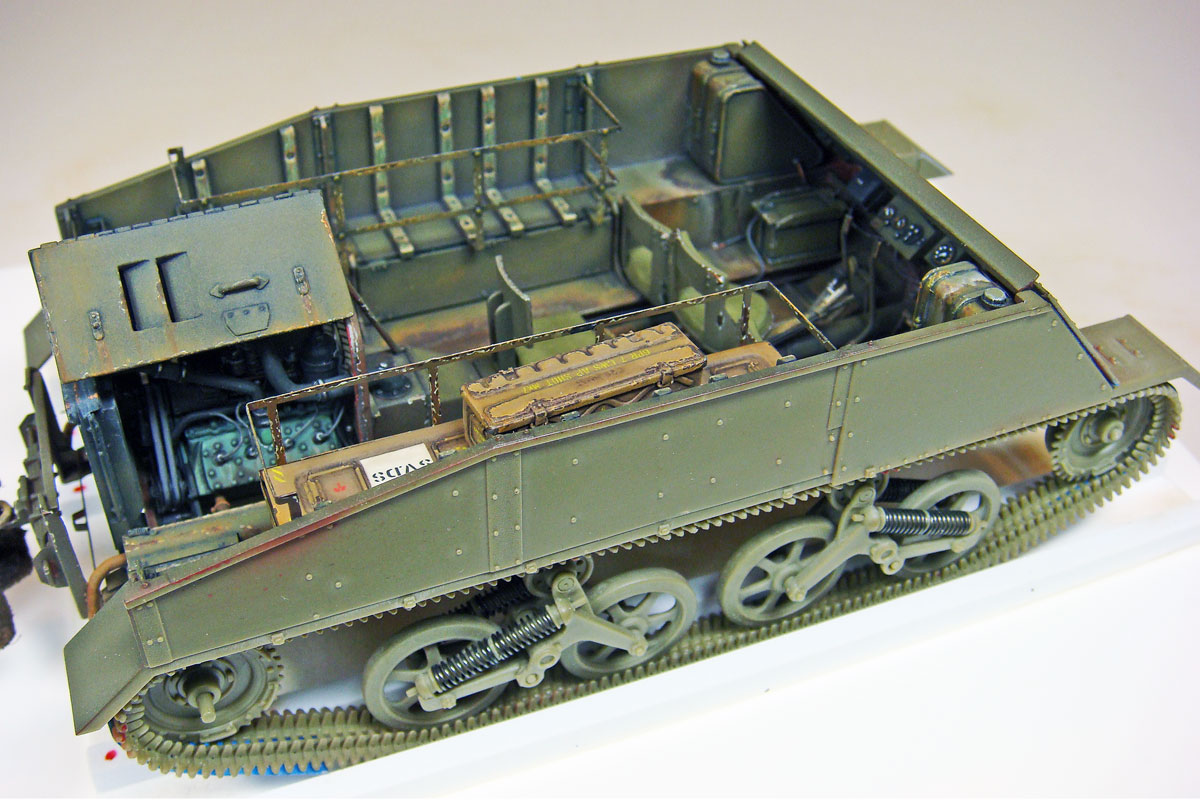
This Riich Universal Carrier Mk.I was finished the same way…

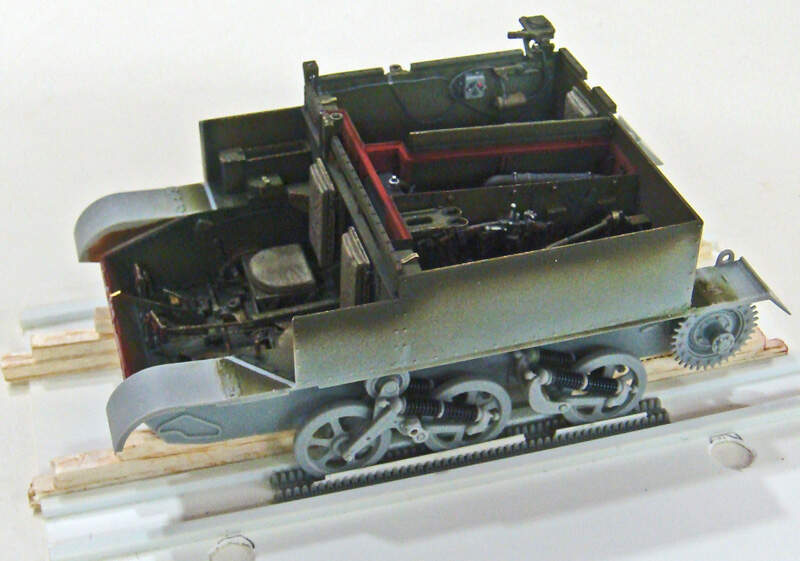
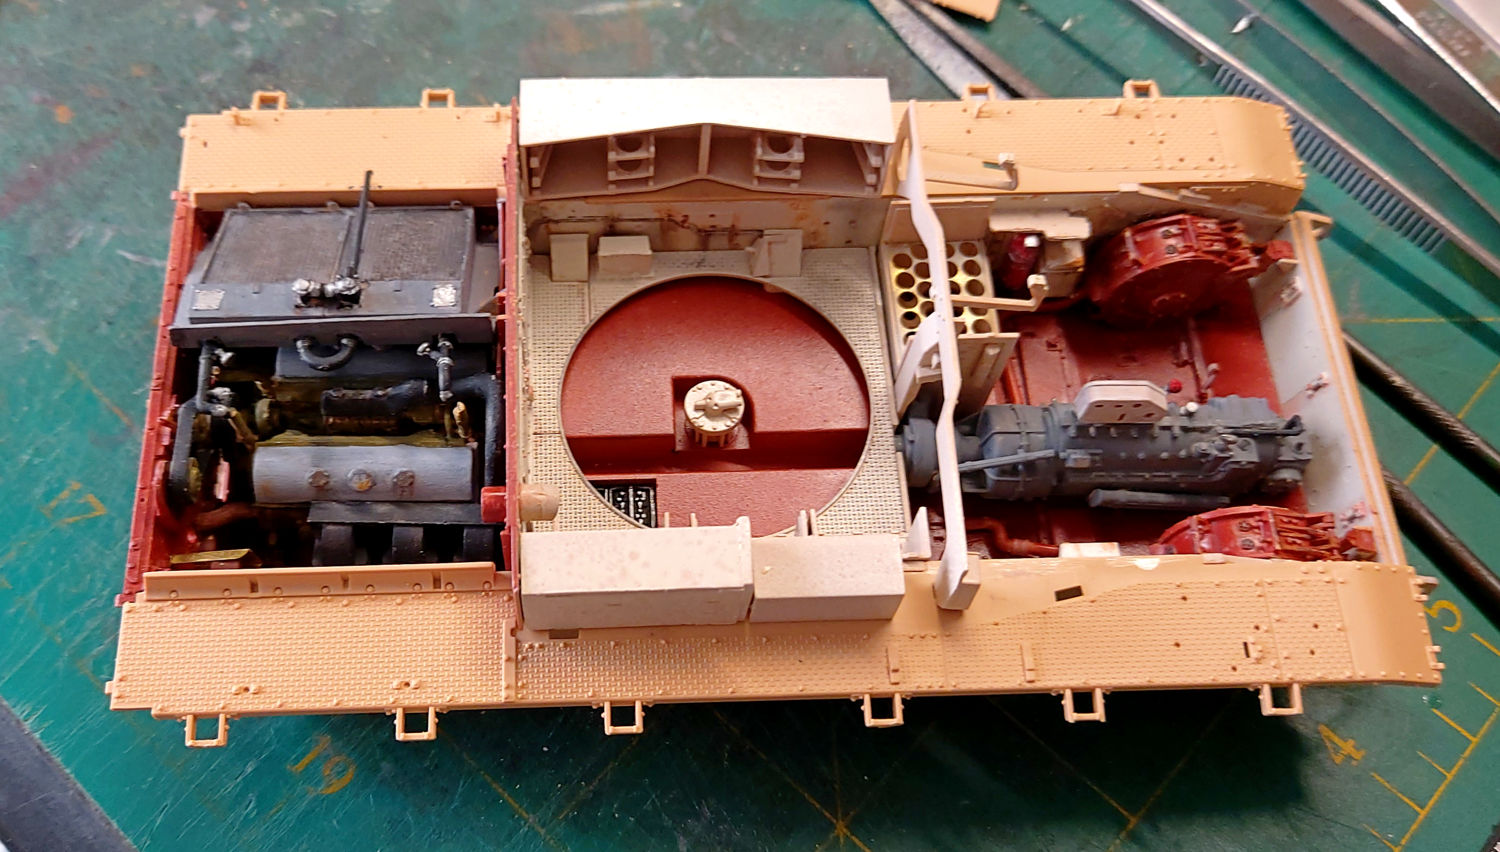
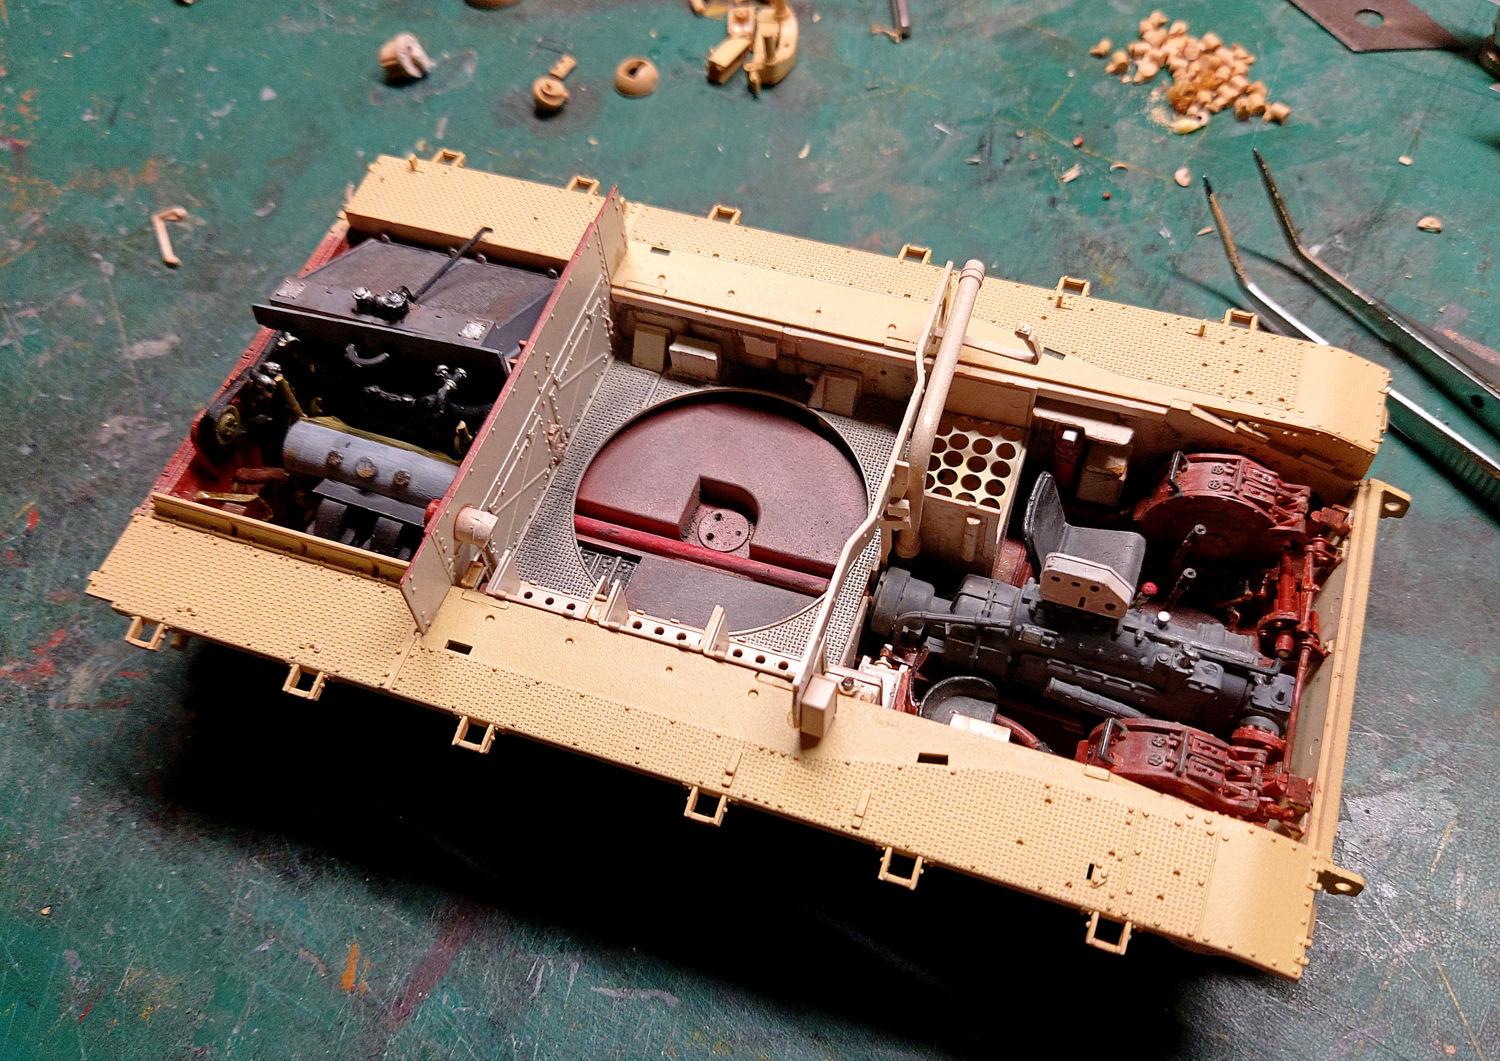
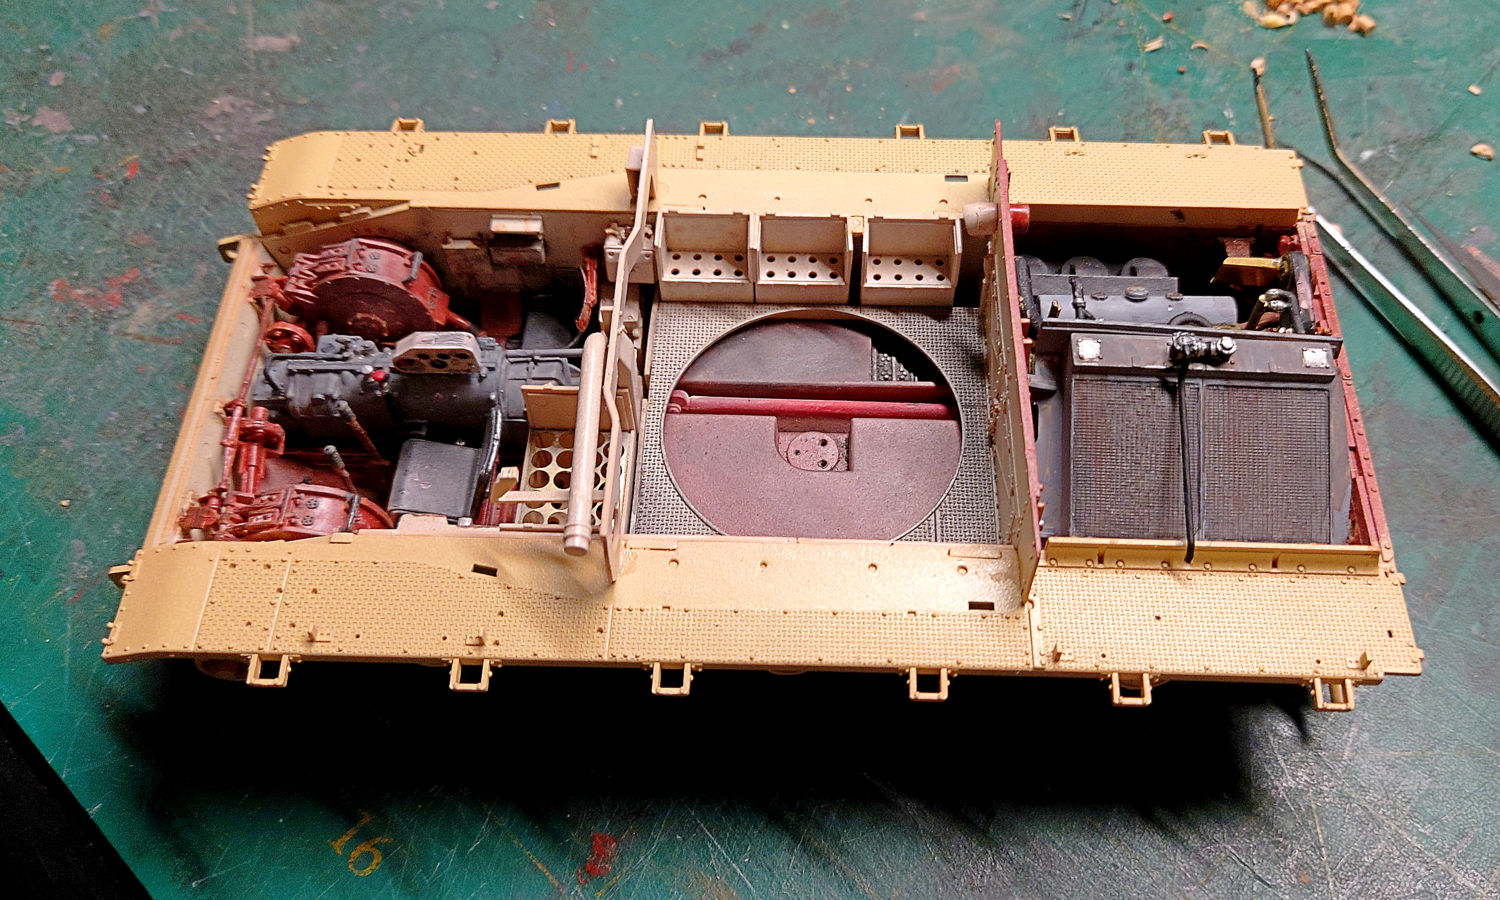
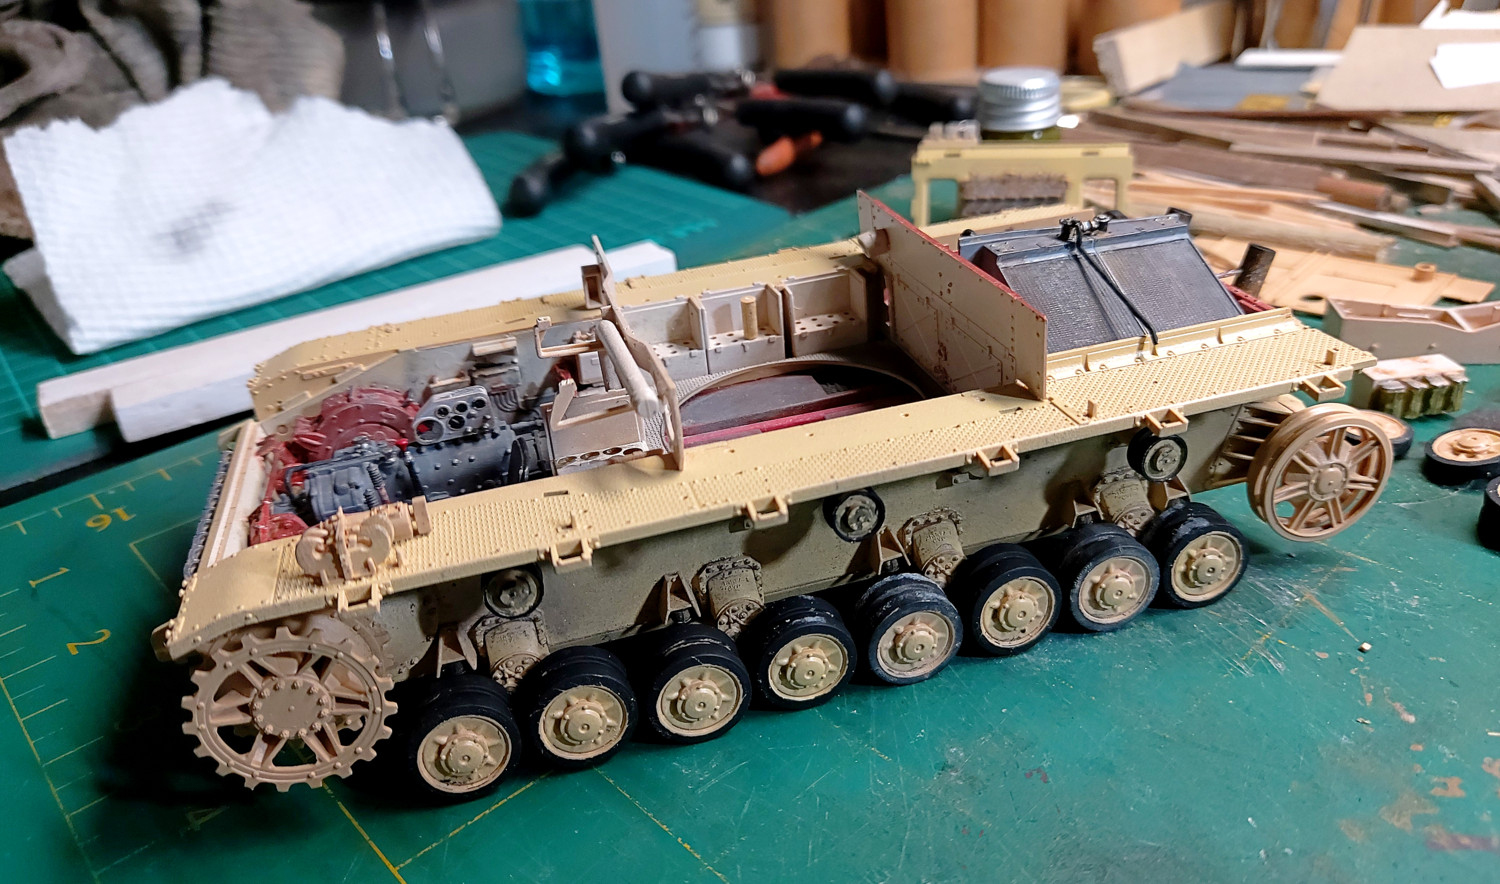
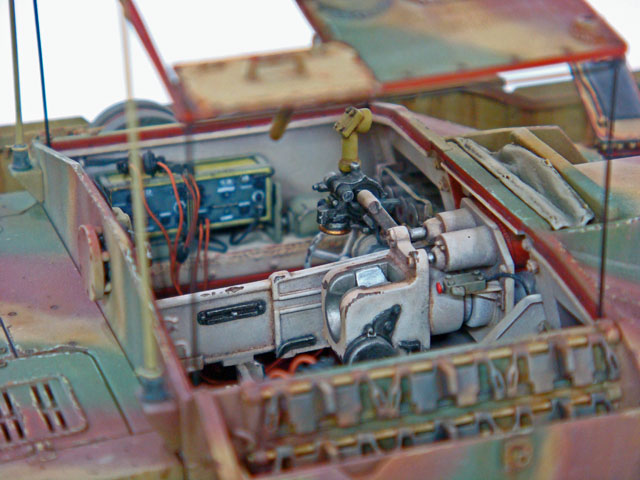
The interior of this Stug IV shows the partial painting of the exterior opening areas (primer red).

Interior Painted Dry Fit 24

The top was masked off using the hull roof with the hatch openings masked from the inside and the exterior was then finished.

Schurtzen-Bracket-Dry-Fit

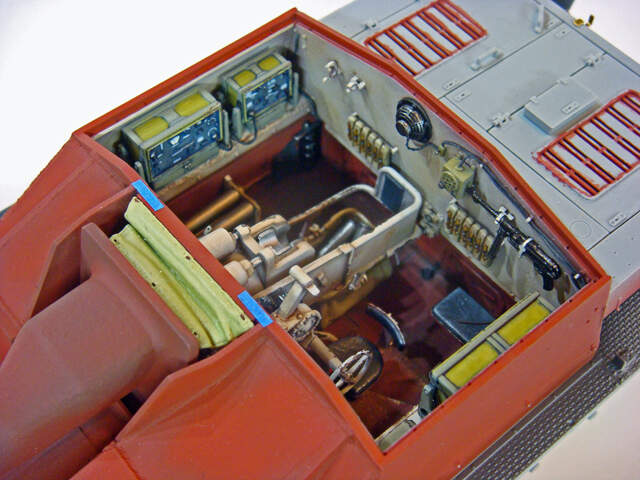
For final display the fighting compartment roof was raised up on thin carbon fiber rods.

Final Test Fit (9)

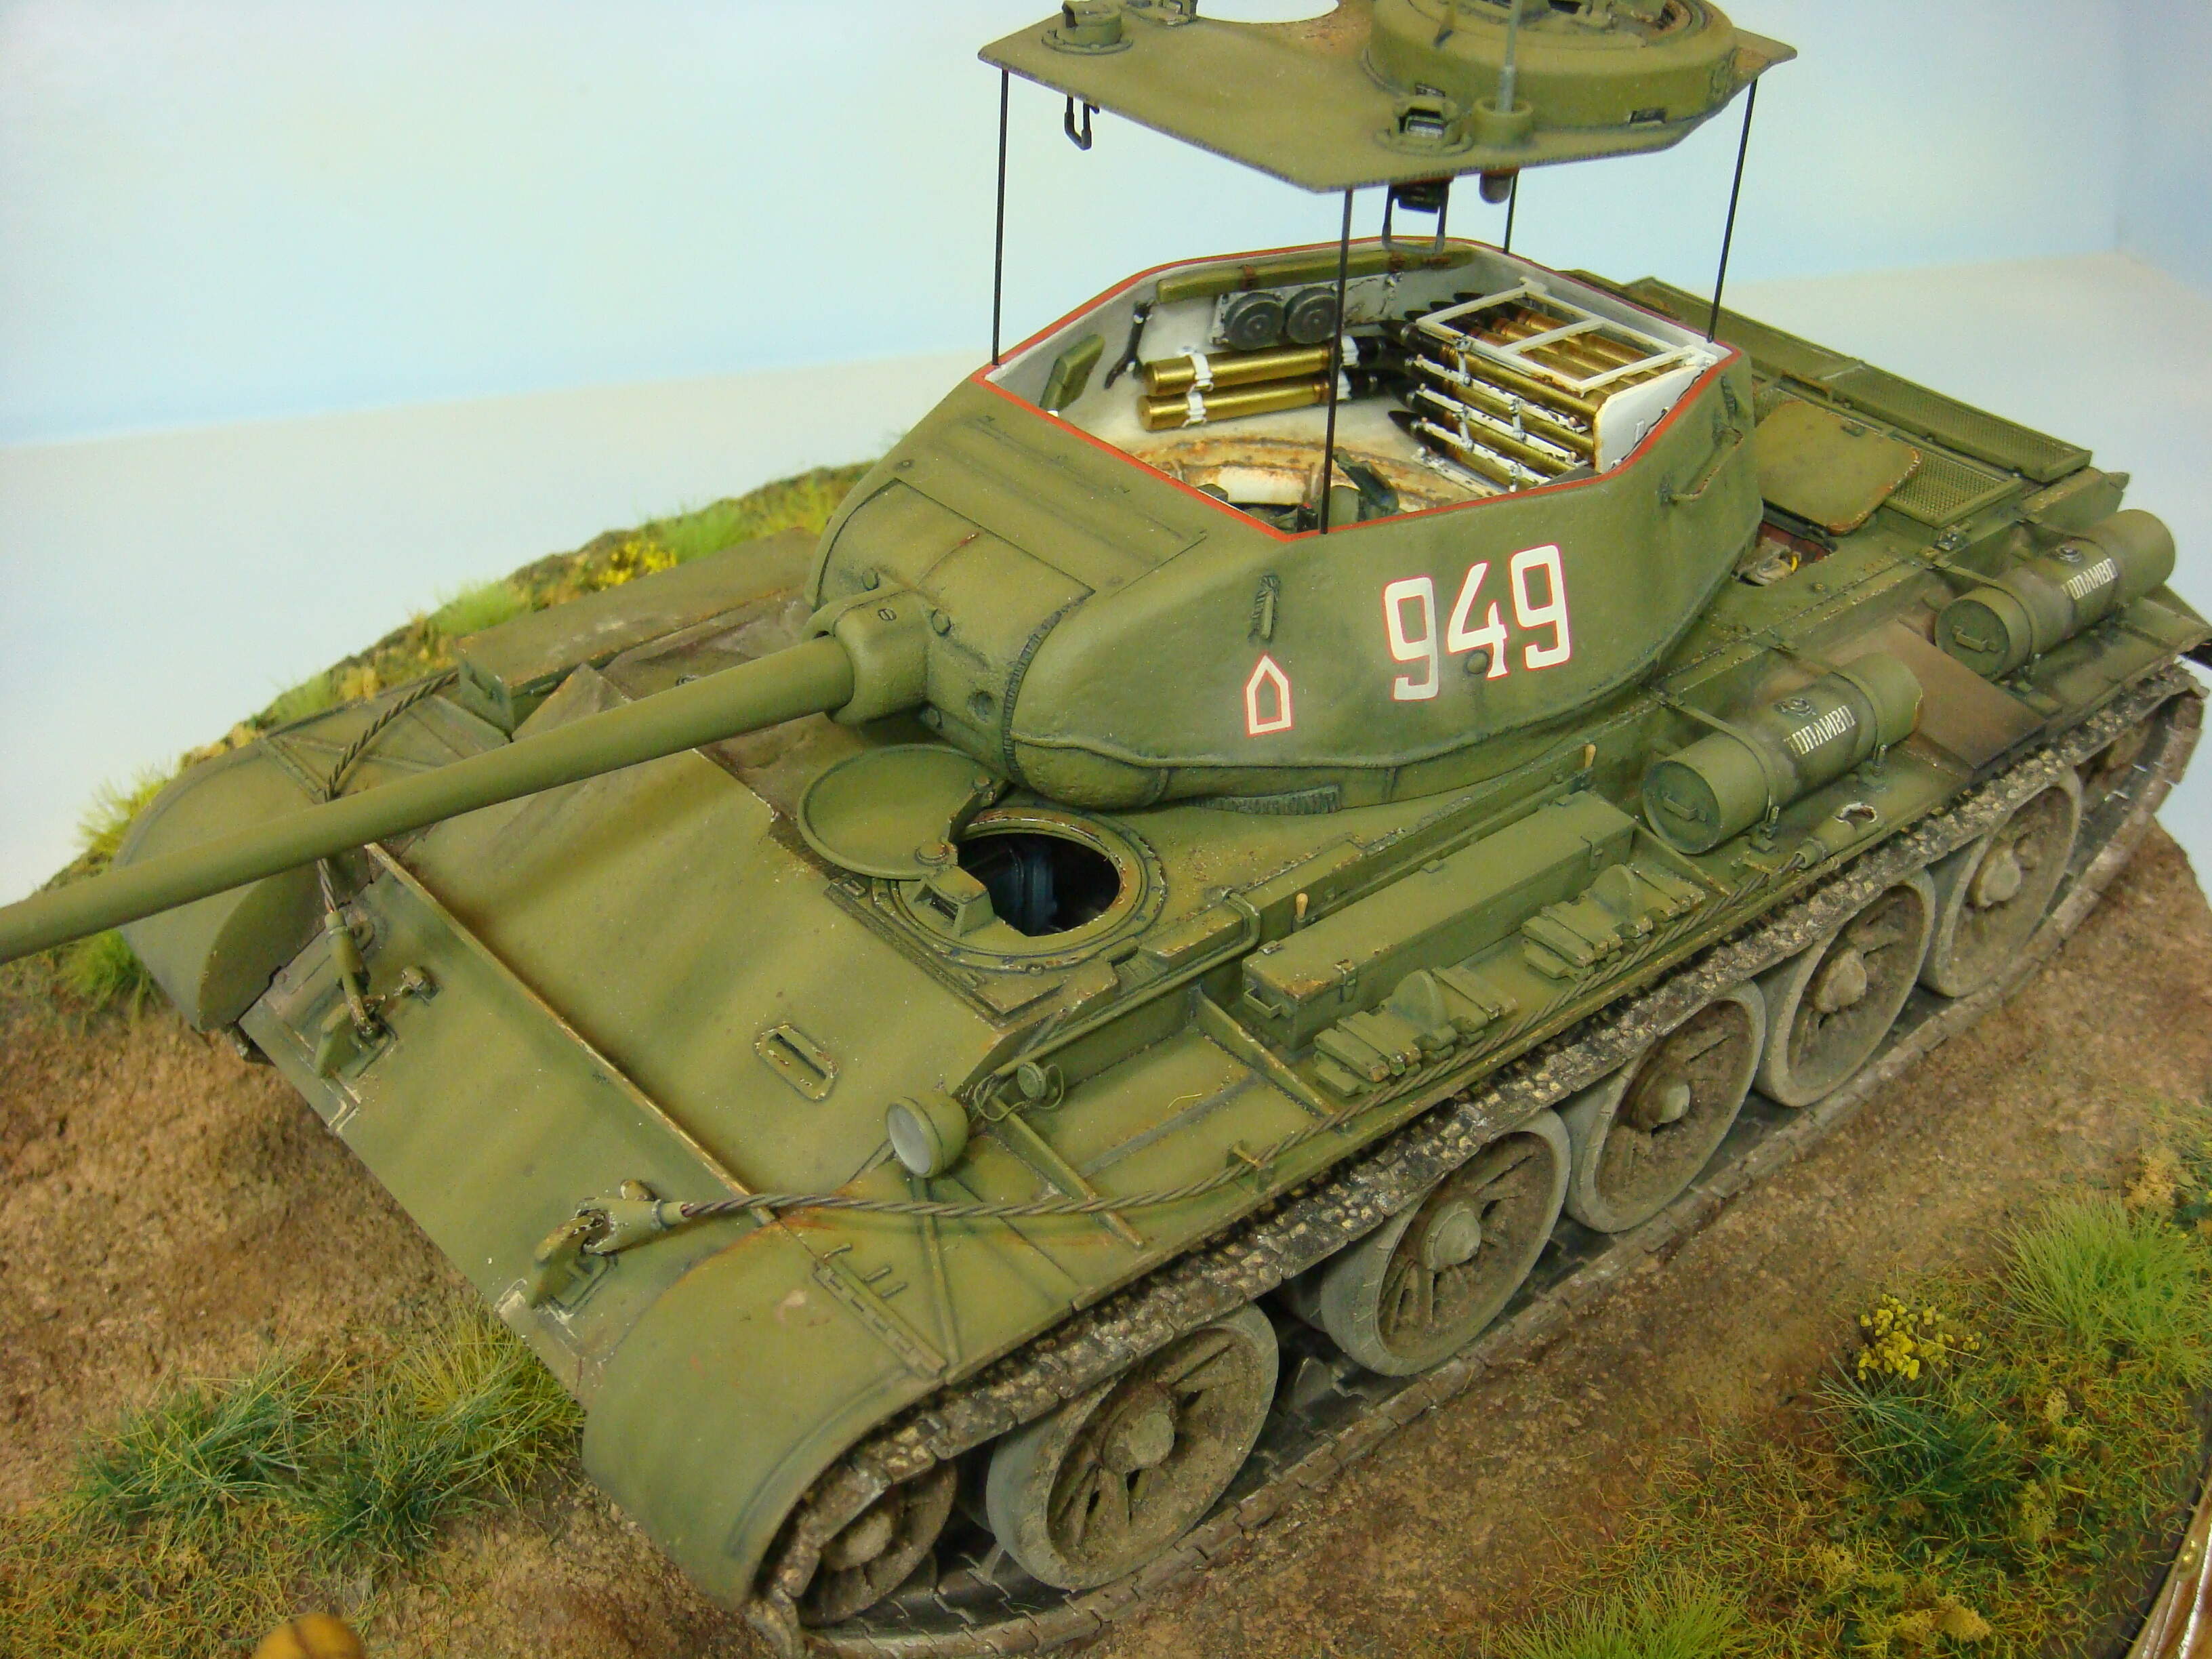
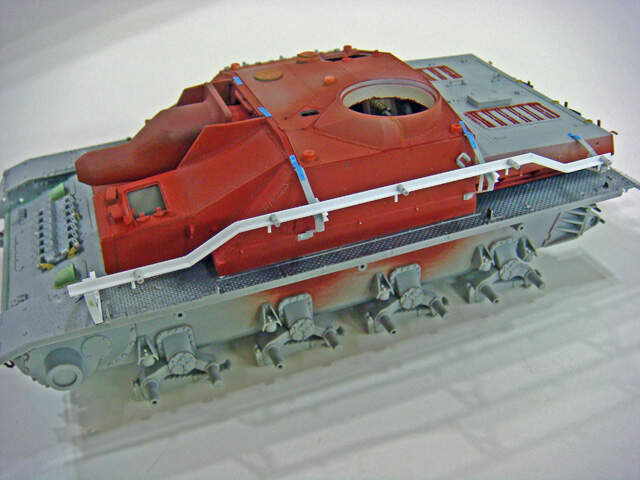
This MiniArt T-44 was built and finished very similarly to the StuG IV. The interior was completed, the areas around the openings were pre-painted with the base colors, then the openings were masked with the hatches and turret roof. The exterior was then finished. The hatch and other openings were touched up and weathered to match. (Again, thin carbon fiber rods were used to hold up the turret roof.)

It just takes some pre-planning and thought to finish these kits with interiors, but the masking techniques are really just the usual, basic stuff.

1 Like

Thanks for the feed back. I think I’ve figured there is no ‘easy’ way. So mask, spray, cleanup.

Interior kits add a whole new dimension to kit building for me.

They do for everybody. That’s why so many people don’t like to do them.
Ken.

1 Like

Interior kits definitely add a new dimension but to me it’s a fun one. Gives a better impression of how cramped these things were and how they operate. Ive really enjoyed my only interior kit, a Miniart T-54, I defintley plan to do more but it will be a once in a while thing, this is defintley a long process.

I do the same as @SdAufKla. I paint the interior sub-assemblies, and glue them together, then I use hatches and such to block openings when I do the exterior, things that I can block get masked with tape from the inside. The only thing I find super tedious and annoying to mask is periscopes

I’m really glad you asked this. I hadn’t thought about needing to do this, but now that I see what you are talking about, it’s going to make me stop and do some more planning…

I have the same dilemma with the T-55 interior kit, lots of pouring over the instructions and planning… slowing down the build.

There should be a dedicated thread with tips on building interior kits. I’ve been modeling railroads for 40+ years. Just discovered 1/35 scale. The RFM Panzer iv J is just my 3rd full kit. First interior kit. I have been amazed at the detail in 1/35 scale. The interior kit is an eye opener. It’s not just the ‘thrill’ of building the kit. It has made me view countless Youtube videos on the Panzers. I’ve learnt so much.

But I’m after a challenge. The fun is in the building. Although I’ve been taken aback a bit by the amount of planning needed with the interior and exterior painting. Anything less now may be a bit of a let down!!

Here’s a couple of images with most of the interior painted and dry fitted. Some transmission parts are done but I left them out just because, er just because I’m Lazy.

My issue now is masking around to hide the painted interior. Next time I would paint the tub before h

and.

1 Like

Full interiors for AFV kits is (with only a couple of early exceptions) relatively new, but consider that aircraft modelers have been dealing with detailed cockpits forever. The same goes for civil automotive modelers who have been adding interiors and engines to their models for decades and decades.

I’d suggest armor modelers can find a lot of useful ideas and tips by studying build blogs of some of these other modeling genres. Masking cockpits, sequencing interior finishes with closing up the exteriors, and other related concepts are routinely discussed along with techniques and materials. If you want to know some tips for masking clear periscopes, then look at how aircraft modelers mask canopies and running lights or how car modelers mask windshields and head and tail lights.

Some cross-fertilization between modeling genres is always a good thing and can lead to new techniques and materials that are applicable to armor modeling.

2 Likes

I’ve been doing them since the 1980s, but it requires a lot of scratch building. And you are right, you can learn a lot from car and aircraft builders. Train builders too, especially if you do dioramas!
Ken.

1 Like

The main issue I see when comparing AFV kits to aircraft and cars is that AFV have more ‘stuff’ to work around. Cars and planes generally have smoother surfaces and not all the ins and outs of AFV.

I would build most of the exterior, but leave off some bits, like the roadwheels, schurtzen, and anything else that can get in the way, mask all the openings, then paint everything. Then attach the loose bits. Once you start, it gets easier.

An update. I’ve all but finished the interior. Sprayed the undercoat and top coat. (Yes very much like the plastic colour). Installed all the sub assemblies. The exterior painting wasn’t as hard as I thought it would be. Simple piece of light card held against the inside wall was all I needed.

Keep in mind this is a fictitious Panzer IV J that turned up in north Africa!!! Just because I like desert paint schemes.

I’m yet to paint the ammo.
I haven’t been too wild with the interior weathering. Remember this was a one off Panzer IV J in the desert!! :slight_smile:

It’s been a good kit so far. My first 1/35 armor kit. First interior. First RFM.

3 Likes

FWIW. I started on the shells. So far the RFM quality has been excellent. But now I come to separate all the shells from the sprue to prep them all for painting I find they all of them have to be filed down. Not only large gates but there is a distinct separation line on all the shells. Looks like the mold hasn’t been aligned properly. Or worn. So lots of filing.

Oh well. Nothing else to do on the weekend!

OK now I’m almost ready for the tracks. I intend to weather down below first then installing the tracks. I had trouble building the tracks. I found it almost impossible to prevent some glue creeping where it wasn’t meant to be. As a result the tracks have some stiff sections in them. Plus they are fragile I have broken them in a few places. So plan of attack is to weather then glue the tracks in place. Sure they wont work but they will sit better.
Exhausts are just sitting there. I want to close the top up before I start to get down and get dirty!!!
I still have to paint the shells so no ammunition installed at this stage.

Interior kits certainly test your planning!!

3 Likes

Ahhhhhhhhhhhhhhhh. I’ve been fighting with the darn tracks. They went together ok. Albeit with a lot of care. Apart from a couple of stiff section I was proud of the result. Now I go to install them. They are so fragile that I now have about 7-8 short sections. They have to be pulled through to get past the return rollers. Any snag and they break.
So I went online to order Friulmodels metal tracks. Local wholesaler is out of stock for some months. So any suggestions for a 1/35 Panzer iv J?