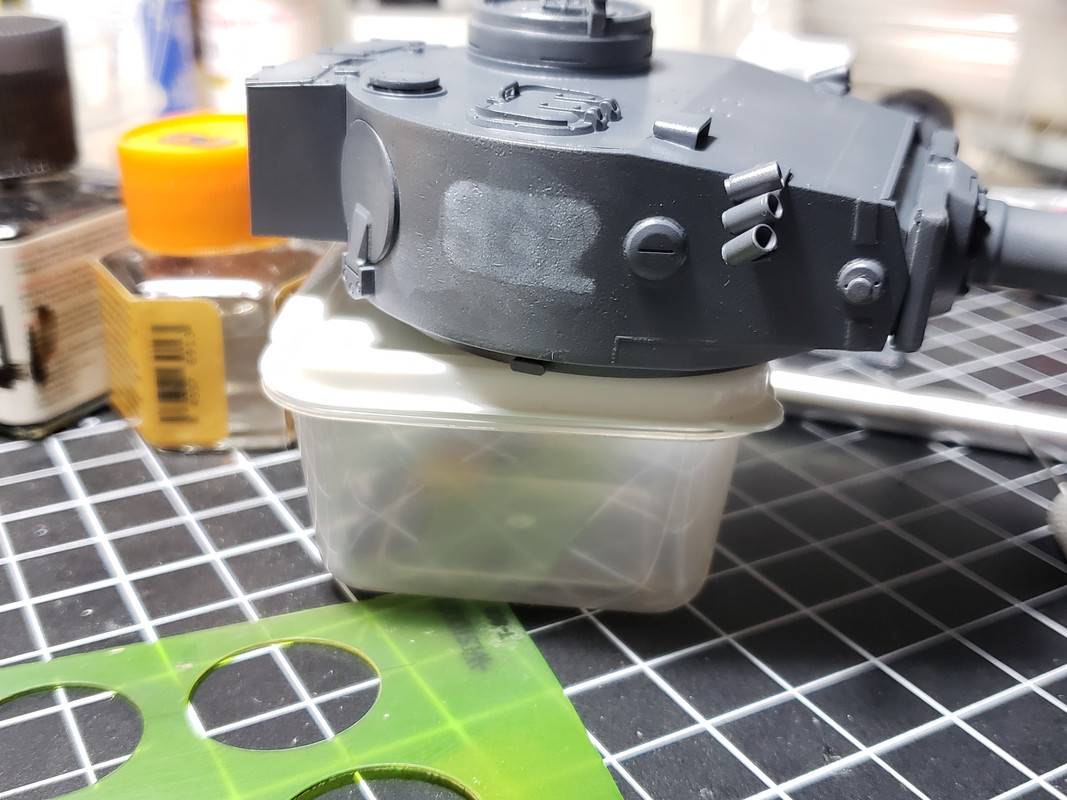
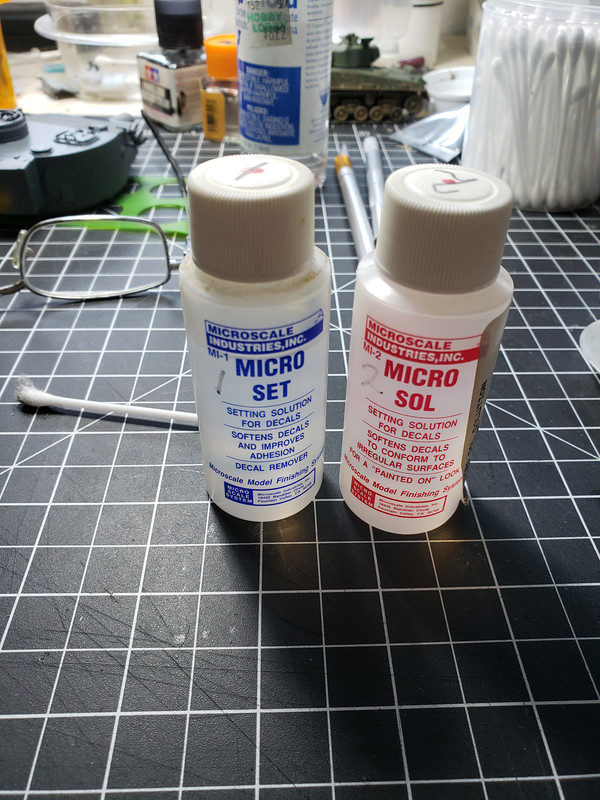
I did my first build using Pledge as a coating to do my decals. The tank sat for three days after applying the Future to it. I applied Micro Sol in the red bottle to surface and then the decal and noticed right away the “burning?” of the clear coat. After about 10 minutes I removed the decal to prepare for repainting.
Any idea the issue? I tried to research this long before using it and see a mixture of answers all from years ago on other forums. Could it be the wrong formula pledge? Or is it just Micro Sol burns itself into the coating and should not be used with it?
@Grauwolf I used Vallejo air. I have seen a mixture of answers about using future/pledge with acrylics also.
@markiii There is so much posted about this in past forums. But it spans over 10 years and there has been so many label changes also that many times posting are about the correct product.
I’ve read these stories but never had it happen to me. Wondering if it’s a result of too much sol? I appl it it fairly lightly in 4-5 applications. I wet a q-tip or paint brush, get the microsol out of it until it’s just damp, and then press it lightly onto the decal and let it sit for a few hours. Rinse and repeat till it settles. My most recent model I even used Tamiya x-20A to get decals to settle though be warned. Once the x-20a is on the decal absolutely do not touch it till dry or you can ruin the paint
Micro Sol is a lot more aggressive than Micro Set. It is really intended
to be used to soften a decal so that it conforms to raised detail or recesses.
I let all my paints dry for a least a week and my initial Future coat for at least another 2-3 days before I attempt to do decals.
Use Micro Set instead unless there is raised details or recesses.
Maybe the Micro Sol is reacting with the underlying Vallejo paint that
didn’t completely cure.
I could probably use a bit less of the Micro Sol. I dont think it would really help though. The area around where the numbers go starting turning within 15 seconds of me touching the turret. I thought at first it might be a humidity or temperature issues and would go away, but no luck.
I have also tried to notice the difference between using these in the past. I still cant see it.
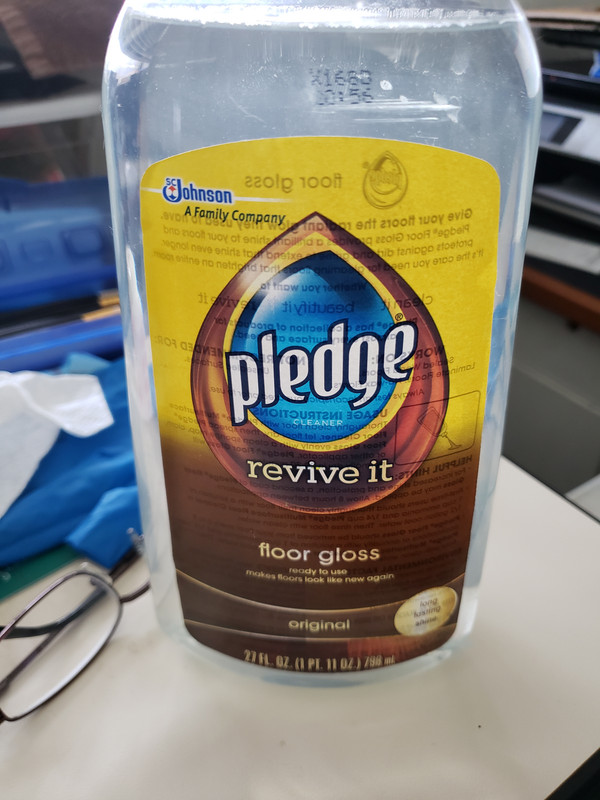
I get similar with Pledge and M-Sol but generally it shows up if I have a stubborn decal that needs lots of coats and bubble-popping sessions. It goes away after a second coat of Pledge (to seal the decal ready for washes etc) but I’m sure it’s the acidic vinegar in the M-Sol attacking the surface of the Pledge. I don’t remember having this when I used Micro-Gloss instead of Pledge, but that attacked the wallet more…
@Grauwolf I was posting before I saw your posting on the micro.
When I sprayed the pledge on the Tiger wheels I may have done it to lightly on some of the wheels and the vallejo reacted and wiped away during the pin wash. So when I did the turret I made sure to have a thicker coat on the turret. I think the turret sat for over a week before I sprayed pledge. But that was just because I just couldnt get to it.
I liked how the the pledge went on. Also I just did the turret decal on the other side with just water and it does sit nicely. So maybe I will just avoid the micro or go back to testors gloss spray can.
How old was the bottle of Micro-Sol and had it previously been opened?
I’ve had bottles that didn’t get re-sealed
completely get stronger as part of the solution evaporated.
Only times I recall using Micro-Sol was for decals on a rough hand made Zimmerit. The decals crinkled under the Micro-Sol and looked like paint afterwards. Otherwise the milder Micro-Set seems to do the trick.
If I understand correctly this could be part of the problem, Micro-Sol should be placed after the decal not below, under you put Micro-Set.
The right sequence should be Gloss-Set-Decal-Sol-Gloss.
However most of the times you have similar effects on gloss or semi-gloss do not touch anything for 24h, let it dry, if you are lucky the effect disappears, if it does not disappear but the surface is still smooth often just give another coat of Gloss and it is like if nothing happened
As others have said, use microset before the decal, Microsol once you have the decal in place and reasonably settled. I have had the milking of the future too if using copious amounts of sol, but it would settle perfectly given time. My future is the original formula though.
I would have left it overnight to see what happened, although it almost looks like the microsol may have affected the ink of the decal.
@Armor_Buff The bottle is a couple of years old. It might stay open the whole time during decals on some builds, but usually gets closed just to prevent getting knocked over.
@Vicious I had the milky look slightly happen during my zero build. It happened after the testors gloss.
I appreciate the responses. It seems there are some variables that can be a real issue without knowledge on this product. not that it doesnt work, just seems it can bite you in the butt easily.
What kinda confuses me is the micro set says decal remover on it which seems to reason its stronger? Both say setting solution. my limited use in the past before this still hasnt shown differences. I could totally be doing stuff wrong though.
I binned the micro sol/set ages ago and just use tamiya acrylic thinners. place the decal where you want it and then give it a coat of the clear thinner, problem solved.
Yes it is true the writings on the bottles can confuse, the blue is the least hot, remove surface tension to help avoid bubbles and silvering and slightly softens the decal, the Red is much hotter and you give it on top of the decal to soften a lot more the decal,use it when you have details or an uneven surface but you have to take it easy,on your Tiger I wouldn’t even use the red but only the blue under and above,the surface on the turret is smooth without any details.
In this case for me either you didn’t let the solution dry enough, or maybe the problem isn’t even related, i Varnishes go milky for a number of different reasons…it is a very common problem