Well, another project that took a fair while; this model shows a Royal Military Police (RMP) vehicle patrol in Berlin August 1961, following the weekend of 12/13 Aug, when the East Germans, with the full support and deployment of the Group of Soviet Forces Germany (GSFG) effectively sealed the East German zone in Berlin. Hitherto, it had enabled the relatively free movement of its citizens. This culminated in an unacceptable – to the DDR government – exodus of far too many of their brightest citizens, a “brain drain” if you like. This directly impacted on the DDR’s economic success, or lack of it. The East German premier, Ulbricht, managed to convince Khruschev of the need to secure his borders. Khruschev eventually agreed.
Now, this is only a very simple version of events; I am sure those who wish to investigate the historical background can/will do so. Also, as I’m recapping a fair bit here, just scroll down past all this guff and you’ll find pics of the final model.
I personally can just remember watching this on our small, grainy black and white TV; I was 7 years old and found it troubling even though I did not fully understand much of what was what in the wider world. The following year of course, meant the Cuban missile crisis, and again I found myself watching TV in an unsettling atmosphere, especially for one so young.
What perhaps is of note is that this was conducted in August, a time when most of the western world goes on holiday. Whoever was not on holiday, given the social impetus of Berlin garrison life, (and military life in general it must be said) would be partying hard over the weekend.
The military missions stationed in West Berlin but given free rein to operate throughout the German Republic, seemed to have missed all the combat indicators; one BRIXMIS (the Brit mission) report opined that the discerned stockpiling of building materials and cement all signalled that the East Germans were about to commence a rebuilding programme to repair damage from the Second World War. How wrong can one be?
Anyway, this is getting away from the model; it may not be well known but British units in Berlin used several vehicles which were not normally on the British Army’s tables of equipment. These included VW Beetles, VW minibuses, Unimog trucks and the ubiquitous German-made MUNGA jeep (as indeed, for instance, did the French).
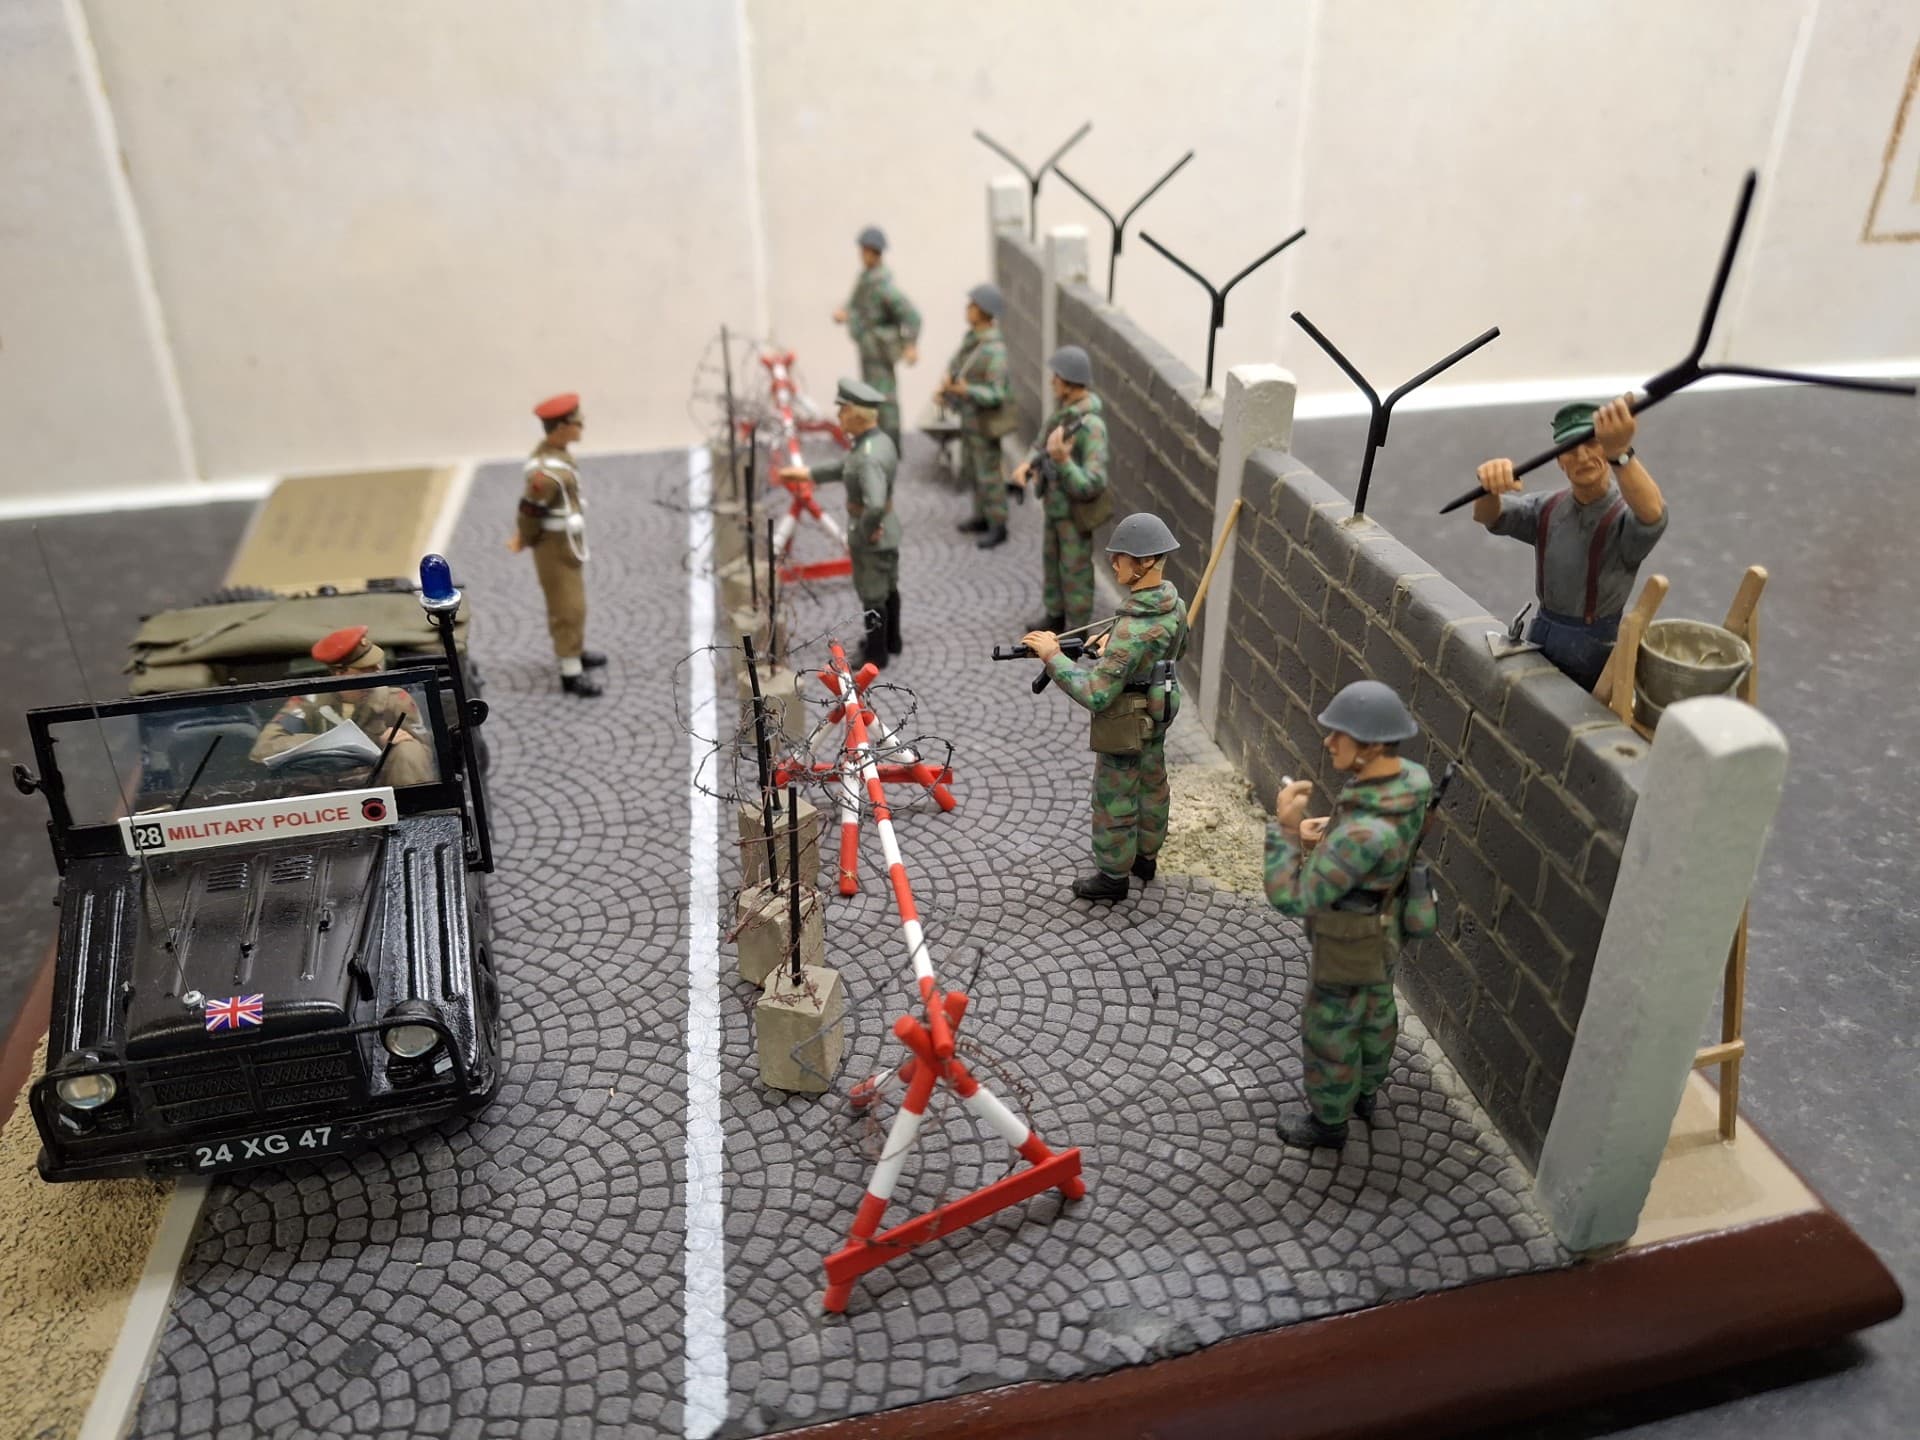
So, here we have a mobile patrol of the Berlin Infantry Brigade Provost Company, doing their normal rounds in the weeks following 13th August. The JNCO, a full Corporal, has got out of his MUNGA and has decided to engage with an East German Army officer (RMP units often contained several German speakers, and attendance at the language course was encouraged). As an aside, relatively junior non-commissioned officers, such as Corporals, in the British Army, were, and are, often invested with a far greater authority and freedom to apply their initiative than that of many other armies. The street has been hastily walled up, and is still being worked on. Troops from the Nationale Volksarmee (National People’s Army) – NVA – are deployed.
The RMP driver is watching with some concern as the conversation gets heated, but no matter how testy things get, nothing will change the price of fish. Berlin will be divided and sealed for the next 28 years. Essentially, given the tense atmosphere of the time, President Kennedy was not prepared to risk nuclear war over Berlin (although there were some senior officers in the US military who just might have). Probably small comfort to those East German citizens who had their lives thus blighted, but such are the vagaries of history, and concomitant inspiration to the military modeller!
Kits/figures used:
MUNGA. This ended up being a mix of both the Elite and CMK kits; I’ve described the build as this project unfolded so I won’t repeat it all here. It was a bit of a bind.
I added 2 x submachine guns, (known as the SMG, L2A1 in Brit Army parlance but known sometimes to those outside of the Service as the Sterling) complete with fitted magazines (32 x 9mm rounds since you ask) and slings, and have positioned these within the vehicle. These RMP patrols went armed. Berlin was always fraught and would become more so after the events of August 1961; as I’ve observed before, all that effort to keep a people in. I don’t actually know if the issue of SMGs came as a result of the Wall going up, or that they were carried before; in the end I just added them for interest, (and because I was issued one generally throughout my career and loved it).
The weapons came from Italeri, with slings from flattened lead wire.
Markings were provided by a modelling mate some time ago (I’ve had this idea on the back-burner for far too long).
I will recap on the figures.
RMP Figure – Standing. This figure is from Resicast; the original figure is a WW2 one so the uniform had to be modified to effect collar and tie, and the map pocket moved to the side of the leg, to reflect the 1949 Pattern Battledress (which I’ve worn folks!) The figure is actually quite small and weedy for an RMP; most members of the Corps, in my experience, are pretty handy specimens; they simply have to be to quell drunken, carnaptious soldiery, when, as Kipling put it, they’re “goin’ large a bit”. Anyway, the knock-on effect of this, was I had to find East German figures of an equal stature. As it happened the Alanger figures I used for the opposition, were just about the same size. I eventually found a decent enough sized figure for the officer, from the ancient Tamiya Kubelwagen set, Wehrmacht figures being suitable for the NVA in the time period; more recent Tamiya figures seemed to be too large.
RMP Driver. This is an Ultracast figure (Jeep Driver), again with his BD modified (though I haven’t done it particularly well) and webbing and holster added. The pistol lanyard came from fuse wire. I also used a Hornet Head from their WW1 British set. Colours are fairly obvious; my go-to Khaki of choice in this scale is Humbrol 26.
East German Officer. As mentioned, the ancient Tamiya Wehrmacht figure. I modified his arm to hint at a bit of emphasis in the discussion. The stone-grey colour of the uniform was quite difficult to match; in the end I went for Humbrol 31 Slate Grey. The Border Troops had recently been reorganised but I don’t think at the time of the Wall going up, that the green cap-bands and cuff titles had come into being; in the end I compromised and went for a black hat band, yet green bordered epaulettes. There is always a sort of interregnum in any army when new uniforms/kit/regulations are introduced.
Soldiers. These were all from the now hard-to-get Alanger set. I stashed several of these and am glad that I did. Whilst they are modelled in the later pattern uniform, I was able to bulk out these with Magic Sculp to depict the earlier uniform. I replaced the weapons with AK 47s from Italeri for a more appropriate depiction for the period (though PPSh were also largely still in use). I added water bottles – sanded-down Wehrmacht pattern – not that accurate but also not that visible; and ammo pouches from Magic Sculp. I used the kit respirator haversacks. The uniform of the time appeared to be bulky so I had to pad out both the smock and trousers to get the effect I wanted. The slit-type pockets on the chest were added from thin card, and the smock drawstrings from fuse wire.
I was looking very forward to painting these as most of the pics from the time were in black and white; with paint I could now bring the camouflage scheme of this uniform to life – hopefully. It is the scheme known apparently as Flachentarnmuster, (patterned camouflage) but also as Kartoffelmuster (potato pattern); God knows why the latter. The scheme doesn’t to me seem particularly redolent of the potato plant; perhaps it reflected the early school habit or printing with shapes cut into potatoes and paints? Or was that just a fragment of my primary education? I have no idea.
Anyway, not just the smock and trousers but personal equipment was all produced in this camouflage pattern. This seems to me to be quite innovative for its time. The British Army for instance, never bothered until around the late 90s to camouflage its personal equipment. Back in 1961 I think only the Bundeswehr in their early iteration (1955) had bothered with a proper camouflage uniform (and by 1961 were wearing a particularly uncomfortable, woollen field grey-brownish uniform nicknamed Filzlaus), and yet, here were the DDR equipping their soldiers with a fairly decent camouflaged effort, uniform and personal equipment.
From a modelling point of view, the salient colours seemed to be a base colour of a medium grey, and then splodges of a bottle-green, a more medium green, and a reddish-brown. I ended up leaving the figures in the grey primer I used, and then utilised Humbrol 88 Deck Green for the darker of the greens, and their Light Green 120 for the other. For the red-brown I used a Revell enamel silk 382 Wood Brown. You will have noted that I tend to major in enamels.
Helmets – as per my own example – were in a dark grey; I used a mix using Humbrol 67 and 27. For the record the NVA produced cloth helmet covers in the same camouflage pattern as the uniform.
The civilian worker installing the stakes into the top of the wall came from Miniart with a Hornet Head. The hands were also from Hornet. The ladder, spade, pick and wheelbarrow were all Miniart, who do seem to have cornered the market in accessories of all types. The trowel was fashioned from plastic card with a handle from lead wire; I haven’t got it quite right in representing those German trowels of the time, but I think it will suffice.
Scenic. The wall was courtesy of Red Zebra (“Wall No 1”). The barbed wire was from an ancient Verlinden set supplemented by Accurate Armour, and Aber; the metal stakes from plastic rod and the concrete supports from a spare upright cut down, from the Red Zebra stuff. The block construction of the wall is not exactly that of the Democratic Republic but I had to start somewhere. I painted the wire in a mix of red-brown and dark grey – representing old and new stocks. I still need to add a bit more.
The red/white barriers were made from plastic rod and card.
I used a rattle can colour of a medium grey for the concrete blocks and wall. The cement, which was applied using Vallejo Plastic Putty, primarily as it had a thin nozzle which facilitated the application, was coloured with Humbol Khaki Drill 72.
The cobblestone base came from Tamiya.
And that folks is that; enjoy. Apologies for the (brief) history lesson, but I always like to explain the context my models are set in; whether or not the good, and knowledgeable members of Kitmaker need any such contextualising is probably a moot point, but forgive me my instructor-like genes - I am aware I proselytise too much!