They represent the different ends of the track pin. The thicker head on the right in your pic is actually a ring that fits over the end of the pin and is held in place by a split pin. :
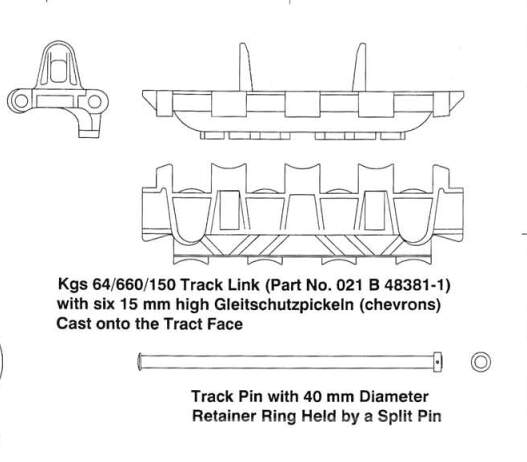
The ring washer can be seen here:
They represent the different ends of the track pin. The thicker head on the right in your pic is actually a ring that fits over the end of the pin and is held in place by a split pin. :
The ring washer can be seen here:
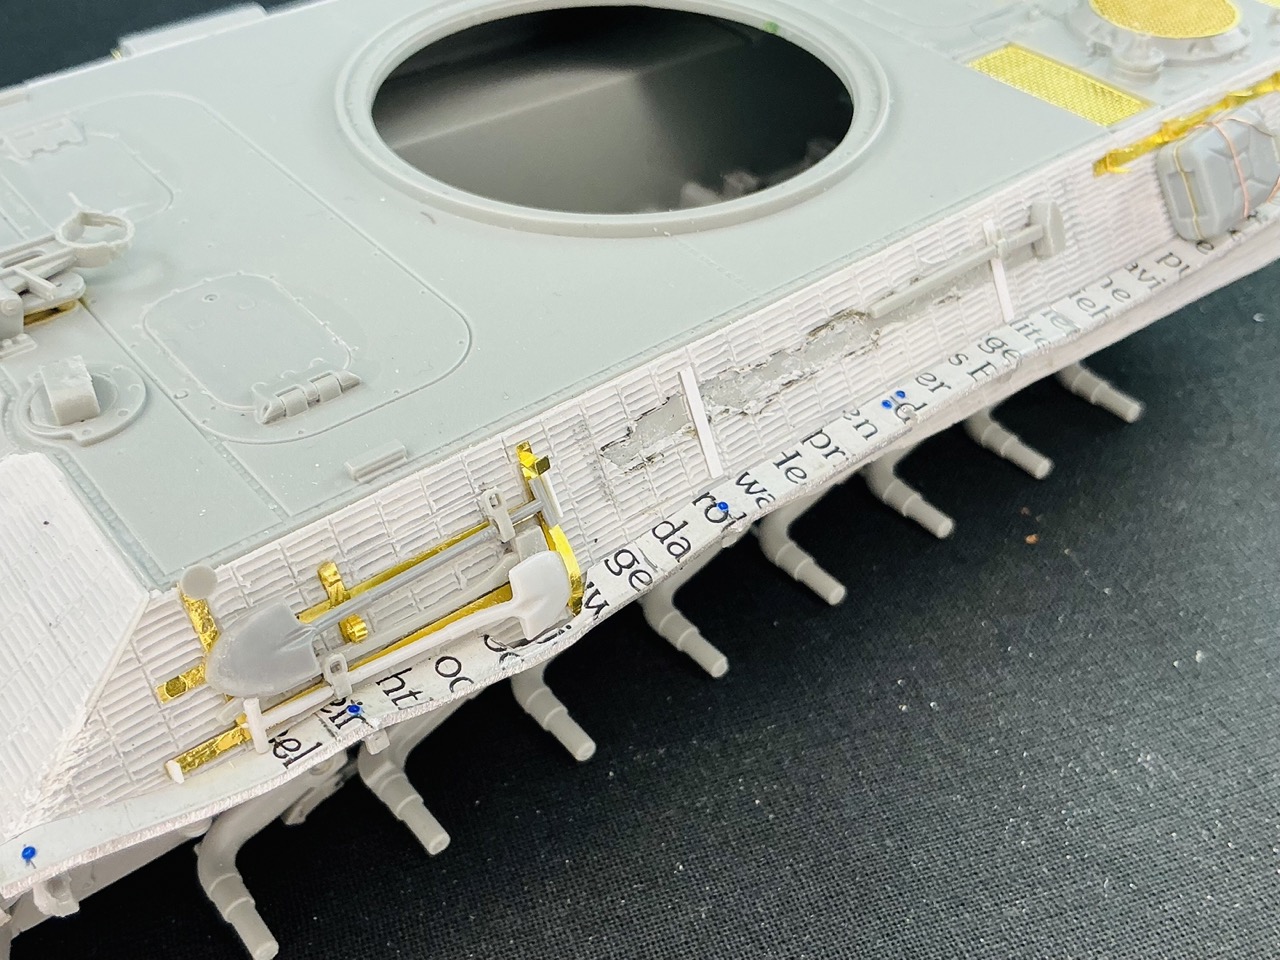
Because the tracks are on hold while I wait for thicker glue, I tackled another job I wasn’t looking forward to: the tool racks.
In the first photo, you can see a brass tool clamp — or actually, two of the three parts for one. By the time I had those in position, I really didn’t feel like doing the other seven, so I went looking for another way to make them. I found that in cutting off the plastic tools from the clasps they’re moulded onto, so that I could drill out the clasps and for the non-round ones, carve the hole bigger with the tip of a knife. That proved much easier than fiddling around with tiny etched parts, so I’m glad I took this route instead. The one at the left front, I cut away after taking the picture and replaced it by a plastic one.
A few details about Cuckoo here:
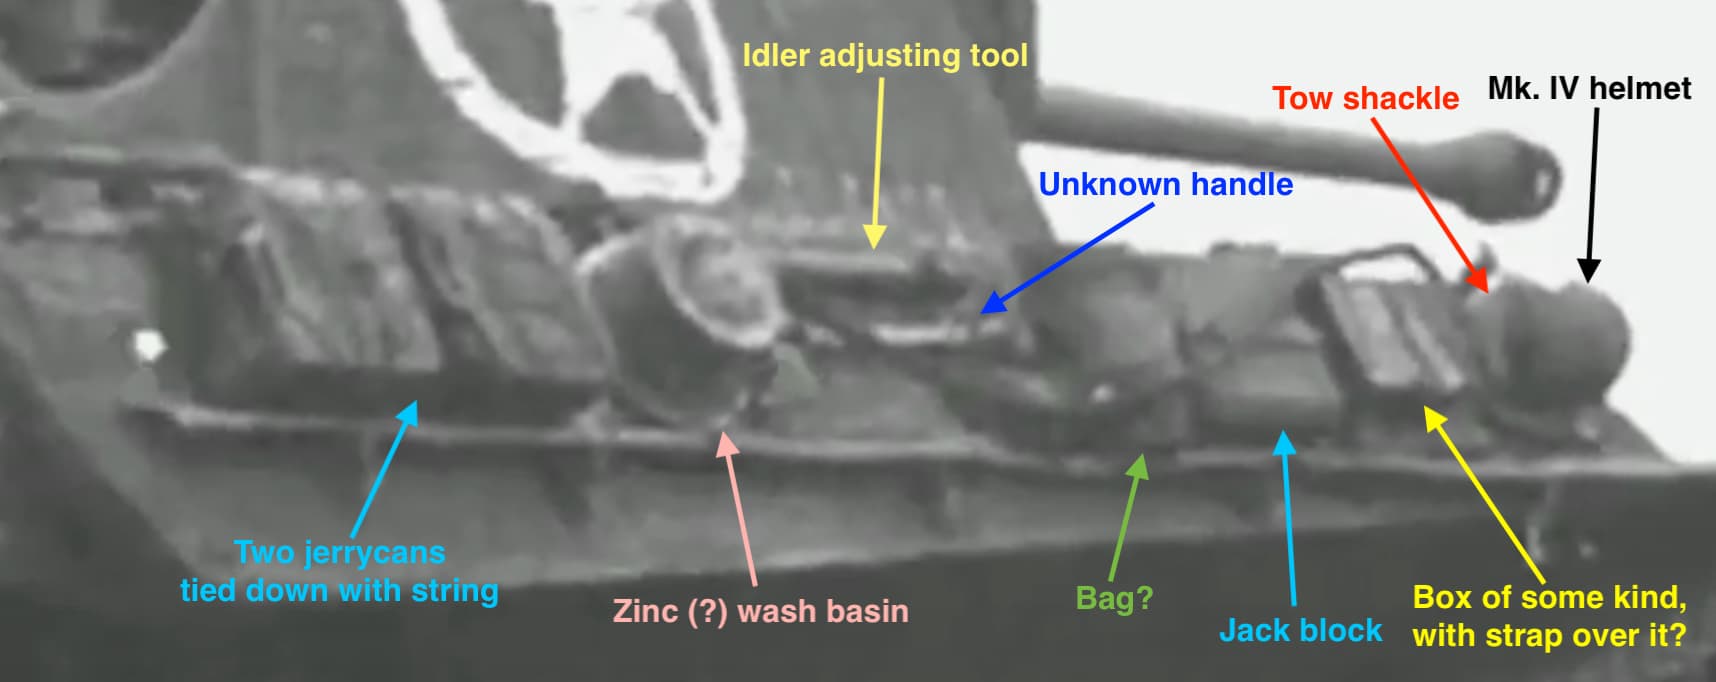
I was thinking along those lines, too. It’s too small to be another jerrycan, but I haven’t really looked into figuring out what it is. I’m also still figuring out what the thing behind the jack block is, where there’s the round fitting for stowing the cable for installing the tracks. Some kind of cloth thing, a bag I think.
It also looks like I was wrong about the rear right tool rack: there is a second thing in it, but what? It doesn’t look to me like the normal hammer or crowbar, but it is stowed in the hammer bracket.
Based on their colour I’m guessing the jerrycans are British, not German, but they could well be German ones that were painted together with the tank, of course. Not that it really matters for the model, because at this point even if they are German, the paint would be new enough that it wouldn’t have begun flaking off yet.
While I was staring at those photos, I noticed that there was no Zimmerit in the area covered by the tube for the gun cleaning rods and spare antennas (which was missing on Cuckoo), so I tackled that in the time-honoured manner: open the photo of Cuckoo in Tilburg in Photoshop, cut out the side, correct its perspective and resize to the correct dimensions for the model, then switch to Illustrator to trace over the missing section of Zimmerit and print it out. Then I just had to cut it out and use it as a paint stencil:
This is not the full length, because in the photo from Tilburg there’s something tied to the side of the tank (my working theory is that it’s a camouflage net) that obscures the rear part.
All that was left was to cut it out on the model:
Trickier than expected, partly because the Zimmerit turned out to be glued down quite well and partly because I had to take extra care because of all the other details already attached to the hull. My advice: do this before you stick the Zimmerit to your model ![]() The part at the back is speculative, and simply cut to match the rest. I then glued plastic strip into the recesses for the brackets that held the tube, as the remains of those.
The part at the back is speculative, and simply cut to match the rest. I then glued plastic strip into the recesses for the brackets that held the tube, as the remains of those.
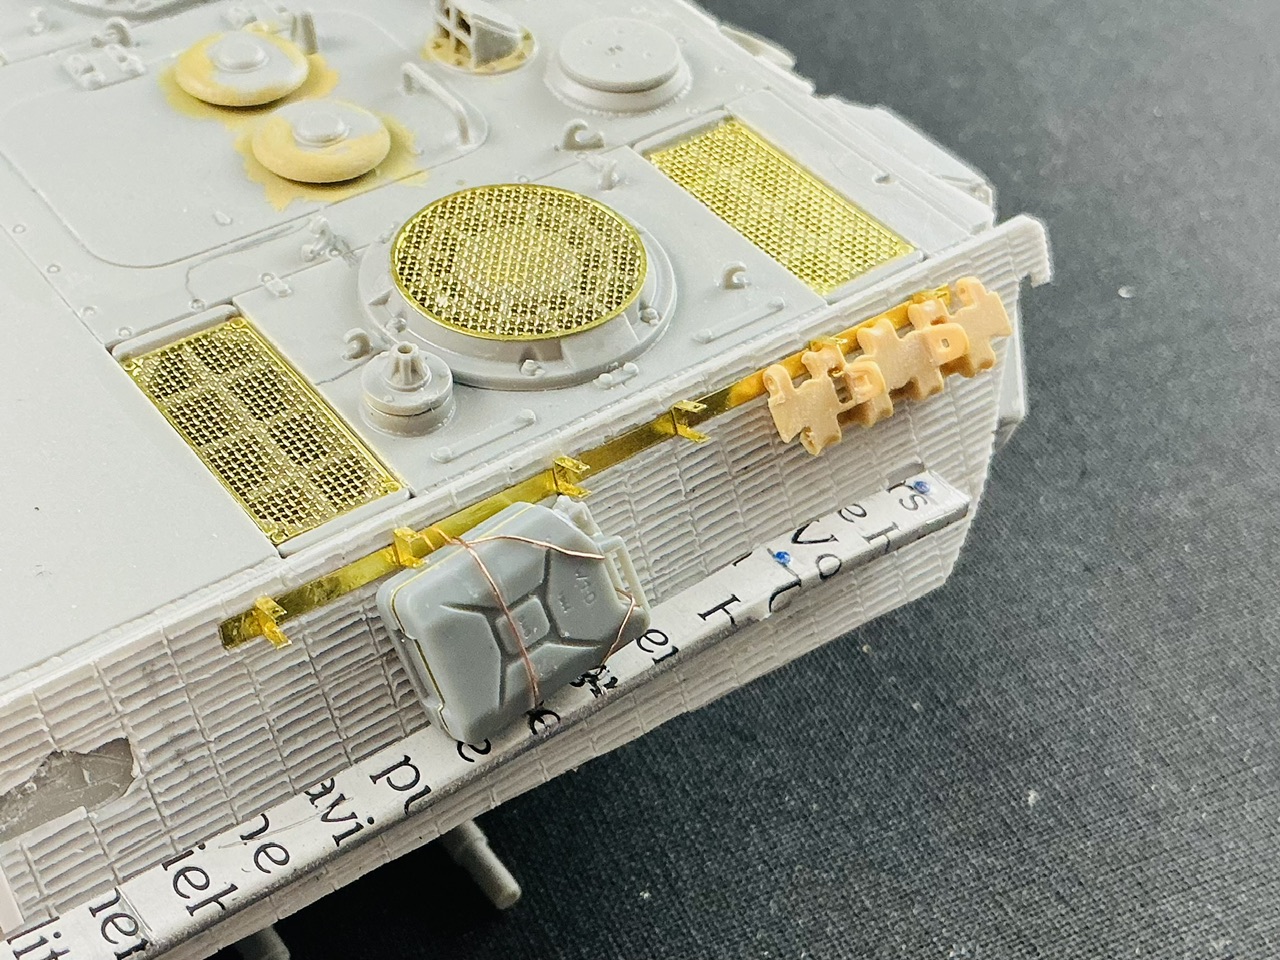
I also added the hangers for the spare track links at the back, twelve nice little fiddly bits to clean up, fold and glue down … Now to add pins through some of them, but I don’t think I will add those to all of them. So here’s some appropriate reference material:
This is the Panther in Overloon, whose details are very similar to Cuckoo’s (which is not at all surprising, as they were lost around the same time in the same area). However, those little bolts on the sides will not be on my model ![]()
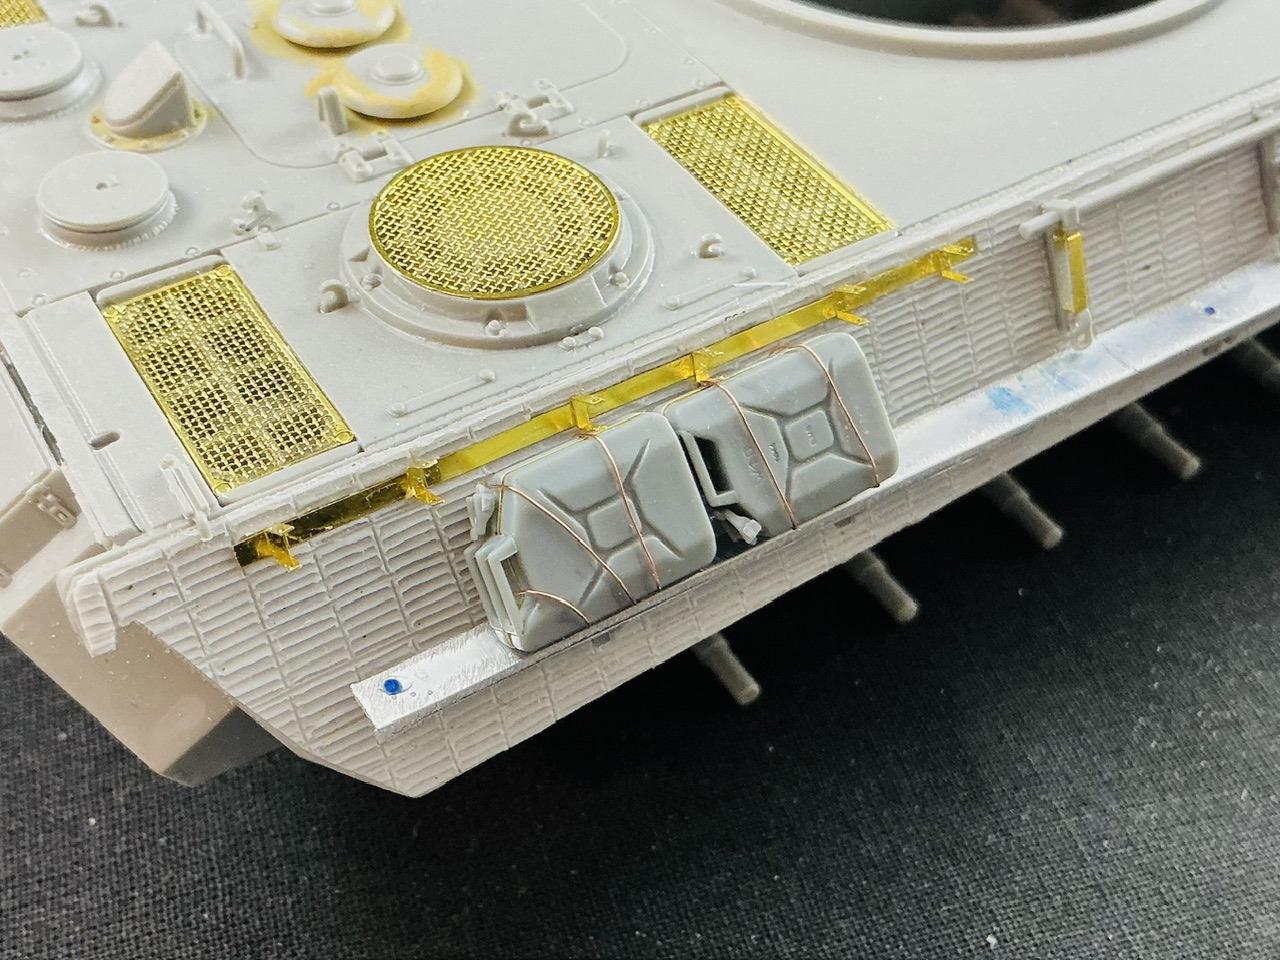
I started building the stowage with the jerrycans, because it’s clear what they are and they’re easy to find. I built three of them from a Bronco set with British accessories, then put copper wire around them to replicate the string/rope that they were tied up with on the real tank. Here two of them, with the the source of the copper wire:
I drilled small holes in the back of the jerrycans to stick the wire into, which you can see on the one on the right, because this is easier than trying to wrap it all the way around. If you do that, it moves around easily and is hard to glue in place.
The wire comes from the rotor of a small electric motor, but I have no idea where that came from ![]()
On the tank:
And the left side, with a track link from RFM:
I wanted to drill out the holes for the track pins in it, but that didn’t want to cooperate. Oh well, we’ll do without, then.
Mate your attention to detail in this build is just excellent!
May I suggest the unknown handle could be an axe with the head towards the rear of the vehicle. Also could the unknown box thing be a second Jack block? Unsure if they’d carry two but it was a unique beast!
Thanks, though I’m just trying to build what I see ![]()
Over on Missing-Lynx, it was suggested that the handle is probably a shovel, which is a thought I had also had. With that bit of prejudice in mind, it does start to look more like a shovel to me — but not a British or German one, more likely a Dutch shovel, which are square and have a T-shaped handle. From top to bottom, here’s a wartime Canadian shovel from a CMP truck (which, AFAIK, is about the same size as a British shovel), a traditional Dutch shovel and a traditional Dutch spade (both purchased ca. the 1970s):
The thing in Cuckoo’s tool rack looks like the shovel to me, and the greater length compared to the wartime shovel explains why it seems to sit over the hammer bracket instead of inside of it.
I thought I had the front box-type thing figured out when I found a British tank first-aid box in one of my spares boxes, but on looking at the photos again, that seems too small to be the thing on Cuckoo – the search continues ![]()
Trying to figure out what the stuff on the hull sides is, I noticed I got the antenna pretty much exactly right:
If i hold the turret of my model so that it obscures the kit turret as well as I can get it, the antenna base I glued onto the Nahverteidigungswaffe lines up almost precisely with the one visible in the footage of Cuckoo firing at Geijsteren Castle.
I made some progress with the stowage but I’m not there yet:
On the left, I added a second shovel (from the Tamiya set of British infantry on the move) and an axe (from a Sherman kit) because they’re visible in the photo of Cuckoo driving down the forest road. That picture also shows the handle of something halfway down the left-hand side of the hull, and though I can’t make out what it is, it was probably held in the rear clasp intended for the crowbar that sat above the tube for the gun cleaning rods (which was missing on Cuckoo). I decided to add the hammer from the kit, glued around a tool clasp from the crowbar, because it’s plausible and sticks forward approximately far enough.
On the right, I converted a shovel I found in my 1:35 tools spares into something that can pass for a common Dutch shovel and glued it into the tool rack.
What a mess … Not only have am I still trying to figure out what some of the things tied to the sides of the tank are, the tow cable is one big puzzle too.
There were two lengths of cable for the Panther Ausf. G: 5.5 m and 8.2 m. However, it’s not clear from pictures of Cuckoo which of the two it had. Judging by the size of the eye on the end of the cable, it was a short one, but how was it stowed?
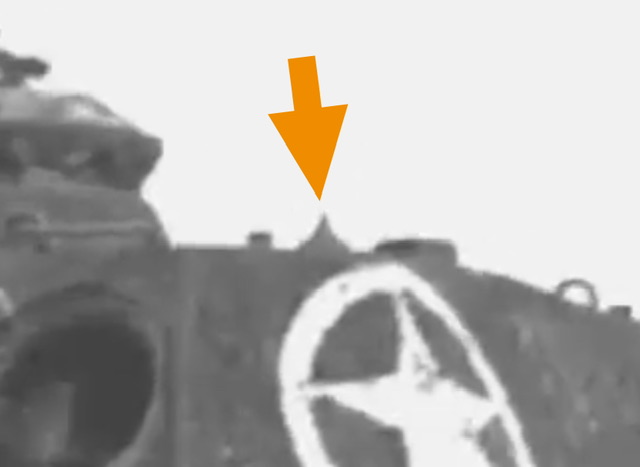
This is my best guess based on the film of Cuckoo. The front end is simple, as that’s clearly visible in the picture taken on the forest road, but the rear can only be deduced from blurry moving pictures, and this is as far as the cable will go if you place it as is visible in those. It looks like something sticks up a little just beyond the jerrycans, and that could well be the eye on the cable if it was attached to one of the spare track brackets. Except it looks like it will be difficult to also fit the wash basin onto the tank with the cable like this.
Then the long one, because in the photograph from Cleve, it’s clear that the cable goes over the engine deck and appears to be secured in the cable bracket at the right rear of that. This is only possible at all with the long cable:
This has left me with the impression the crew got another cable from somewhere, because you can see (sort of) in the film that it doesn’t run that far over the engine deck. If it did, it would be visible in front of the empty 75 mm cases being thrown out of the loader’s hatch, and exactly because of those cases you can tell that there’s nothing in that bracket … All of this is not made easier because in the film shot from the right side of the tank (rather than the right rear) there’s some barbed wire in the foreground that’s visible and which can be very easily mistaken for the tow cable — and possibly, it even obscures the real one.
I think it’s another one of those cases where you just have to pick something that seems plausible, and let anyone who disagrees, prove you wrong ![]()
Once more, i find these discussions worthy, as they can point to certain details i have omitted before. Your model is a good guidance for me, keep up the good work!
Thanks ![]() I have by now figured out to my satisfaction how the cable was probably stowed:
I have by now figured out to my satisfaction how the cable was probably stowed:
This fits with the pictures taken at Geijsteren, in which there is no cable visible on the engine deck, and also explains an object that can (sort of) be seen inside the curve of the cable where it hangs down behind the jack block. The short cable cannot fit like the film shows it, because the large sleeve behind the cable eye prevents the cable from hanging down in the curve in the way it’s visible in the film.
Notice also I replaced the shovel by a British one after all, because when I tried to fit the cable and wash basin on, the square shovel I had made was in the way and didn’t quite seem to be in the right place.
The details make it look great.
Finally, I’ve figured out the tow cable to my own satisfaction! ![]()
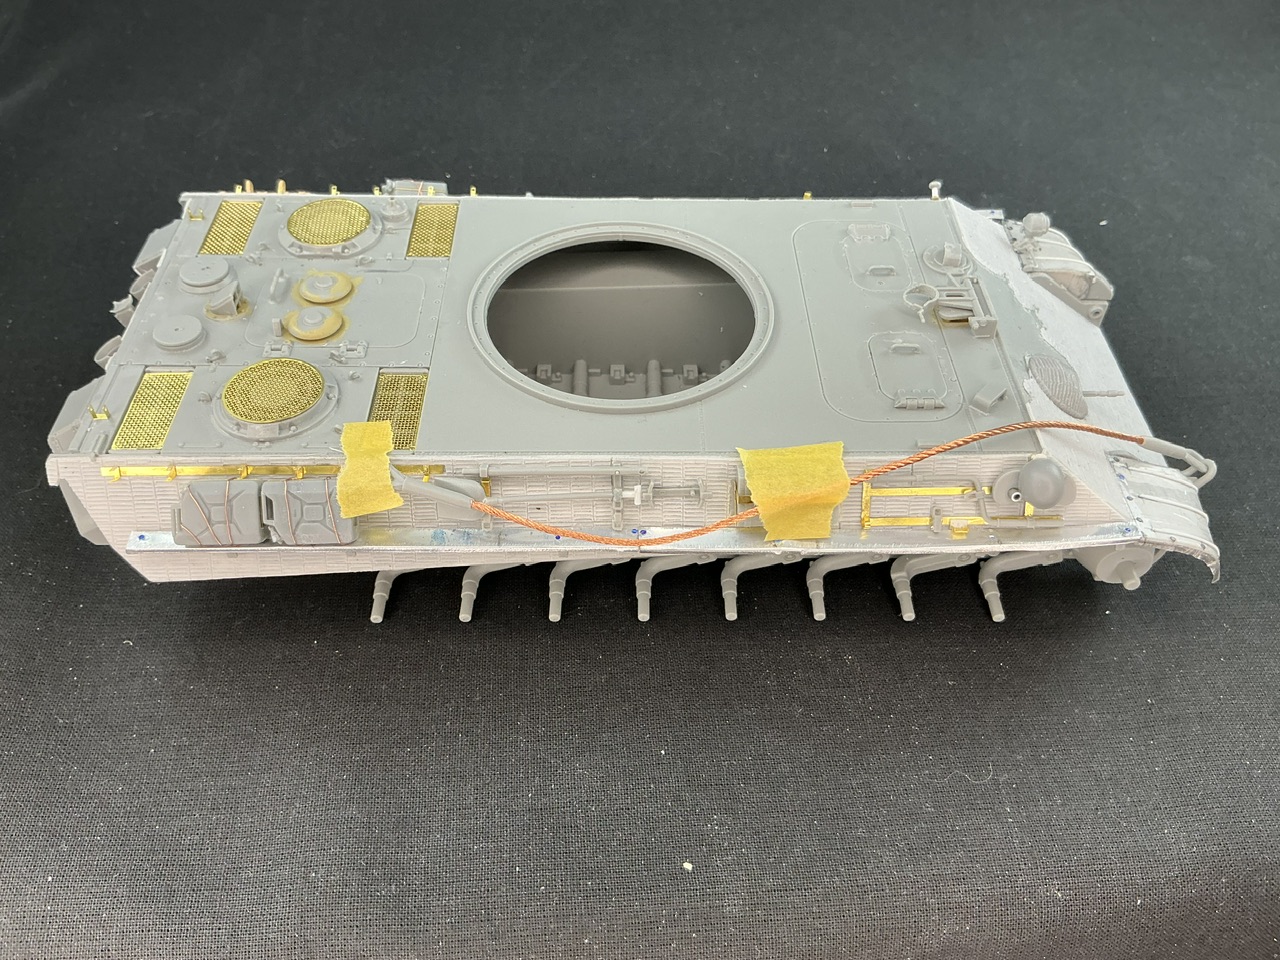
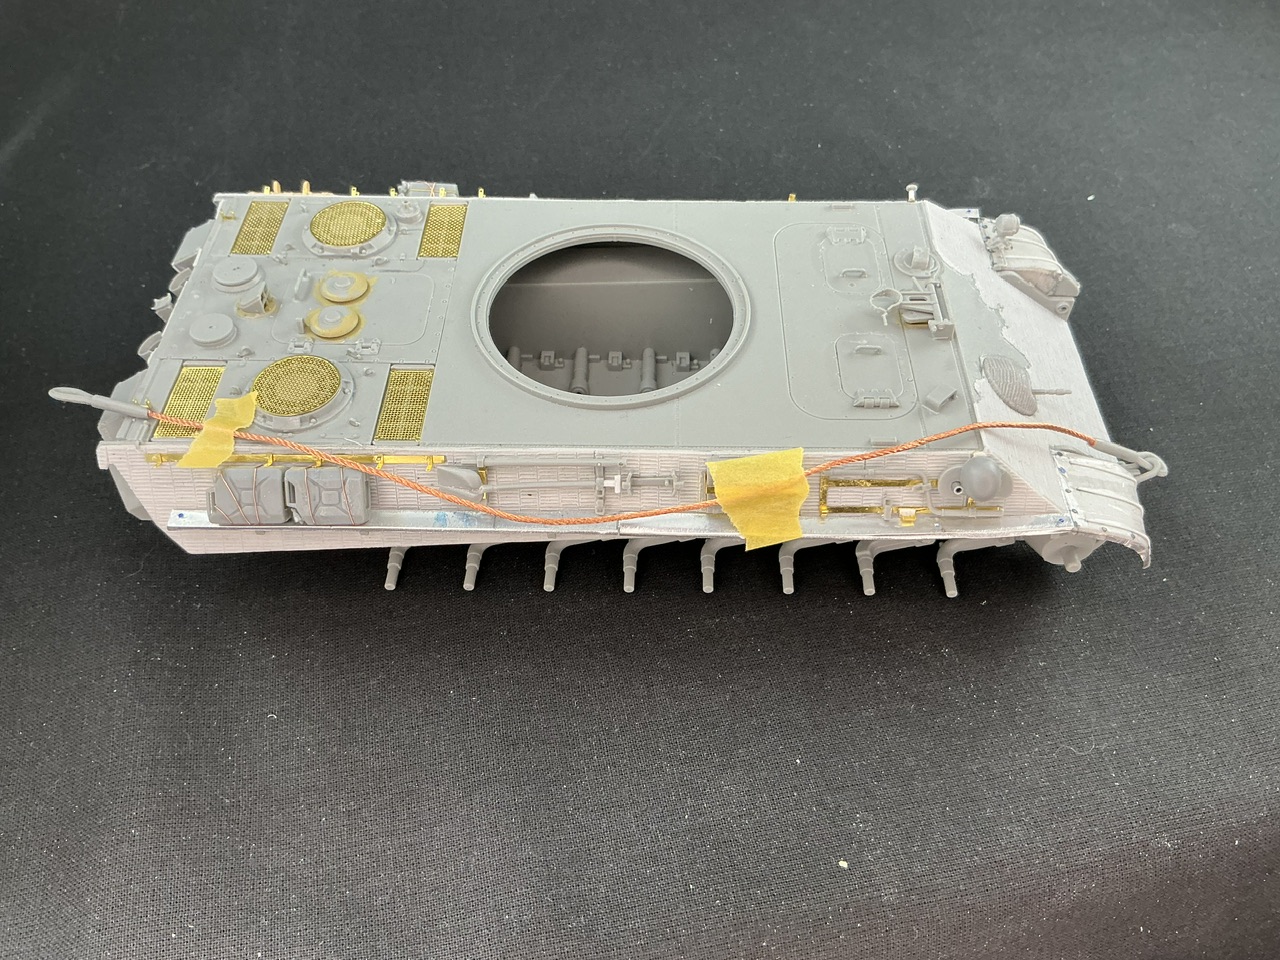
In the D-clasp at the front, then through the tow cable bracket at the top of the right-hand tool rack, down past the jack block, then in front of the thing stowed behind that (I’ll get back to that in a bit), up in front of the shovel, through the frontmost spare track hanger, then around the second and back forward along the top of the side skirt rail.
I can’t prove that the tow cable was stowed exactly like that when the film of Cuckoo was shot, but this is the most plausible way as far as I’m concerned, based on what is and isn’t visible in those pictures.
I did have to scratchbuild a new front hanger, because during the various attempts to fit the cable, first the top and then the bottom bits of it broke off. That’s what you get with small etched parts with folding lines ![]() The fix was to take a bit of leftover fret, drill two 0.55 mm holes near the ends (the ones in the Dragon parts are 0.5 mm) and bend it into shape before sticking it to the model.
The fix was to take a bit of leftover fret, drill two 0.55 mm holes near the ends (the ones in the Dragon parts are 0.5 mm) and bend it into shape before sticking it to the model.
I also made the wash basin:
This started as a bucket in the Bronco set of British accessories, from which I sawed off the bottom half. I then made two discs from 0.25 mm plastic card using my oversized punch-and-die set, one for the bottom and a second for the top that stuck out a little along the bucket’s rim. Once the glue was dry, I stuck a knife tip through its centre and cut away everything inside the bucket. Then all that remained was to add two handles from bent copper wire.
Here it is on the model, for which I stuck one handle behind the L-shaped pin through the bracket that also holds the tow cable:
I made that pin from 0.45 mm brass rod, just bending it with pliers to the dimensions of the plastic pins you get with the kit. I put a pin like this in just over half of all these brackets, but I still want to add the little chains you get for them in the etched parts.
Then we get to two two remaining items on the right-hand side of the tank, that I had a hard time figuring out, so I took an educated guess and made them things that have approximately the correct dimensions and which seem plausible:
At the back (left) an oil can, at the front a jack block from a Churchill tank. I’m not certain about the oil can, but the film does show that the item here sticks out beyond the side skirt rail, and it also gives me the impression that it may be circular. The can I used is from Tamiya, and at first turned out to be too tall: after I glued it in place, the turret couldn’t rotate without sweeping it off the tank. So I sawed it in three pieces to remove a section, but I had taken out too much, which I solved with a piece of 1 mm plastic card that I trimmed to size once the glue had dried. A bit of copper wire ties it to the tank.
The Churchill jack block is because I had first measured the approximate size of this item in images of the real tank, and when digging through spares to find something of around that size, I found this block from an AFV Club Churchill kit. Its dimensions are very similar to whatever was on the real tank, and Cuckoo did belong to a unit equipped with Churchills — and though I can’t think of a reason why they would take this when the Panther’s jack block was still present, I think it’s plausible enough.
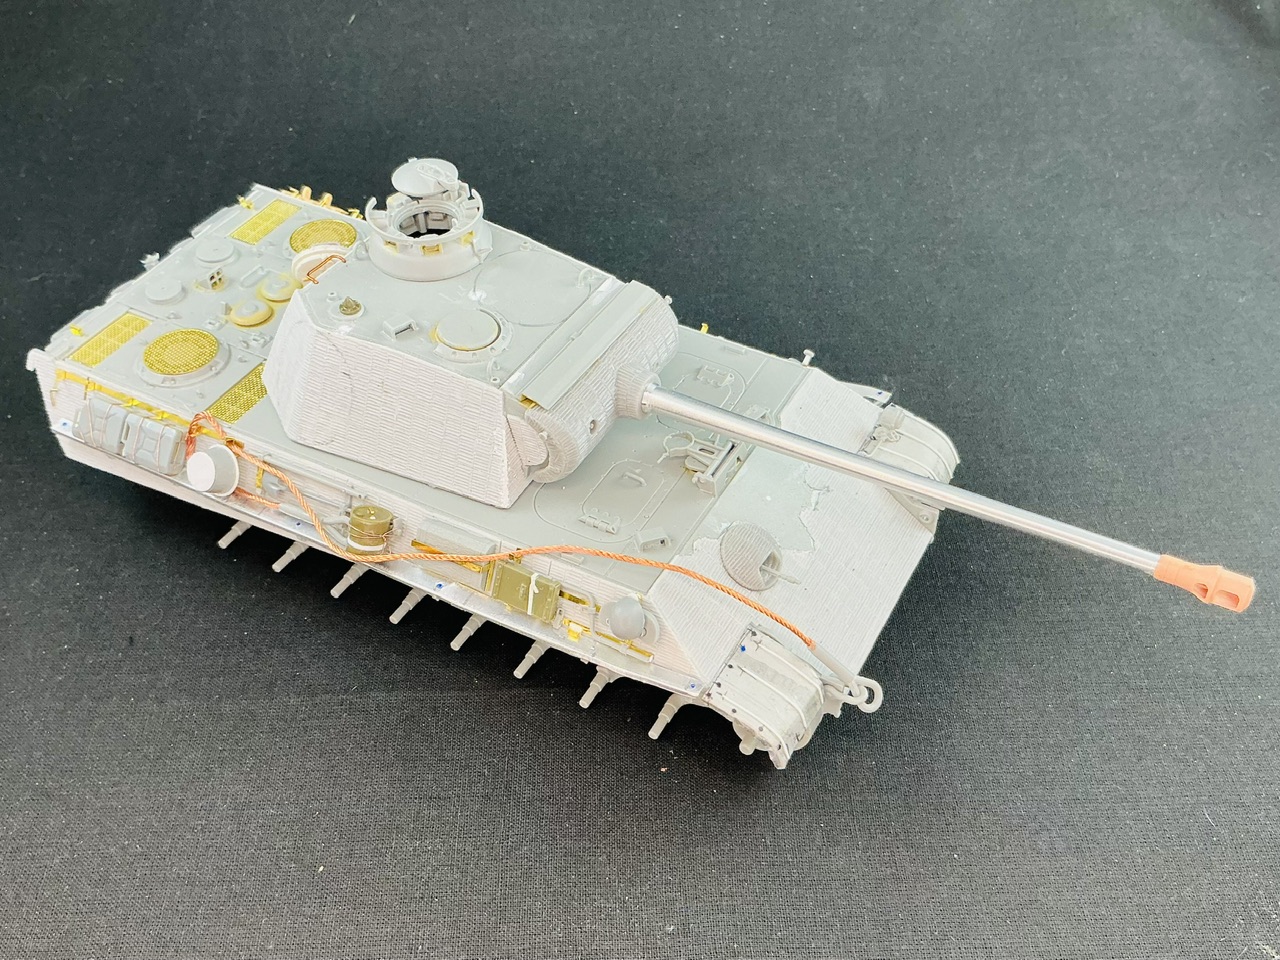
I think I’m done building the model now. Well, except for the wheels and exhaust pipes, which I’ll only add after painting, and the tracks, that still aren’t cooperating ![]()
On the left-hand side, I added a rolled-up camouflage net, the old-fashioned way by soaking a bit of bandage in thin PVA glue, and while it was still wet, rolling it up and tying it in place on the tank with more copper wire. The jerrycan on that side is now further back than before, because when I looked closely at the film footage of Cuckoo from the left, I noticed that there appears to be the net, then a gap, and then an item. I can’t tell if it’s actually a jerrycan or the bag-like thing that’s visible there in the photo taken in Tilburg, but as I already had the jerrycan but no bag, I took the easy way out ![]()
I did try to add etched chains to the pins in the track hangers, but I had a great deal of trouble doing that, and when I finally got one in place I could hardly see it anymore, so: too bad, but I’m not going to bother with them. There’s just one on the right rear, because I put a loose-hanging pin there, which makes the chain a little more obvious.
The pencilled circles on the turret sides and roof, BTW, are where the white stars will go. I’ll probably only add them after painting, but I drew them now to get an idea of where they will go. This mainly because I was checking if it’s possible at all to put a white stars on the turret roof in such a way that both the left-hand Pilz and the left front lifting eye end up being painted white. And yes, it turns out to be exactly like that if you draw a ring as large as possible on the roof in front of the commander’s cupola ![]()
At the risk of teaching you to suck eggs (a peculiar, quaint English expression perhaps) a net without “garnish” is just a net; I suspect that the net Cuckoo sported would have had had Hessian strips (in - normally - green and brown) affixed, and although they would have been rolled up with the net, they would still be visible I suspect. Of course, if Cuckoo didn’t have a garnished net, then I’ll get back in my box(!)
All superb work of course!
Thanks for the explanation. It’s not visible in the few photos in which this — what I suppose to be a — net is visible, but I had considered that. This being a bit of bandage, though, I didn’t think it’s feasible to weave any garnish into it. The holes are maybe 1 to 1.5 mm square, but perhaps I could stick some strips of tissue to the outside to make it look like they’re woven in.
It might still be possible to give the effect of a net, stowed, with Hessian strips; see the rear of my Dingo in this pic. I used Tamiya masking tape cut to whatever size I think the Hessian was around 2" - 3" in width. I just prodded the tape into whatever gaps I could find.