Tamiya Pz.Kpfw IV Ausf. D (Beginner)

It was designed for, and sold with, battery holder, motor and switches.
The diameters of two C-cells sde-by-side forced Tamiya to make the hull slightly too wide.
The holes in the bottom are for the switch (narrow rectangle) and for screws to hold it all together.
One early Tamiya kit in my collection, don’t remember which, actually contained the “final drive” gears for the motorisation. The assembly wasn’t exactly on the Swiss watchmaking level and looked as if the gears could have a “seizure” after some use.

If you want to you could fill those holes but there are more details and structure missing from the bottom so it is hardly worth the effort. Good practice though …

Tamiya bottom (initial release 1977):
image
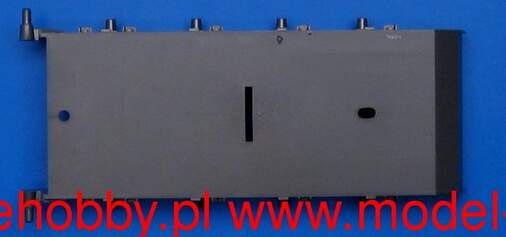
Image borrowed from https://www.super-hobby.se/products/Panzer-Kampfwagen-IV.html

Italeris Pz IV bottom:


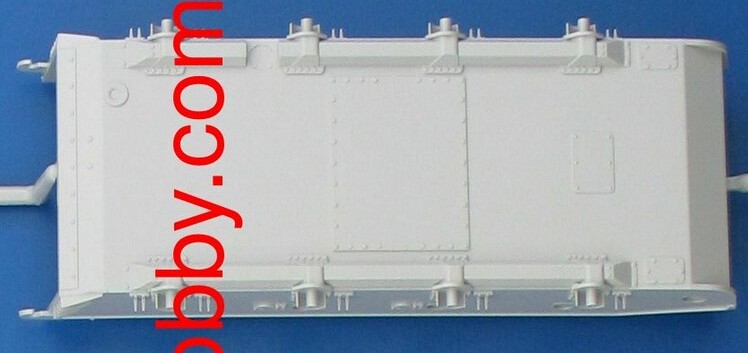
Same vintage (1974, company name was Italaerei, Ital + planes, in those days).
The Italeri kit has been upgraded with indy-link tracks since the original releases.
Full history here: Panzer IV F1-F2-G, Italaerei 217 (1974)


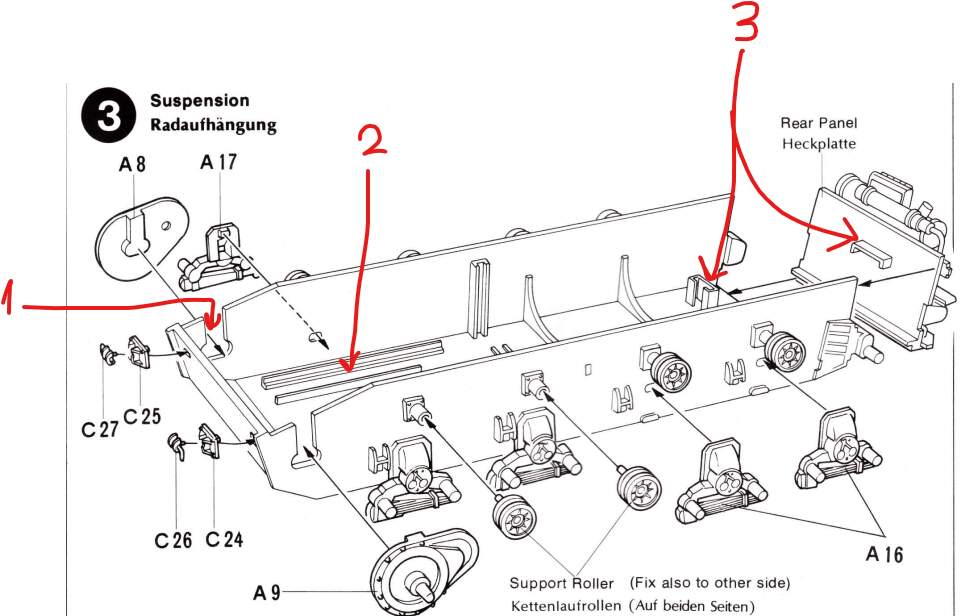
Nr 1. Holes to allow the gear assembly woth axles to be dropped into the hull.
The lower end is oblong to allow the gear and motor assembly to slide forward-backward
to adjust track tensioning. The hole in the bottom for the screw is also oblong.
Nr 2. Slides for the gear box and electric motor assembly
Nr 3. Fixtures for battery terminals.

The whole assembly sequence consists of four main parts:

  1. Lower hull, the steps for the motorisation stuff have been omitted, except the tracks
  2. Upper hull with all “fragile” details
  3. Tracks
  4. Snap the upper and lower hulls together (put the lid on the box). The motorisation requires that the hull can be opened again to insert new batteries …
1 Like

Being quite old my self, I got one of those motorised kits when I was a kid, the Sd.Kfz. 7. It worked, at least for some time… I think suspension was not really prepared for this task, and also it had a tendency to throw the track. But it was funny seeing it running :slight_smile:

2 Likes

Ha, I finished step 1! I think I did ok - at least one oops, ha. I’ll post my experience with the rear section and muffler later, but I’d figure I’d get this question going first since I’ll probably need to get some orders in and wait for shipping.

First request for paint… “Matt [sic?] black” on the road wheels and apparently 16 sets of them. How should I paint these? What paint and method? Thanks!

Personally I add the running gear at the end, when everything is built and the lower hull is painted and weathered.
In any case, for painting the rubber band I either use a brush and carefully paint, or use a template with a cheap circle drawing ruler and airbrush.

“I do it my way” :notes: :notes: :notes:

My first few sets of roadwheels were tediously handpainted (it sucked).
Then I started mounting them on pegs in the chuck of a CHEAP and LOW POWERED
electric mini drill (a Dremel is WAY too powerful, see below).
The peg is made by mounting a short piece os sprue in the chuck and then filing it
slightly conical while the drill is turning.
Paint the central parts of the wheel, let dry.
Press the wheel onto the peg, run the mini drill at the slowest possible speed while braking the rotation with your thumb against the chuck (that’s why a Dremel can’t be used, too powerful).
The cone shall be shortened so that it does not stick in the poly cap before the inner wheel (part A4) sticks to the cone. Adjust the wobble until it is almost invisible, getting it non-existent might be possible but it isn’t worth the trouble.
Use small paint brush with a small amount of paint, apply paint brush to the outer parts of the “rubber” area and move slowly toward the center. With some practice it takes less than a minute to paint one complete wheel.

Other methods:
There are also commercially available wheel masks (essentially little circles cut in some sticky material.
Circle templates, if you find the right diameter, can be used when painting with an airbrush.


Circle template, used for drawing circles.


Foamy rubber mask (airbrush) for Pz IV wheels in Dragon kits, I can’t guarantee that these will work with the old Tamiya kit


Self adhesive wheel masks designed for Academys Brummbär (Pz IV chassis),
Maybe there is one for Tamiyas old Pz IV. This type is essentially disposable.

The foamy rubber thing can be reused but you’ll need an airbrush, same with the
circle drawing template.

I prefer my method (of course :grin: :wink: ) but another method may suit you better.

Edit: See excellent suggestion by barkindigger below

3 Likes

If using Robin’s method, try using a cordless electric screwdriver instead - they are geared slow, and usually have a torque setting to stop the bit if it gets stuck. For a mount, take a pencil (already the right size & shape of shaft for the driver chuck!) and whittle the end to the right diameter to fit in the wheel. Mount the screwdriver in a vice (or clamp it to the table) pointy-end up and voila! Clamp the trigger “on” and paint the rubber as the wheel spins…

3 Likes

I hand paint road wheels. I use a good flat black (like Vallejo Model Color flat black), thin it a bit with water, & then flow the paint onto the wheel. If the wheels have fairly substantial rims, the paint should flow onto the wheel & stop at the rim. You can airbrush them using templates, like others, but I have never done this.

Damon.

1 Like

For warped parts I will soak them under warm-hot running water and slowly them back into shape. Try it. It works well. Also, if the part is large, you can put in braces. For example, I built the Italeri Tiger I (Late) last year. The lower hull was warped inward and I couldn’t use my usual method with the warm water. So, I built a lattice work inside which pressed the hull sides to their correct shape. Good luck!

Bill

2 Likes

So the either Tamiya Flat Black (XF-1) or Vallejo Black (RAL 9005) pots should work? and thin with a little bit of water?

Are these paints mostly acrylic? water / soap cleaning or thinner needed?

Are these brushes ok? Amazon.com

Thanks as always!!

I prefer Vallejo, but you could use Tamiya Flat Black as well.

Tamiya you can thin with some alcohol as well. DO NOT do the same with Vallejo (incompatible chemistry).

The brushes look fine. Personally I buy soft bristled cheap brushes at the art or craft stores, with the idea that they won’t last long, & quickly get delegated to mixing paints, drybrushing, or I just throw them out. Some people advocate buying expensive brushes, but I found for most of my armor models they are not necessary compared to cheap brushes I’m not afraid to burn through & dispose.

Damon.

2 Likes

I never thin Tamiya paints with anything but their own thinner - had too many bad experiences with water, IPA etc. And what I wasted was far more than the cost of the correct thinner!

Vallejo thins with water, but make sure it’s distilled rather than tap…

2 Likes

Great, thanks all.

Do you ever bother with the spray cans?

The only time I use spray cans is when I want to use it as a primer. For everything else it is either my airbrush, or hand painting details.

Damon.

2 Likes

First, may I congratulate you… You have made an EXCELLENT choice for a first armor kit.

My best advice is to just build it. Follow the kit instructions and don’t over-think things. Right now, your greatest hurdle is… your own expectations.

Just get it DONE. I know everyone here is offering up their most sincere advice. However, just it done is mine.

The biggest “fail” that I see with new modelers is that they try to do too much. They try to get everything perfect; they want to build a model that looks like the ones they see in the magazines; and when none of that happens, they get frustrated and quit.

Everyone wants to do their best. That’s only natural, but first-time adult modelers simply try too hard and have expectations that are often too much. They don’t have the experience or the context to put most of the well-meaning advice they get to best effect, and when they reach a certain point where their expectations are not being realized, they give up (since nobody wants to be a failure).

THE MAJOR HURDLE with any first kit is simply finishing it - warts and all.

So, get an X-acto knife with some #11 blades, a pair of fingernail nippers, a couple of Emory boards, and a bottle of glue. following the instructions, nip the parts off the spues and use the Emory board to smooth the nubs, test fit the parts, and trim with the X-acto knife to get them to fit, then glue 'em up! Keep at it until the kit’s done.

Again, following the instructions, use a pair of scissors to cut out the decals and follow the instructions to apply them to the model.

Don’t worry about paint unless you want to add some detail colors. If you do, buys a bag of cheap small brushes, a select few bottles of paint, and have at it. If you paint parts before gluing them together, then scrape the paint off the spots that will be glued together using your X-acto knife. If you paint the parts after assembling them, just do the best you can.

For detail painting, again just follow the instructions as to colors and when to paint the parts. That is, if the color “call out” is in step 2, say, then paint the details on those parts in step 2.

Capitalize on your excitement and enthusiasm and just build your model and enjoy the accomplishment!

Welcome aboard and here’s wishing you many, many more happy builds in the future.

7 Likes

There’s no such thing as a truly ‘Black’ road wheel tire.

Personally, I use Ammo Mig ‘Rubber & Tires’ which is actually a very good scaled down rubber colour. Other brands produce similar colours (for rubber/tires) but i’d never use matt black, it just isn’t right.

I use Quickwheel templates (rubber mask) for my kits. Fairly expensive, but I can do a whole Panther wheel set in an hour.

1 Like

Lol, took a minute due to reasons but hey I now have paint and thinner! Brushes and air brush kit, too.

Thanks for everyone’s advice so far! I’ll try it all and see what works well with me for now, ha.

Guess the next question is around thinning paint before applying. Is it something you always do? How much thinner do you add to the paint each time? mix in a little glass/plastic dish/container? Can you get away with not thinning? Cleanup suggestions? Thanks :metal:

Are you airbrushng or hand painting only?

Actually the answer for both is always yes.

If you’re airbrushing, I thin the paint in the airbrush cup. I’m less concerned about thinner ratios, & more about consistency of the paint. If you keep doing this, you’ll get a good idea of what consistency is good. Many say don’t thin in the bottle, or dump back unused paint, but I do anyway.

If you’re hand painting, you might get away with not thinning the paint, especially a new bottle of Tamiya. But thinning paints to put down thin layers of color is better than one thick layer. Admittedly I haven’t hand painted anything, other than figures or details, in decades. But at least when painting figures I thin the paint perhaps around 50% (again aiming for consistency, rather than an exact formula), with the idea that I achieve opaqueness in 3 thin coats.

Damon.

1 Like

Someone here recommend a while back to me to mix 1 part flat brown to 2 parts flat black and then a drop of off white like buff. It is a perfect rubber tone to me, a warm tone downed black

1 Like

Sorry it’s been a minute! Here I am so far, sorry for any mistakes. Like I said it’s been 30 years :joy:

Panzer IV Ausf. D, 11th Panzer Division:

Before wash (something I’ve never used before ha):

3 Likes

Welcome back to the amazing world of armor modeling. As your first tank build, I think you did an exceptional job. Nice even spray paint, detail parts are well painted. In the last photo, there seem to be some stains around the decal, may be the decal solution hasn’t dried.

I think you are more than ready to move on the next level, weathering. I would try something easy like adding filter, washes and some dry brushing on your next tank. Looking forward to seeing your progress on the next build. Keep up the good work.

1 Like