Holy cow, how many hours did it take to real those out? Awesome.
1 Like
Hehehe, thanks for the compliment, HG. But you must give it to Eduard. That are the original parts from them, I didn’t do anything to drill the exhausts open. As I said, top quality kits  I’ll have a look when I’m back home from work if I can show the exhausts from the Mk. I DualCombo, which is still in my stash.
Edit:
This is the original sprue with the same parts from my Mk. I Dual Combo “The Few” which is still sleeping in my stash. Here you can also see the sinkmarks …
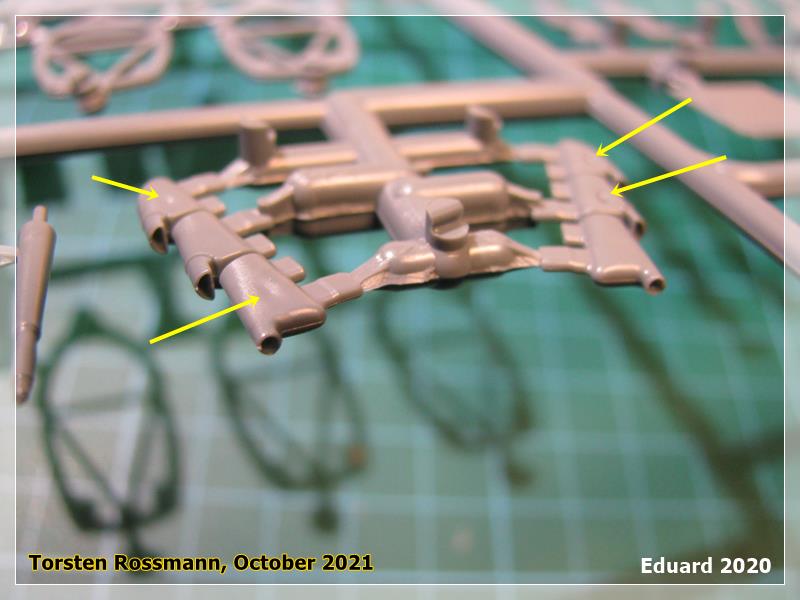
… and for comparison, the exhausts from the 1993 Tamiya kit. Two different worlds …

Torsten 
2 Likes
I’m working on fabricating actual ones. If I can get the steel molds right down to that size, plus the outside metal fold. OYE!!! I need my head examined.
Yours look great, but the color is off a little.
All the best,
HG
1 Like
Torsten,
the exhausts really look great. Hats off to Eduard on them. Even the rear exhaust manifold is round not oblong. From what I do remember of my aircraft days, they were all always oblong, and if you wanted them opened up, one had to do it with as they came solid.
Looking forward to two decaling treats as you never disappoint with a poor or rushed decal job.
joel
1 Like
HG Barnes,
I gotta get back to following your incredible build of Brian’s B-17F as every time I get caught up, I just fall behind again.
The Ball turret still is so amazing I can’t figure out how you accomplished it even with text and pictures. And now you’re casting your own exhaust headers for all 4 engines. That’s another 1st for sure.
joel
Joel,
Thank you for the kind words. The exhaust system for the B-17 are done. I was referring to making English exhaust parts.
Thanks Joel! As always I’ll try my best. But I have already noticed, that I was a bit too optimistic when I said everything could be finished by next weekend. I have started yesterday and haven’t done much yet. So, when they’re done, they’re done … 
HG, the exhausts are painted with 3 different Revell paints, Brownish Red, Metal and Black.
1 Like
HG,
Thanks so much for the correction. Like I said, I’ve got to get back to the B-17F and catch up. Your work is often brought up and discussed with my brother whose been a aircraft modeler since the late 1950’s. And yes, we’re really that old: 74 next month.
Torsten,
I completely agree. Any model is done only when it’s really done at the pace the builder has set.
joel
1 Like
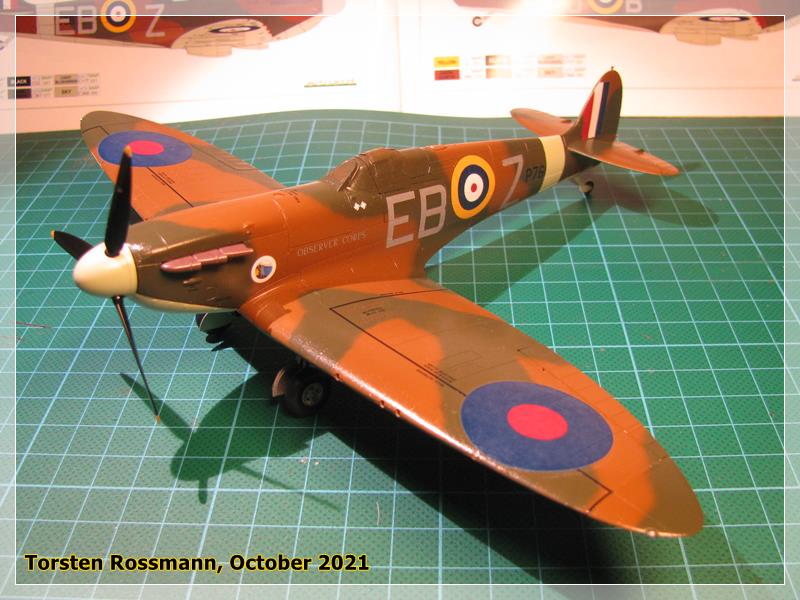
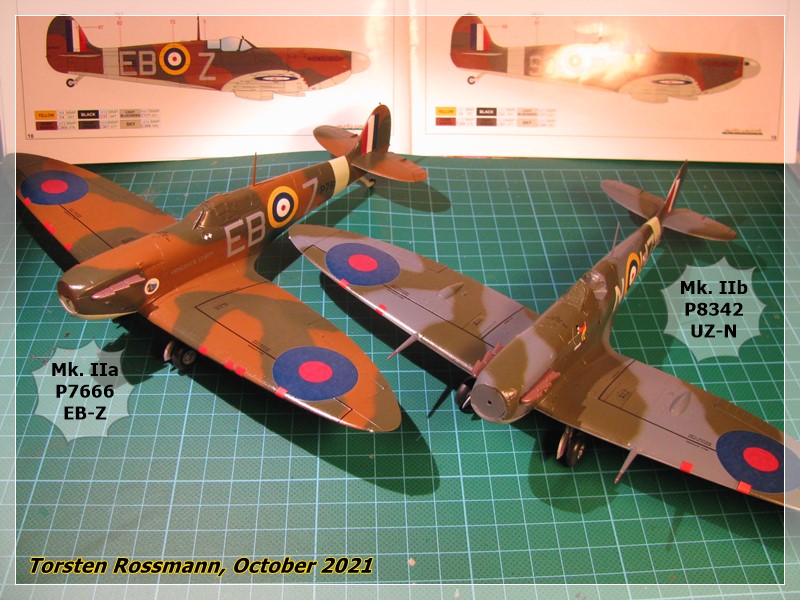
Started this week with the decals on both and now P7666 has turned into EB-Z and is close to the finish line. This is the first time I have used Eduards new kind of decals. They are their own brand and I have mixed feelings about them. The printing is clear and has no misalignment but they are a bit too much on the sticky side for me, not easy to move on the surface of the model. I’ve put them for 15-20 seconds in warm water but had to use a brush full of water to make them movable again on the model. Usually you can’t place a decal 100 % in the correct position at the first attempt, at least I can’t. So that’s a negative point. The decals further have a cover film which is removable after 10-12 hours if wanted. I have decided to leave this film on because the next morning it’s nearly not visible. But I cut the excessive edges of it away where it was possible. This is the result of my attempt. Looks satisfying to me … 
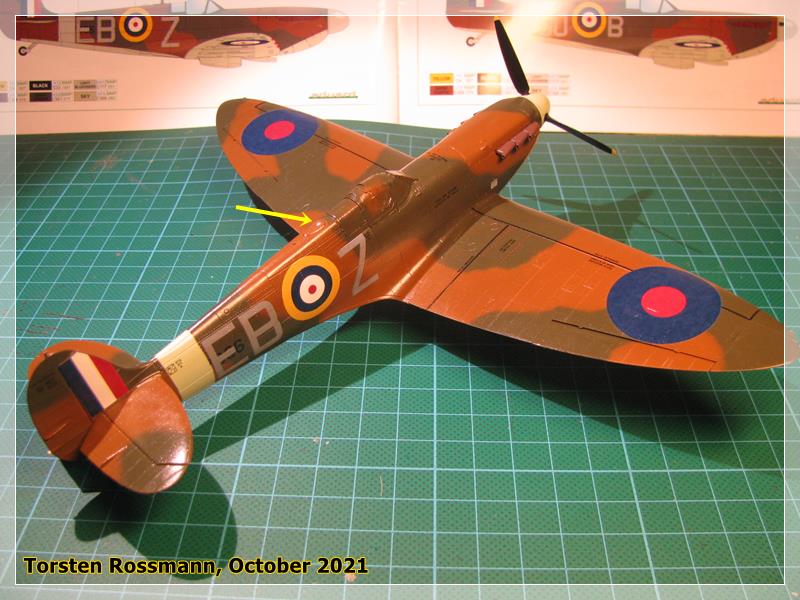
… stencils on the propeller hub are still missing. For the gun covers I will use painted Tamiya Tape. That looks better than the decals. And I will glue the antenna again which broke during “handling” …

… P8342 is also on a good way. All stencils are on and the rest will be applied in the next days.
Have a nice Sunday!
Torsten 
PS: Joel, when is your birthday?
8 Likes
Yesterday evening I risked it and removed the cover film from the big roundels on the wings. At first I was anxious that I would ruin the decal because it would tear apart. But it went really smooth, using a sharp scalpel and tweezers, slowly and with patience …
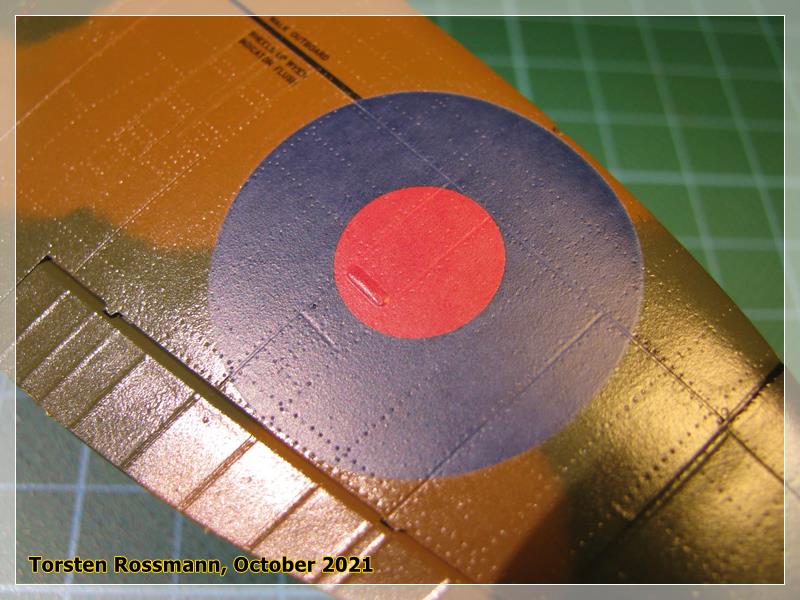
… I did the same on the underside. All decals are still in one piece. Before I carry on here, I will seal the decals with Bodenglänzer. I would recommend removing the film only on big decals like these roundels. Not really necessary here on a painted surface like this but I can imagine it would be useful on NMF surfaces like a P-51 or a P-38. Or B-17
 …
…Test passed!
7 Likes
@BlackWidow The roundels really settled beautifully into the surface detail! I have still only tried these new decals for stencilling and smaller designs but will probably use them all over my next build to see if it works out for me. Getting rid of the film reduces the advantage of using my own stencils, what I do like about the stencils though is that for stuff like German crosses you can use a dark grey and an off white to reduce the rather stark contrasts from decals that are usually printed pure white and pure black! Not a problem in this case though  !
!

Magnus
1 Like
Passed??? With an “A” passed!
1 Like
Thanks guys!
Magnus, I use Revell Decal Soft under and on the decal so it “snuggles” nicely into the panel lines. That softener does the job for me in most cases. And if I have an uneven surface or a mulish decal I still have Agama Hypersol to make it behave properly … 
With the german Balkenkreuz I always find it difficult to airbrush the inner part in RLM 74 or 75 because the decal is already applied to the fuselage. So I have to cover the white cross parts. I use Parafilm for it. With Tamiya Tape I would most likely destroy the decal. Here’s my attempt on one of Gerd Barkhorn’s Bf 109 G-6 in 2018 …


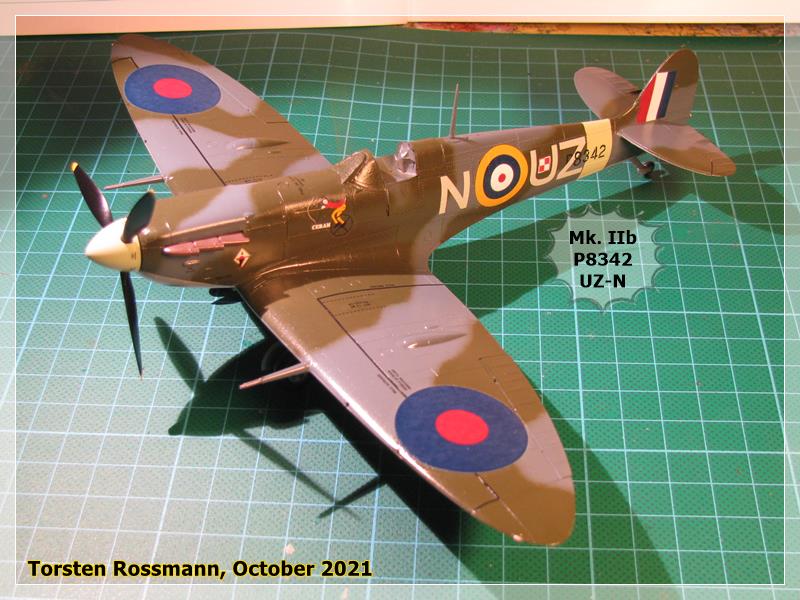
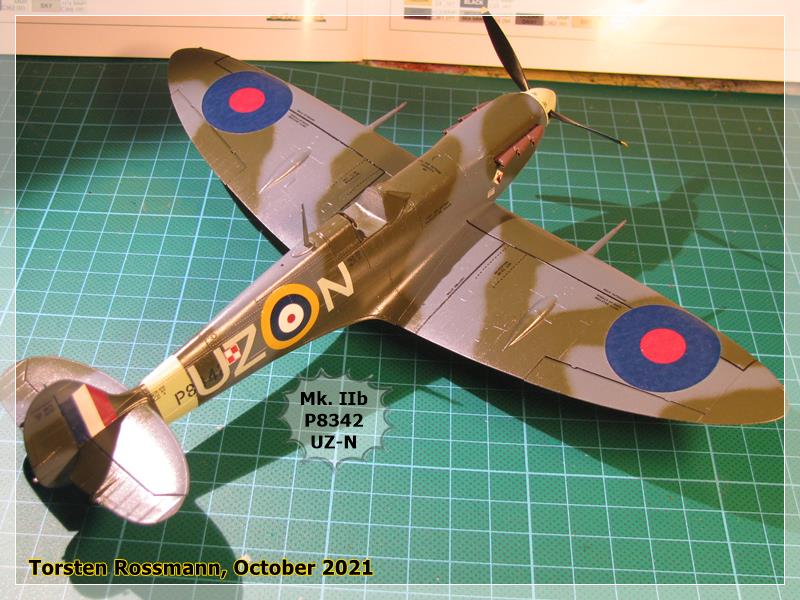
… anyway, all decals are on both Spits now and P8342 has turned into UZ-N now, I like the Polish checker in the “U”. I will again remove the film on the big roundels tomorrow. Still a lot of small works to do before the final coating but there’s a light at the end of the assembly line. Stencils are also on the propeller hub now. And I didn’t break the antenna this time … 
Next update soon. Stay tuned …
Torsten 
11 Likes
Those decals do look good Torsten 
1 Like
Torsten,
What an epic decal process you just went through. the end results on both Spitfires looks absolutely perfect even when i enlarge the pictures.
As for moving decals around when 1st placed on the model’s painted surface, I have that issue no matter whose kit or AM decals I’m using. I guess that the base decal film/glue has a lot to do with it. Like you, I need to flood the decal with the warm water and gently work it under the decal to move it into position, then the Microscale decaling process.
As for that clear film, this is the 1st time I’ve ever heard or seen of it. Nice job in removing it. I see no real advantage to it other then as a protectant for very thin decals by newbie modelers.
joel
I
1 Like
The two Spitfires look amazing, Torsten! 
1 Like
Thanks for your feedback, guys!
I’m completely with you, Joel. I also don’t see a necessity to remove the cover film of the decals as it goes really well into the panel lines. But that’s up to everyone’s taste. I was just curious if it works as it is described in the Eduard manual. On P8342 I also tried to remove the film on a stencil. It didn’t work, don’t know why. Had to do some minor paint repairs instead … But nothing serious. So removing is only good for bigger decals in my opinion. The only thing I recommend is to remove the large film edges of the decals where possible. That’s what I did.
A small update without photos. Just sealed the decals on the builds and added the gun covers made of Tamiya Tape (6 mm x 3 mm/12 pieces). The last thing missing now is the final flat clear coating. I have another little break this weekend, because I attend my first model show in 2 years …  The last expo I had in October 2019 in Soleuvre/Luxemburg. Lots of new stuff to show now. Have 9 aircraft and 6 vehicles in the boxes.
Have a nice weekend!
Torsten
3 Likes
Torsten,
Looking forward to your next update with pictures of the finished two Spitfires.
And have a great time at the show. Just bring plenty of money for all those goodies that catch your eye.
joel
1 Like
Thanks for your kind words, Joel!
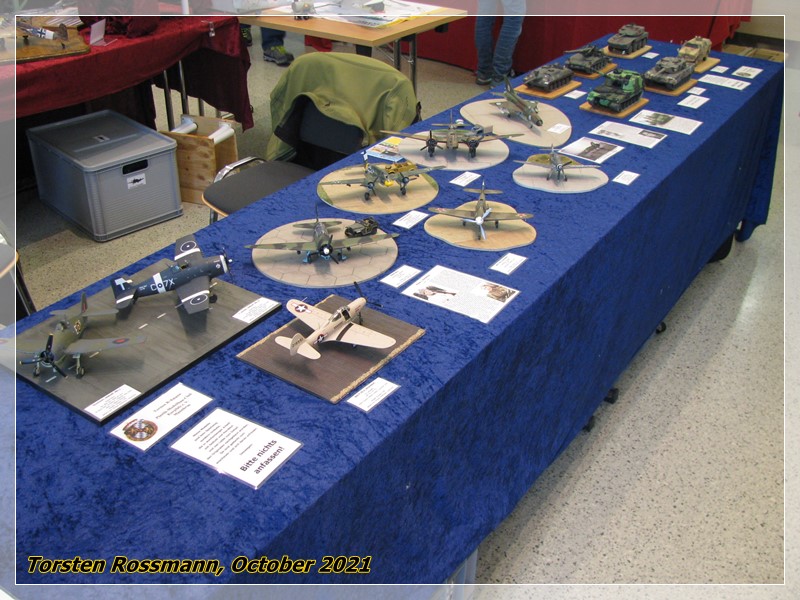
Indeed I had a great weekend at the model show. After 2 years it was good to meet all the guys again who share the same hobby. Though we’ve stayed in contact via E-Mail or phone calls. But I met only a few of them in the last 2 years. Funny, I didn’t buy any new kit or other modelling stuff but I was quite successful in selling some older kits, 8 of 11 found a new owner.
This was my table at the show. I’m sure you guys recognize some models on it from this thread …
… and this is the status quo of the Spitfires. P7666 (EB-Z) will probably be finished first, because I still have a little work with the door of P8342 (UZ-N) but I hope everything is finished by next weekend …
Torsten
8 Likes
Torsten,
Sounds like you had a great time, and that’s the important thing.
Your shows are so different then ours as the focus is on the contest, and your models are entered in classes. I rarely see anyone asking for a table to display non-contest models.
Your not buying anything at the show shows extreme self control. I always go with the belief that I’ll buy as little to nothing as possible, then go home literally broke!!
joel
1 Like