Type 95 Ha-Go light tank of the Japanese Imperial Guards near Bakri, Malaya 18th January 1942

Some of you may already have spotted this build as part of my Diorama project:
The Road to Singapore: Australian gunners defeat tanks of the Japanese Imperial Guards near Bakri 18th January 1942

However, because I suspect that some AFV modellers don’t necessarily stray into the Diorama section of this site - and also because Japanese subjects don’t seem to be as popular as other Axis armour - I thought it would be worth posting this build here as well. So apologies for those who have seen it twice…

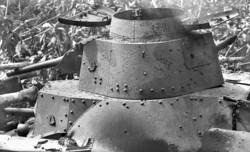
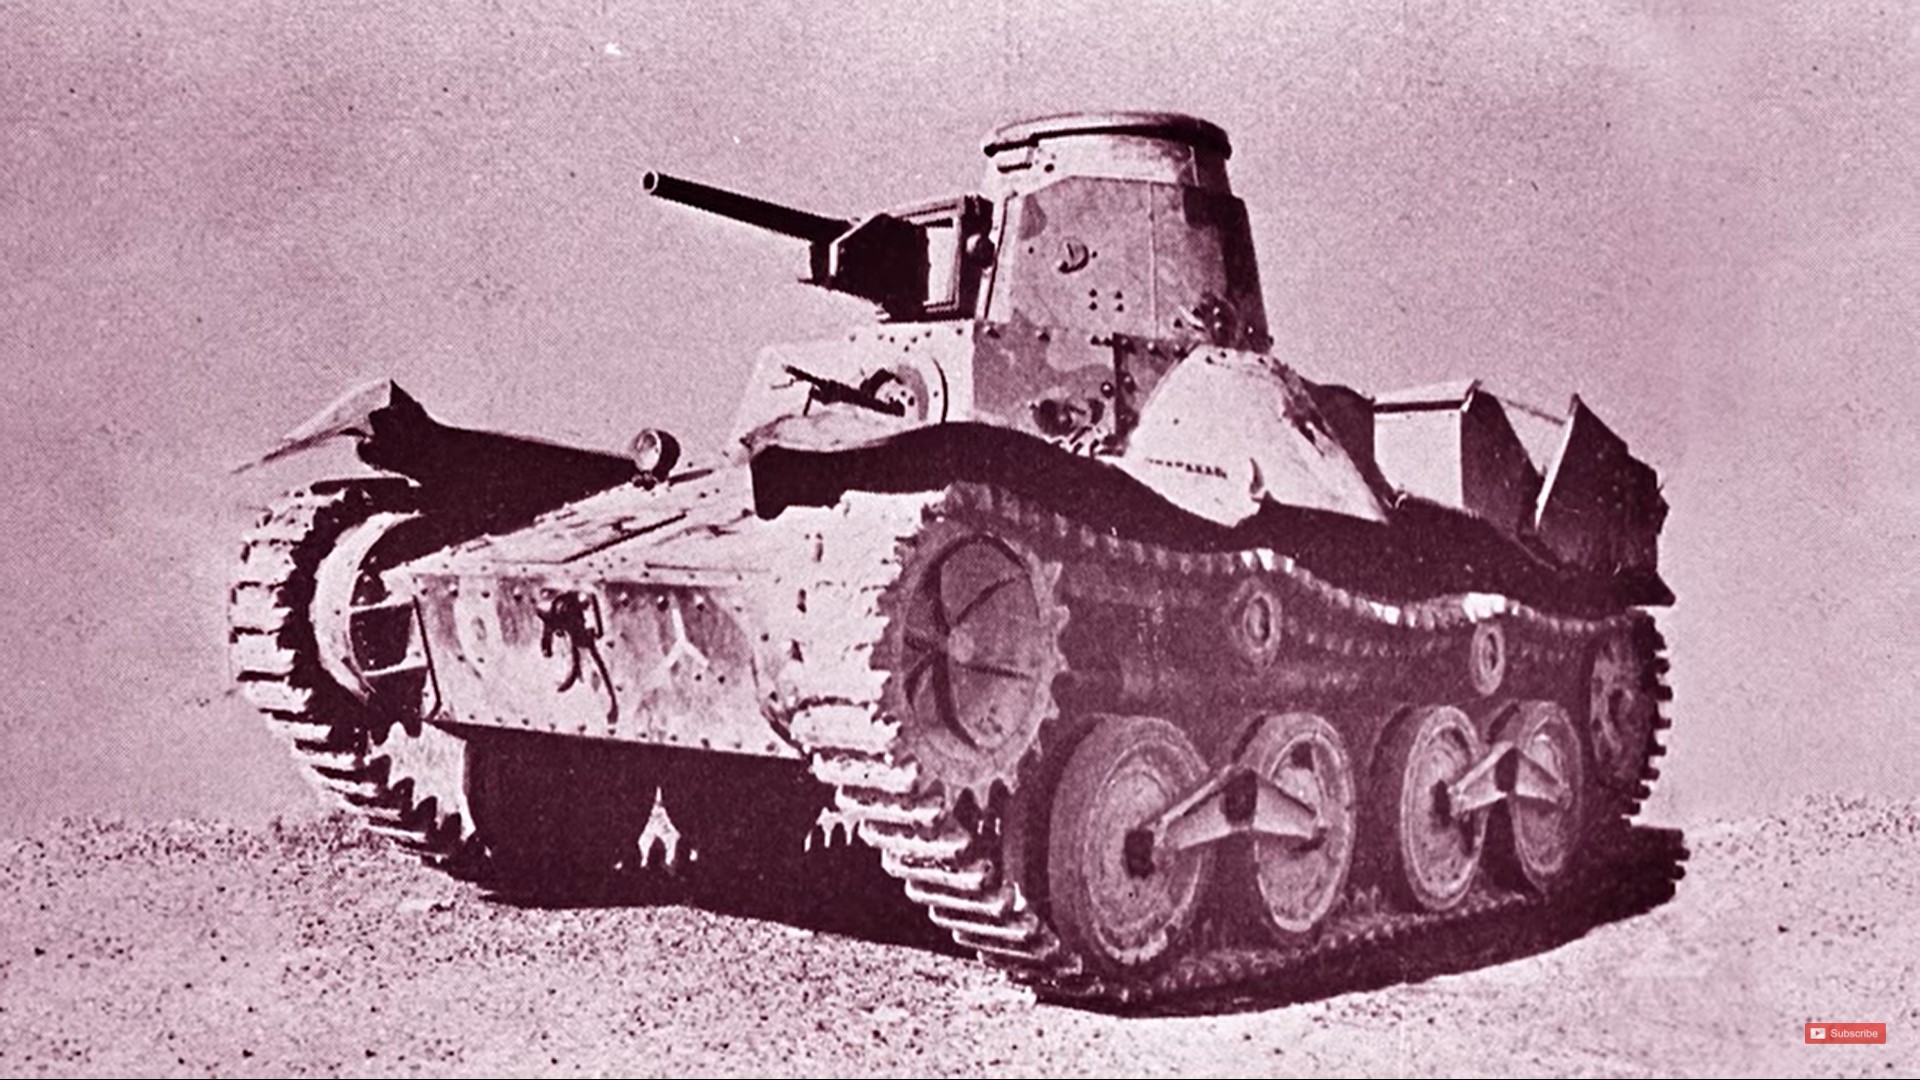
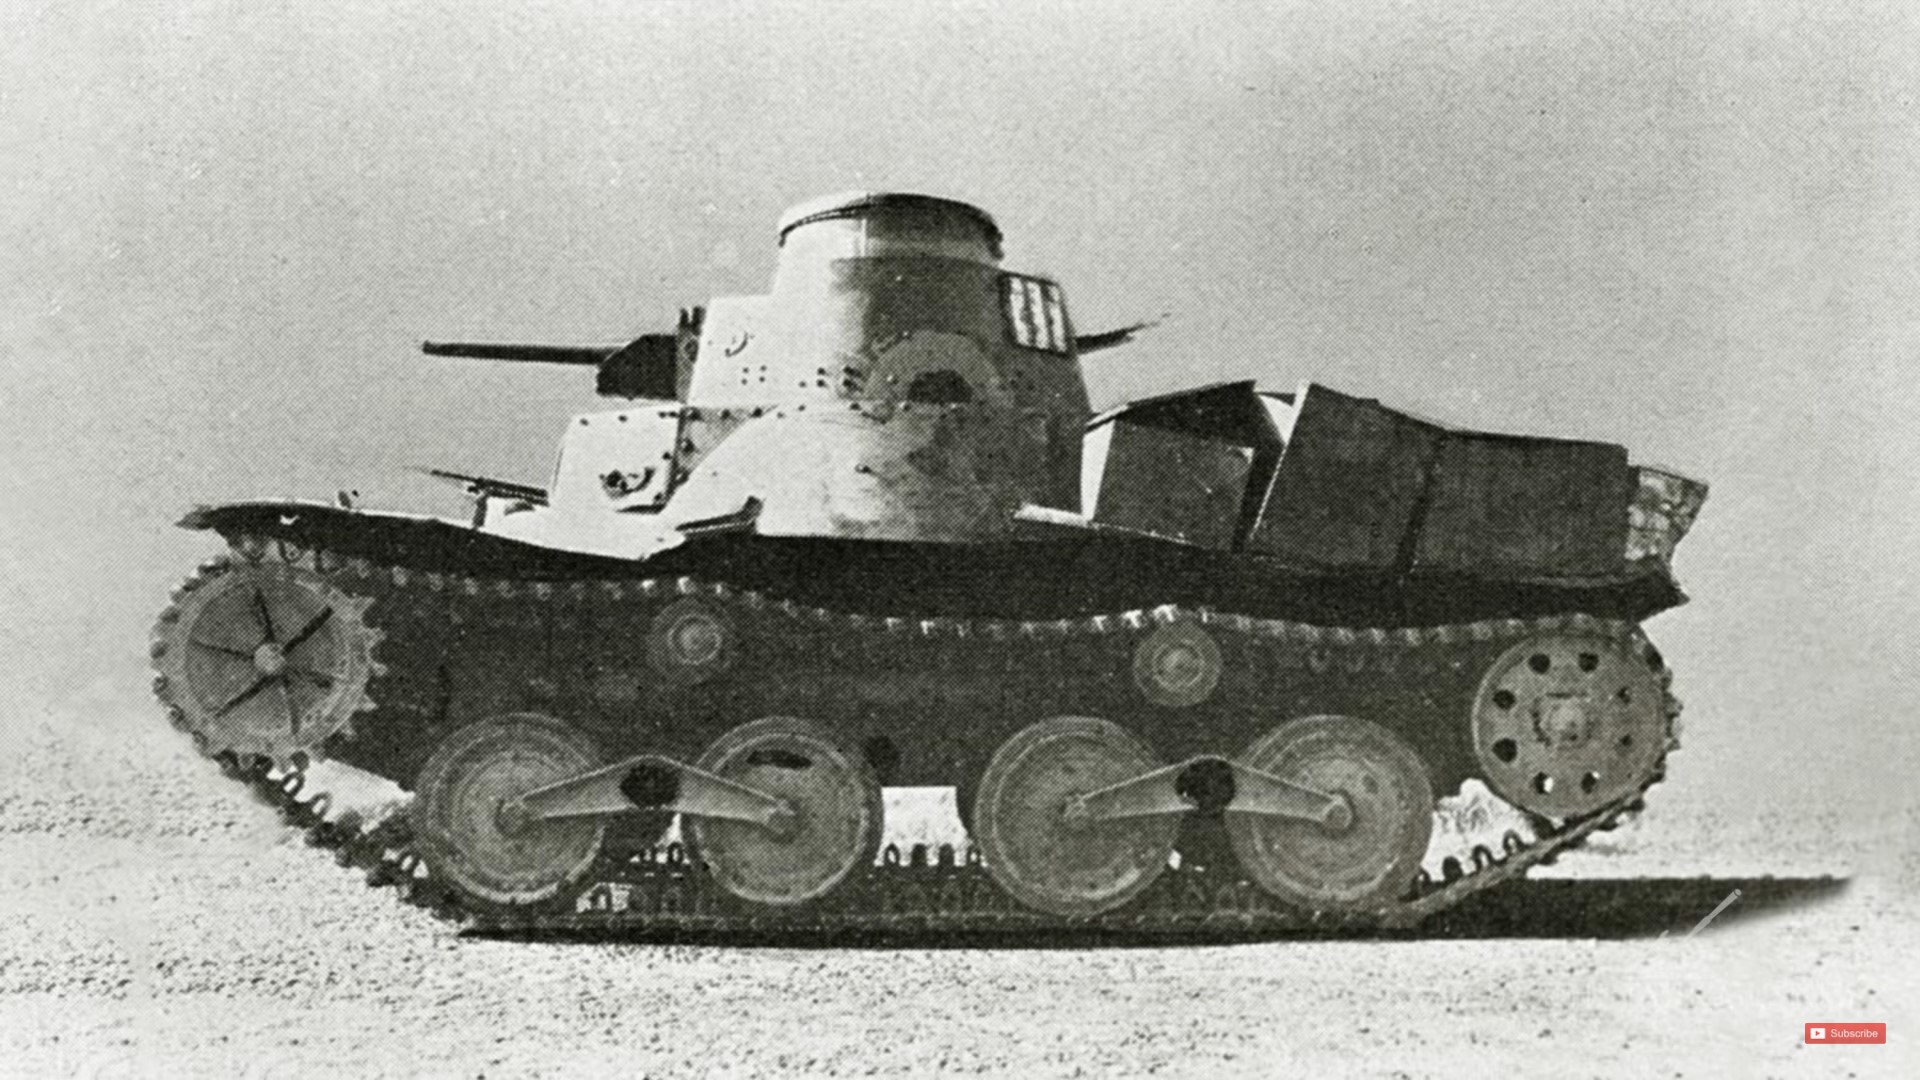
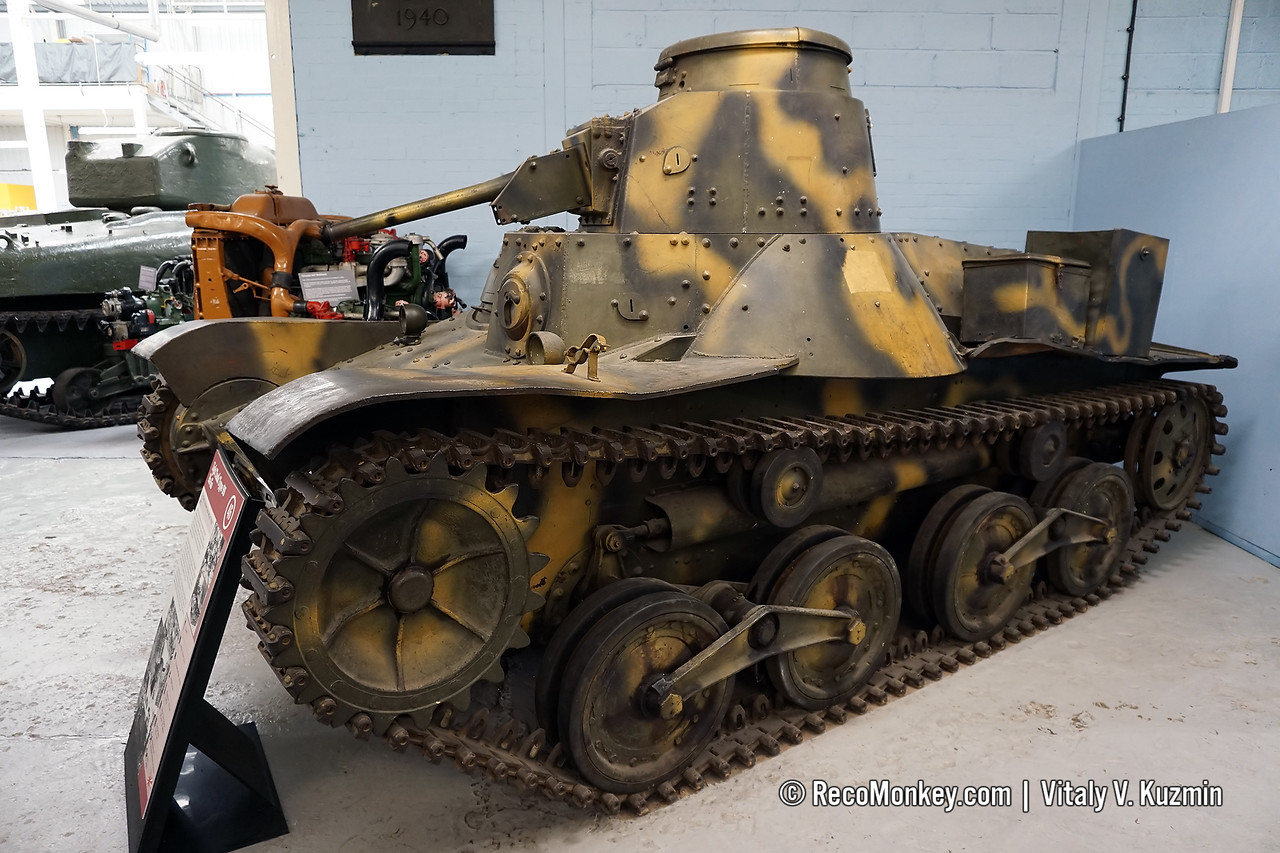
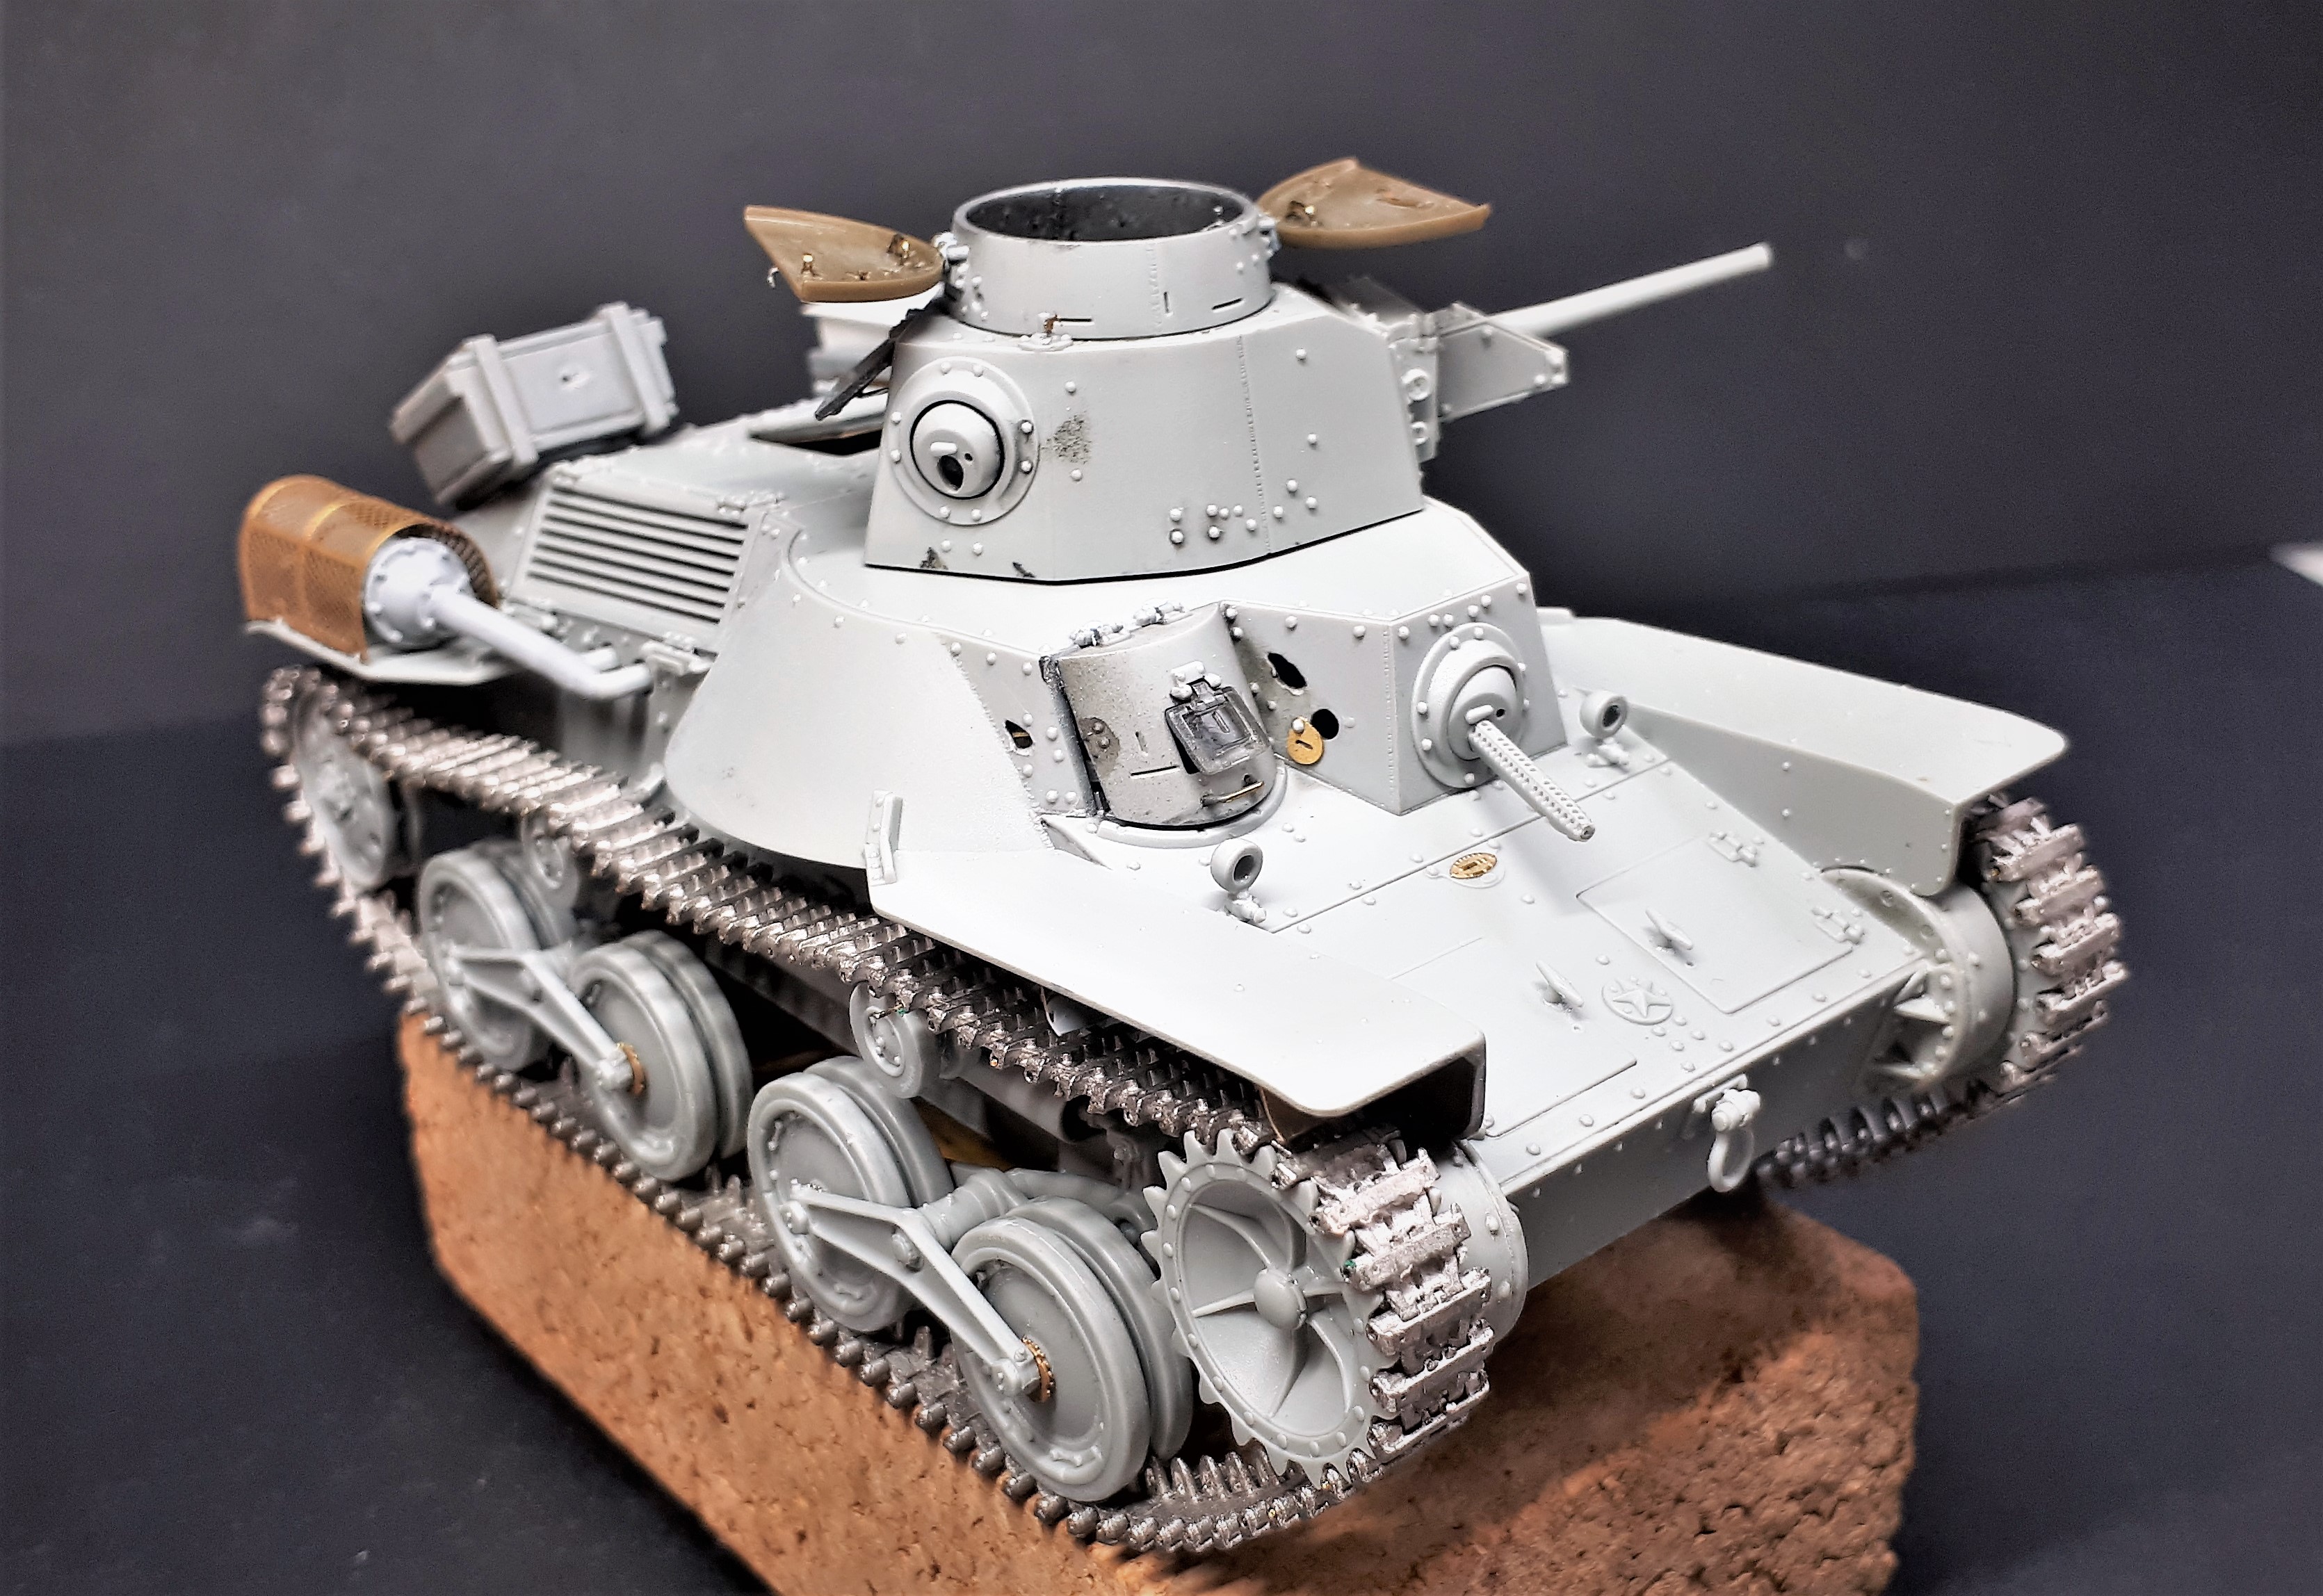
I deal with the fascinating history behind this particular Ha-Go in some detail on my diorama blog, so I won’t repeat that all here. But although this may not be saying much when you compare it to the much better known images of armour from the European theatre, I don’t believe I am wrong when I say that this is probably the most photographed Type 95 tank from WW2.

4096802

011298 JAPANESE TYPE 95 HA-GO LIGHT TANK HALTED BY AUSTRALIAN ANTI-TANK FIRE, MALAYA, MARKINGS ON FRONT - LEFT FRONT VIEW 4090051

4083545 enhanced

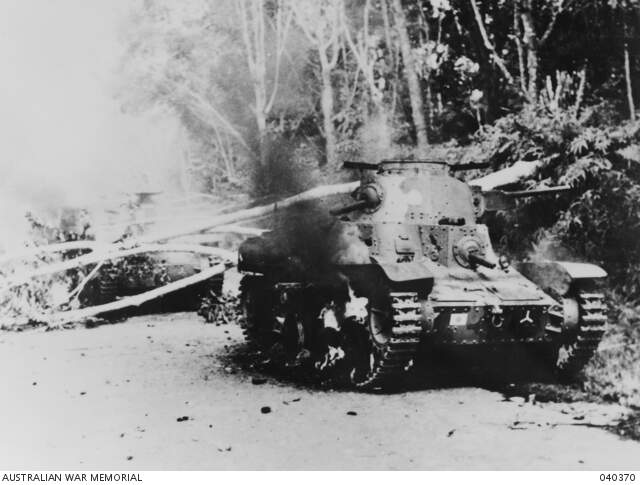
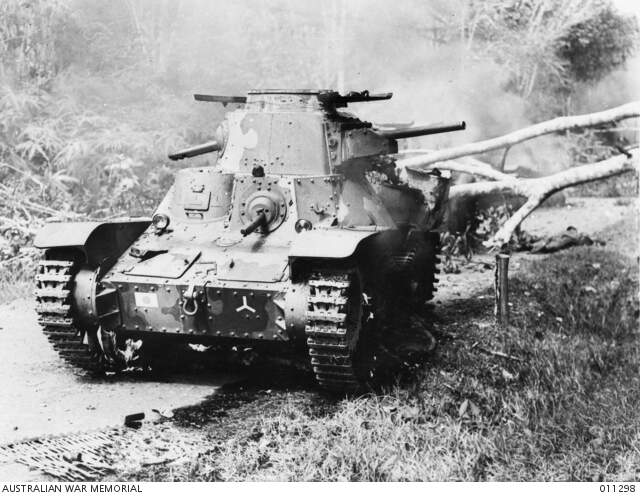
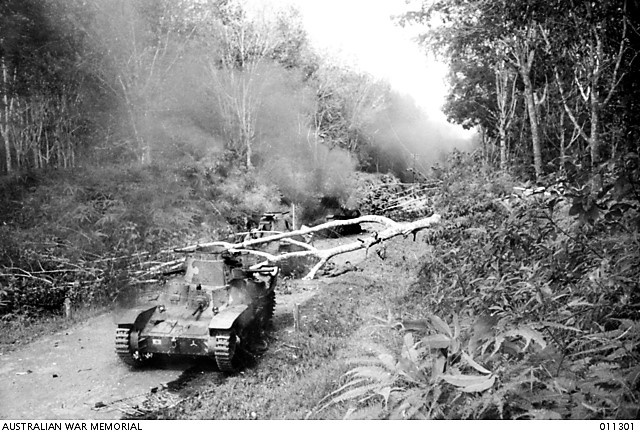
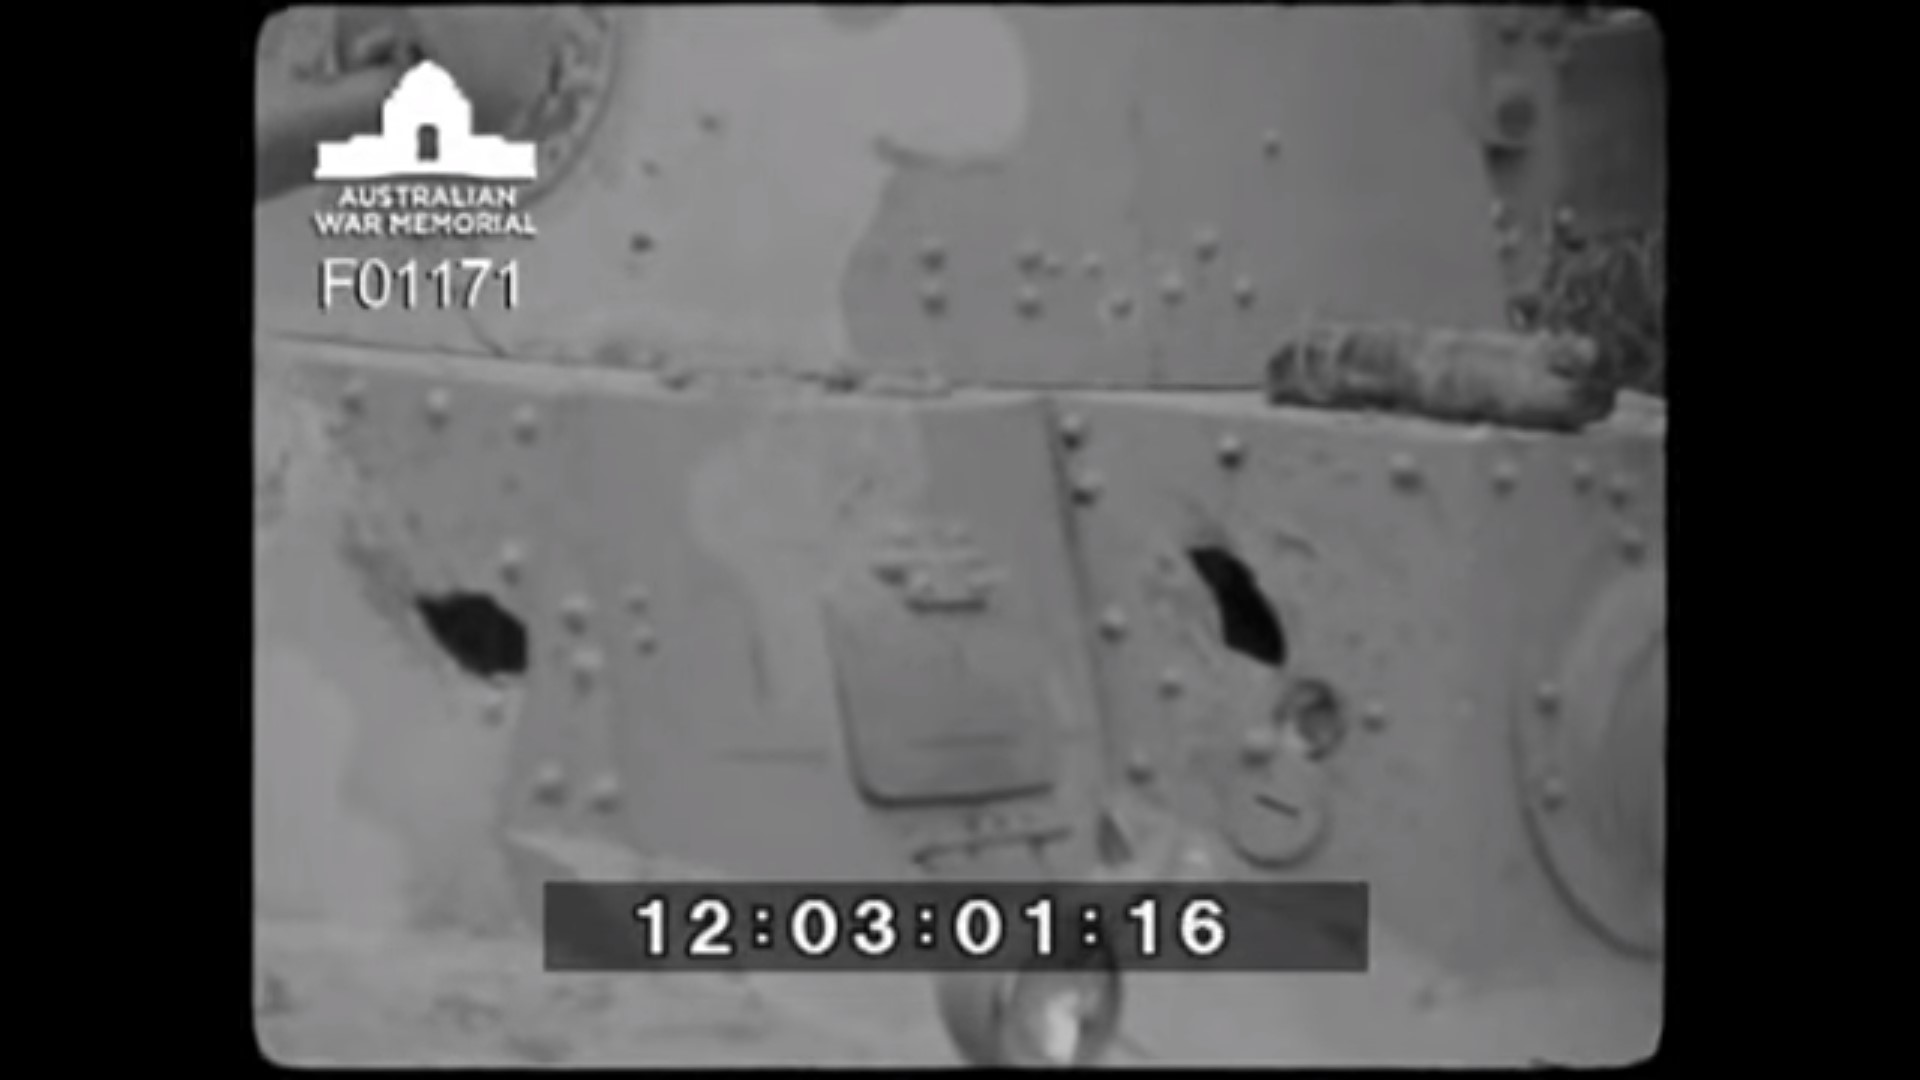
I start with much thanks to the Australian War Memorial for their on-line archive from which most of my contemporary images are drawn. These pictures (including some cine film) were taken by Australian War Correspondents during the Battle of Muar, one of the decisive engagements in the short, sharp Malayan Campaign. This had been launched by the Japanese on the 8th December 1941, only a day after the attacks on Pearl Harbour, and it ended on the 15th February 1942 with the surrender of the Singapore garrison.

This rapid conquest of one of the ‘jewels’ of the old British Empire was a shocking defeat for the defending Commonwealth forces, who were comprised of British, Australian and Indian troops. On the other hand, it was a brilliant success for the Imperial Japanese forces and has understandably been likened to the German blitzkrieg in Western Europe. However, the fight did not always go in the favour of the victors.

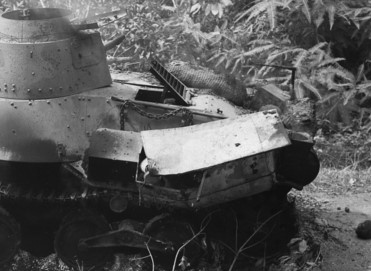
At 06.45 hrs on the 18th January 1942 the Imperial Guards Division, under the command of General Nishimura, launched a dawn attack on the town of Bakri. It was spearheaded by Type 95 Ha-Go light tanks of the 3rd company of 14th Tank Regiment under the command of Captain Shigeo Gotanda. Their advance took them down the road leading from Muar to Parit Sulong, via Bakri (hence it is often referred to as the ‘Muar-Parit Sulong Road’).

Perhaps inspired by the successful night attack by tanks at Slim River earlier in the campaign (where the Japanese armour had used surprise to penetrate into the enemy positions over a distance of several miles) the advance against the Australian 2/29th Battalion was made with little or no infantry support. However, unknown to Captain Gotanda his tank company were driving into the path of two well-sited 2-pounder anti-tank guns from the 2/4th Australian Anti-Tank Regiment under the command of Lieutenant Russell (Bill) McCure.

In a rapid dawn engagement at close range the gunners succeeded in annihilating the attacking force, knocking out at least 8 Japanese Type 95s in the process and killing the tank crewmen who put up a desperate fight. Left burning in the road surrounded by felled trees, the knocked-out tanks gave the defending forces a brief taste of victory and formed the backdrop to what is perhaps the best known image of the conflict… although, as you will see from the research in my diorama blog, this photograph may not be entirely what it seems.

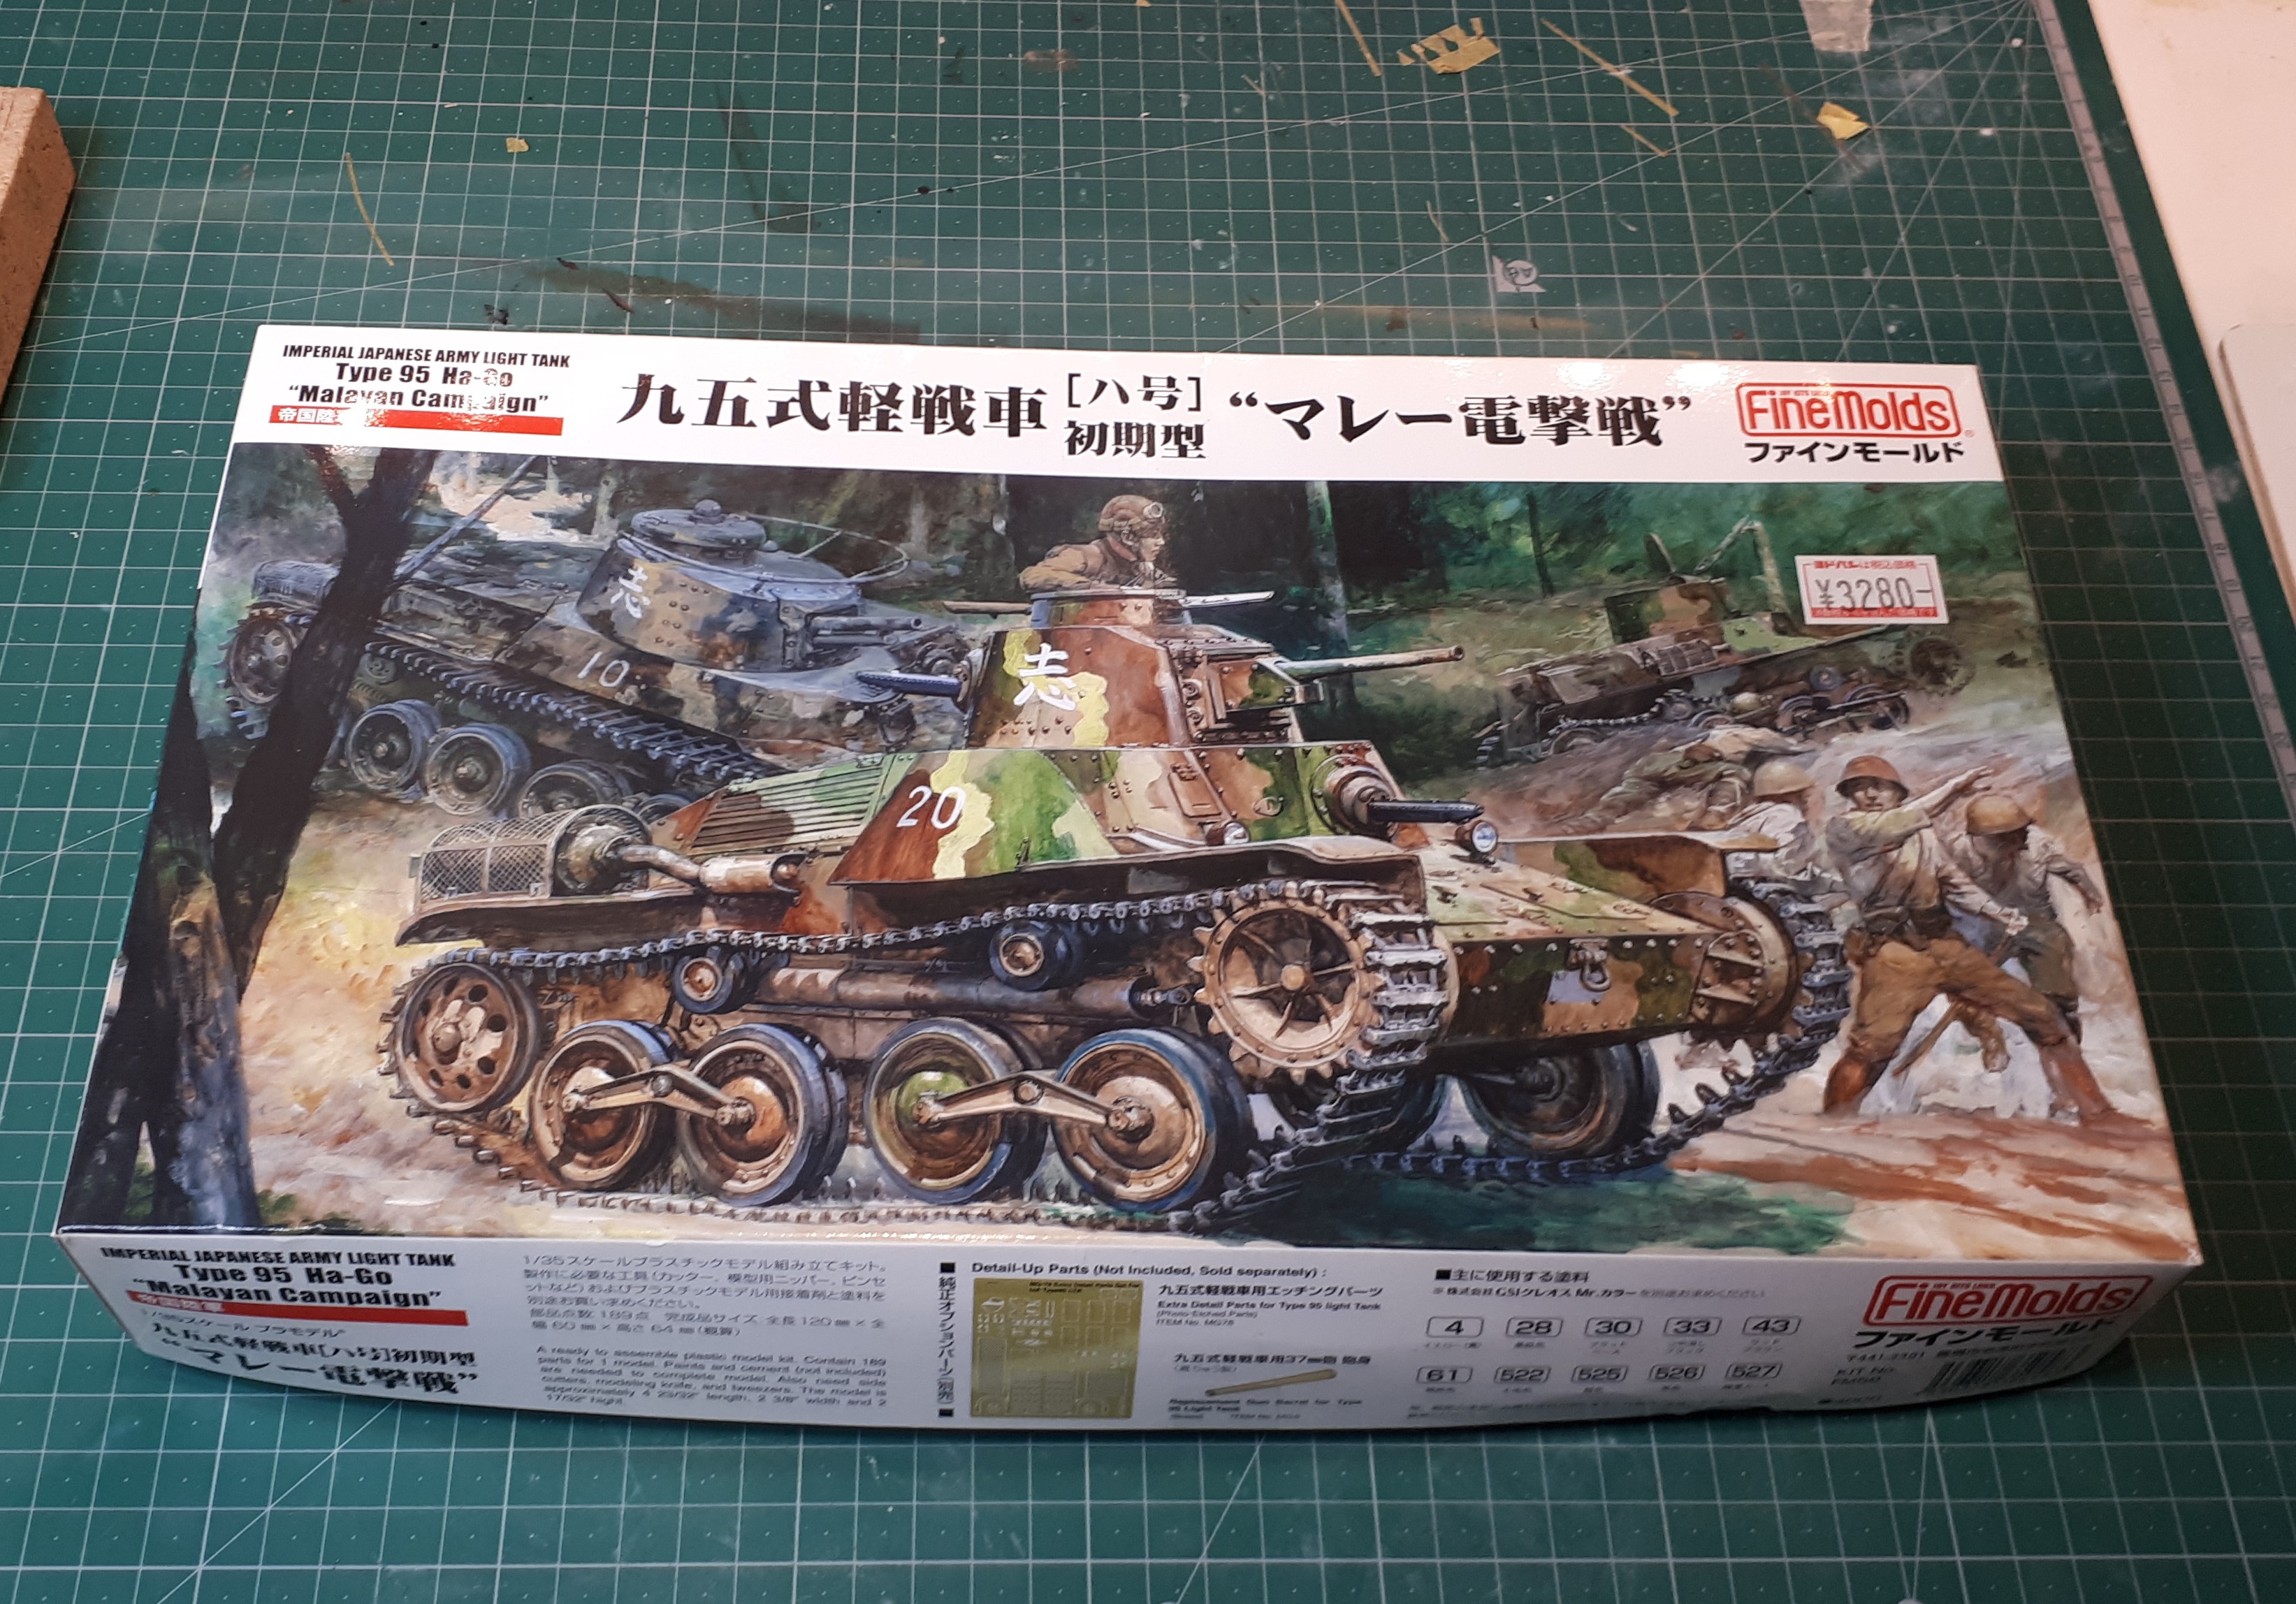
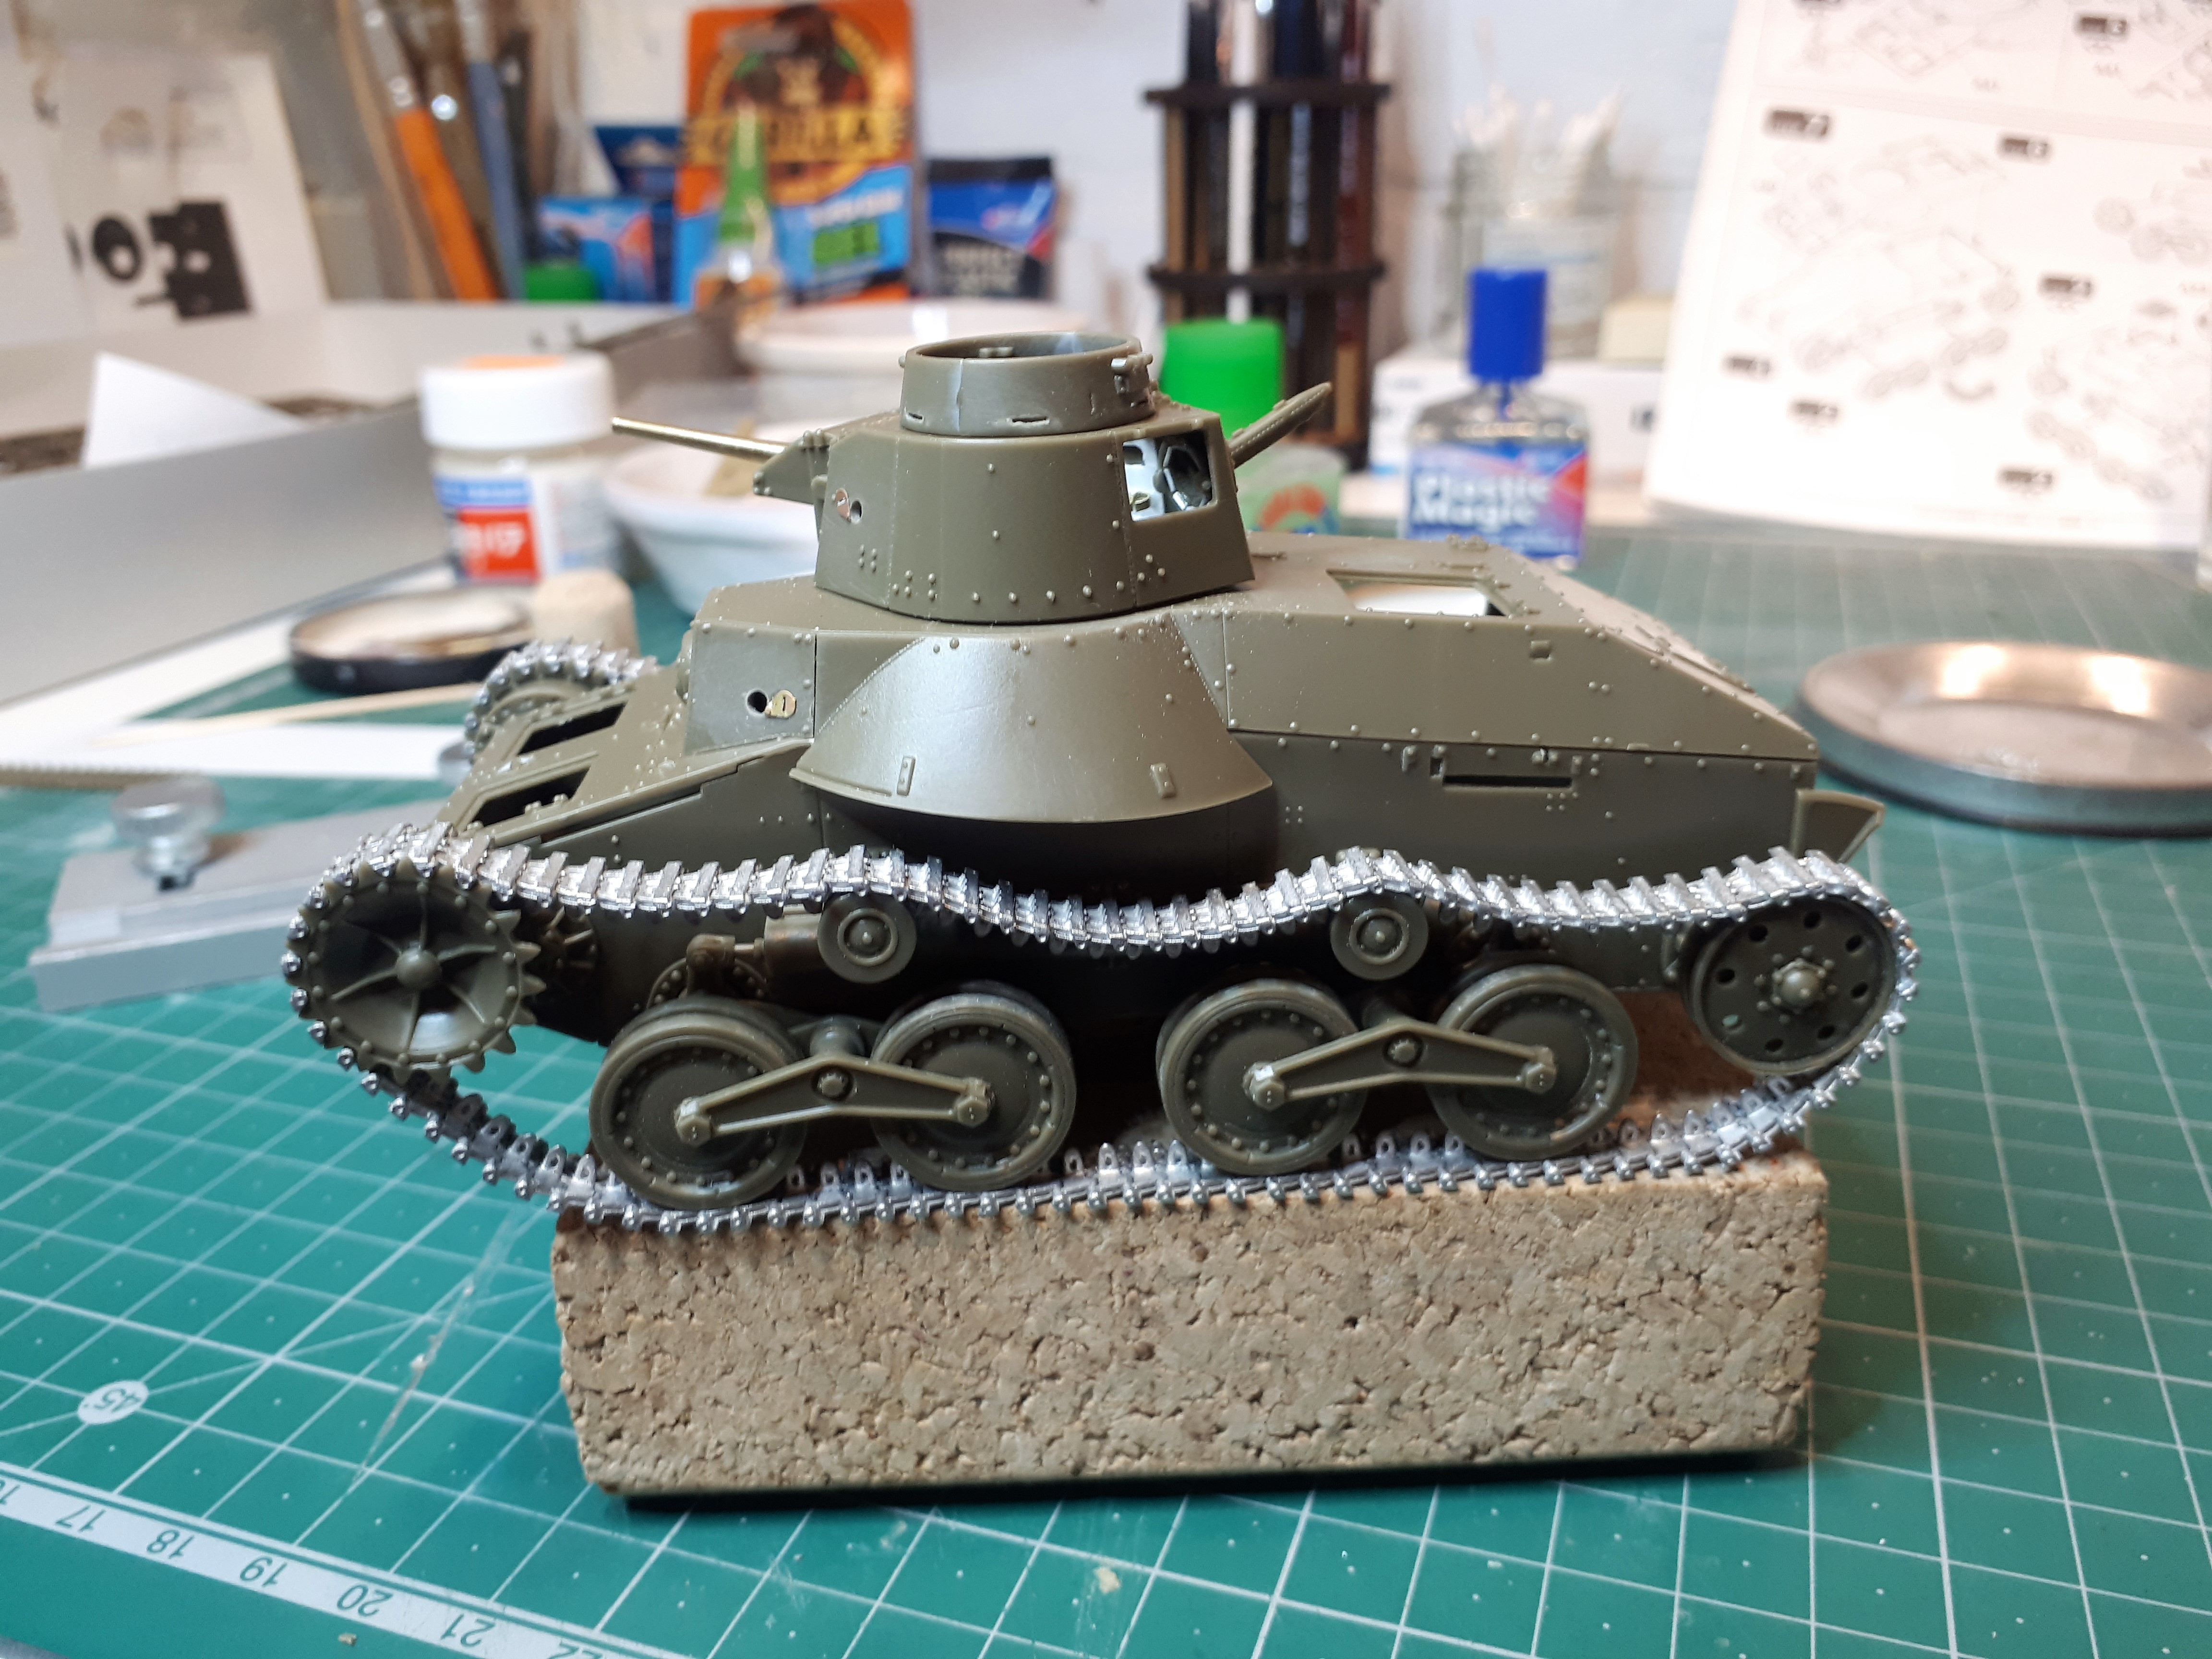
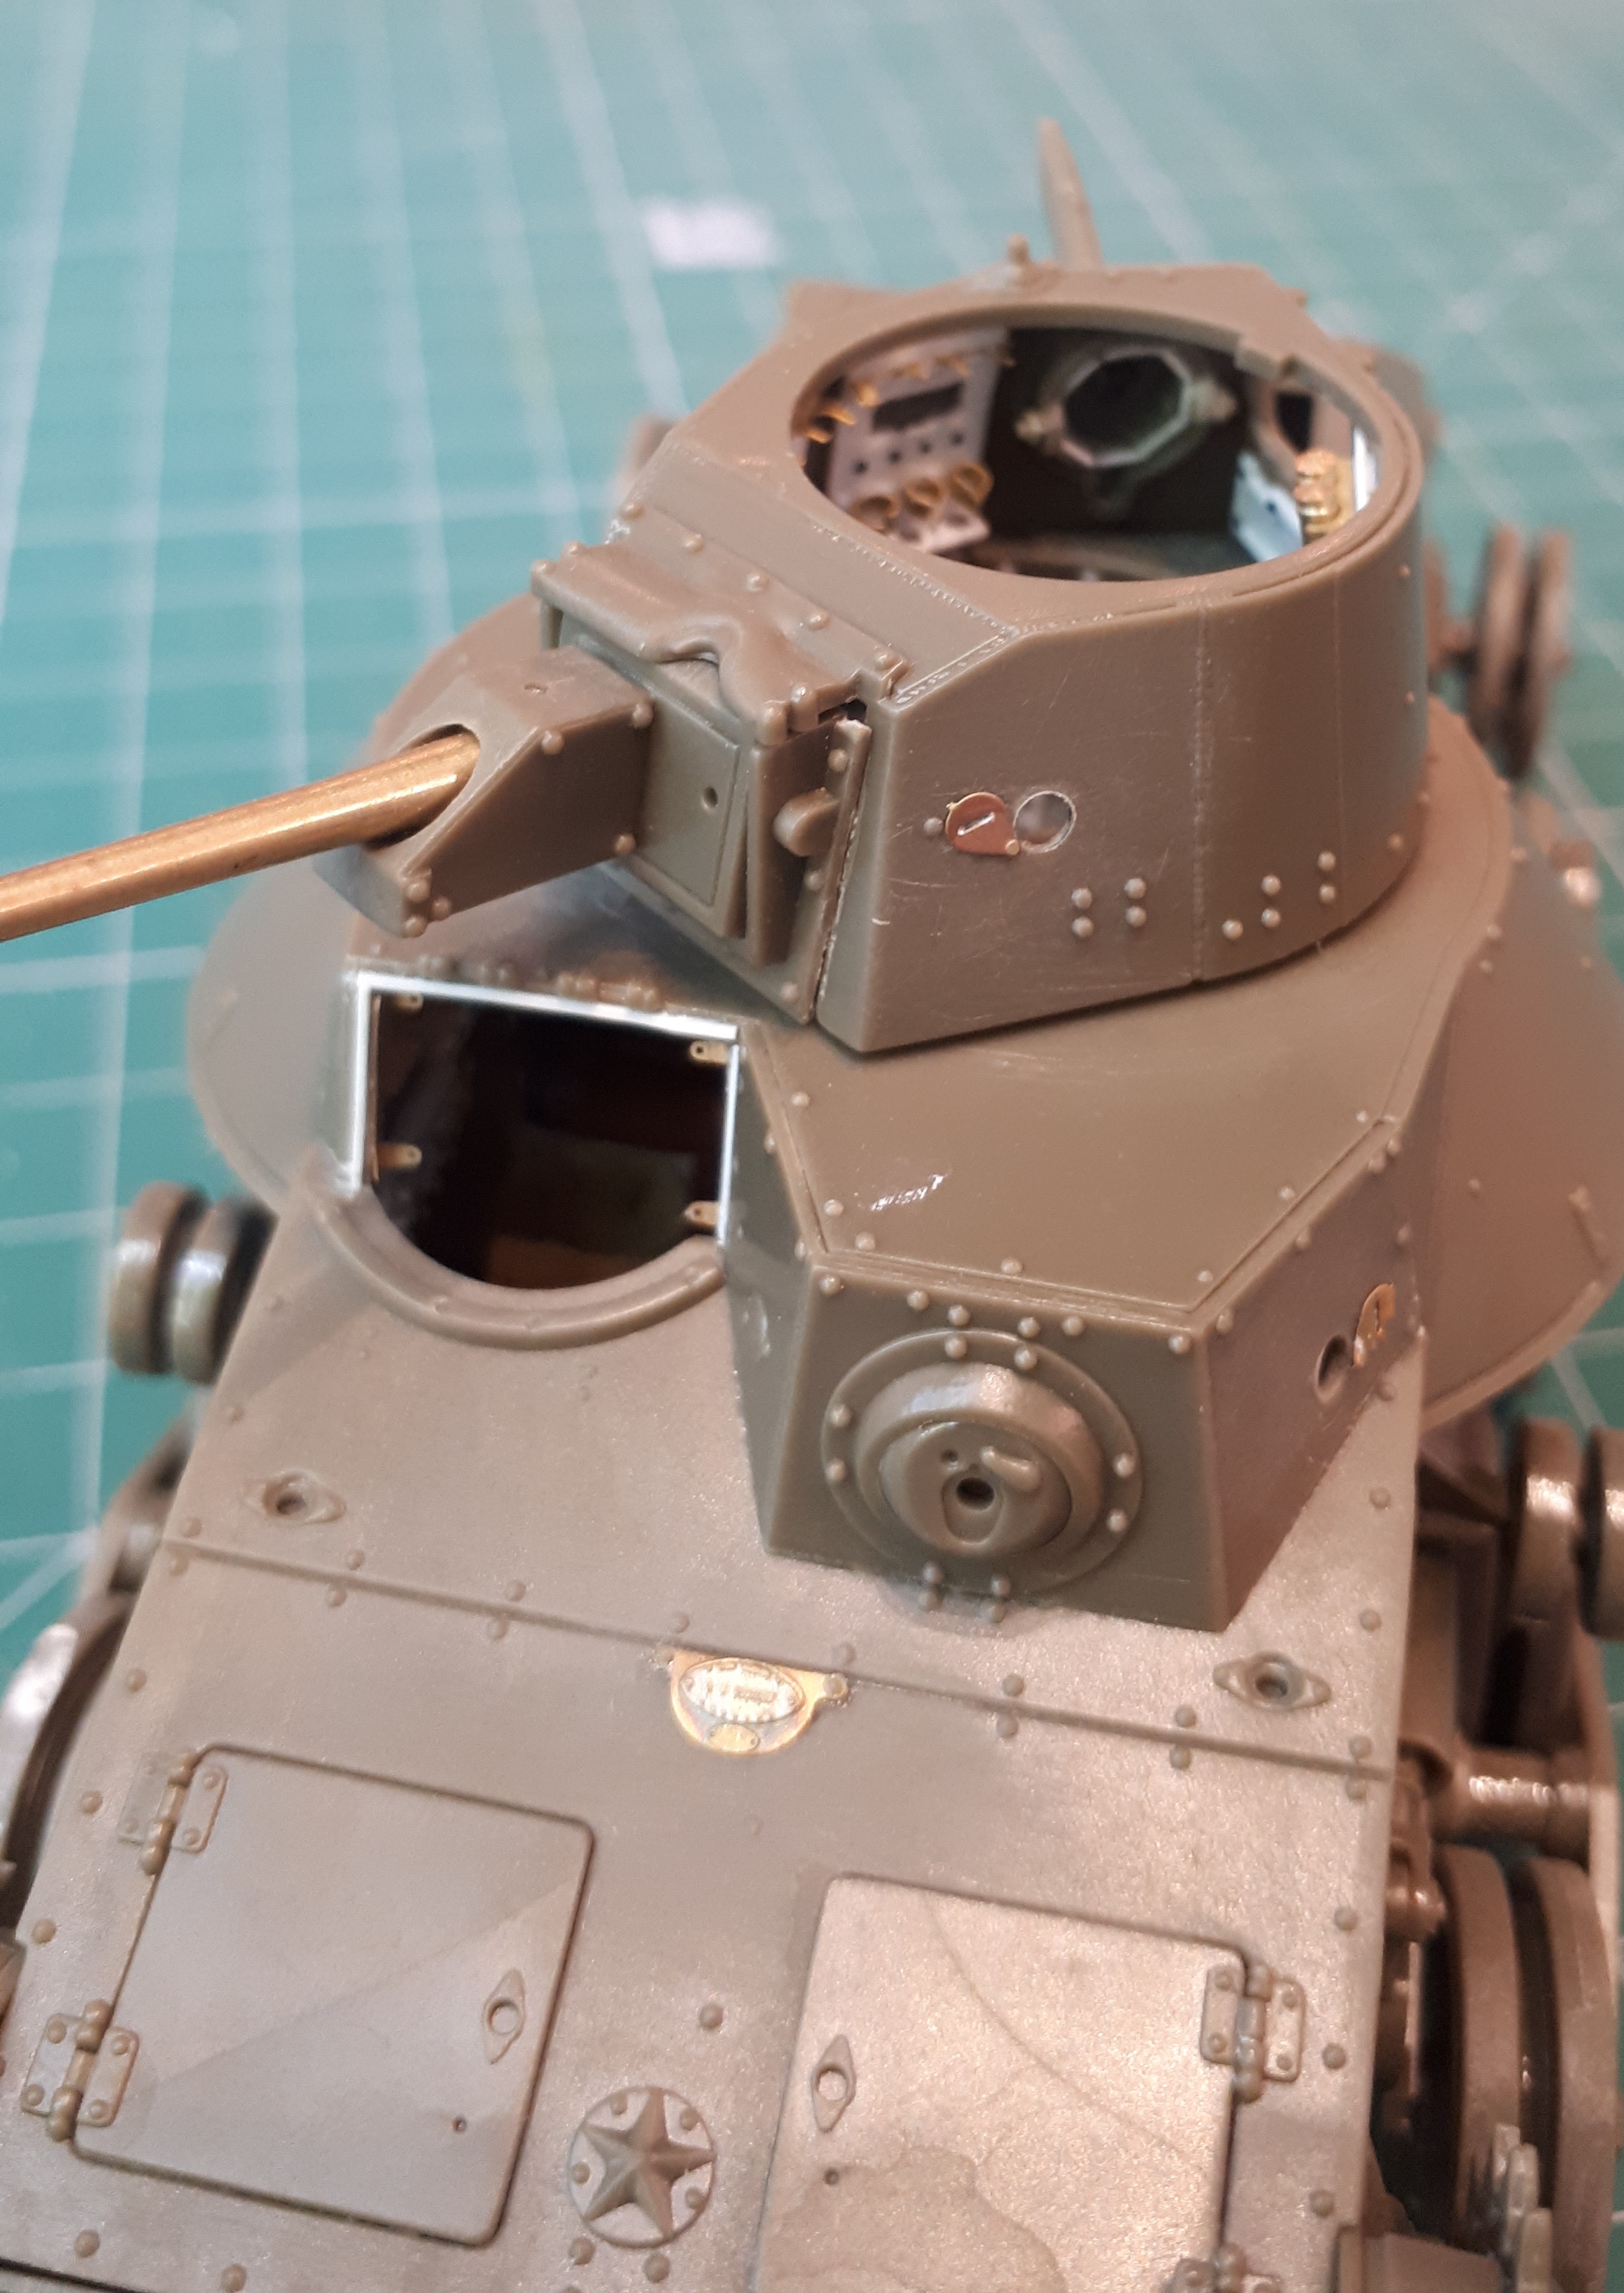
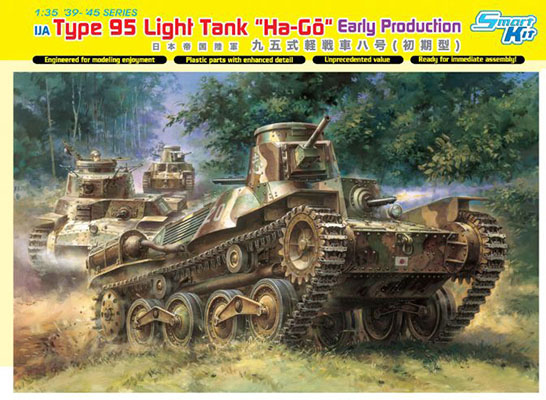
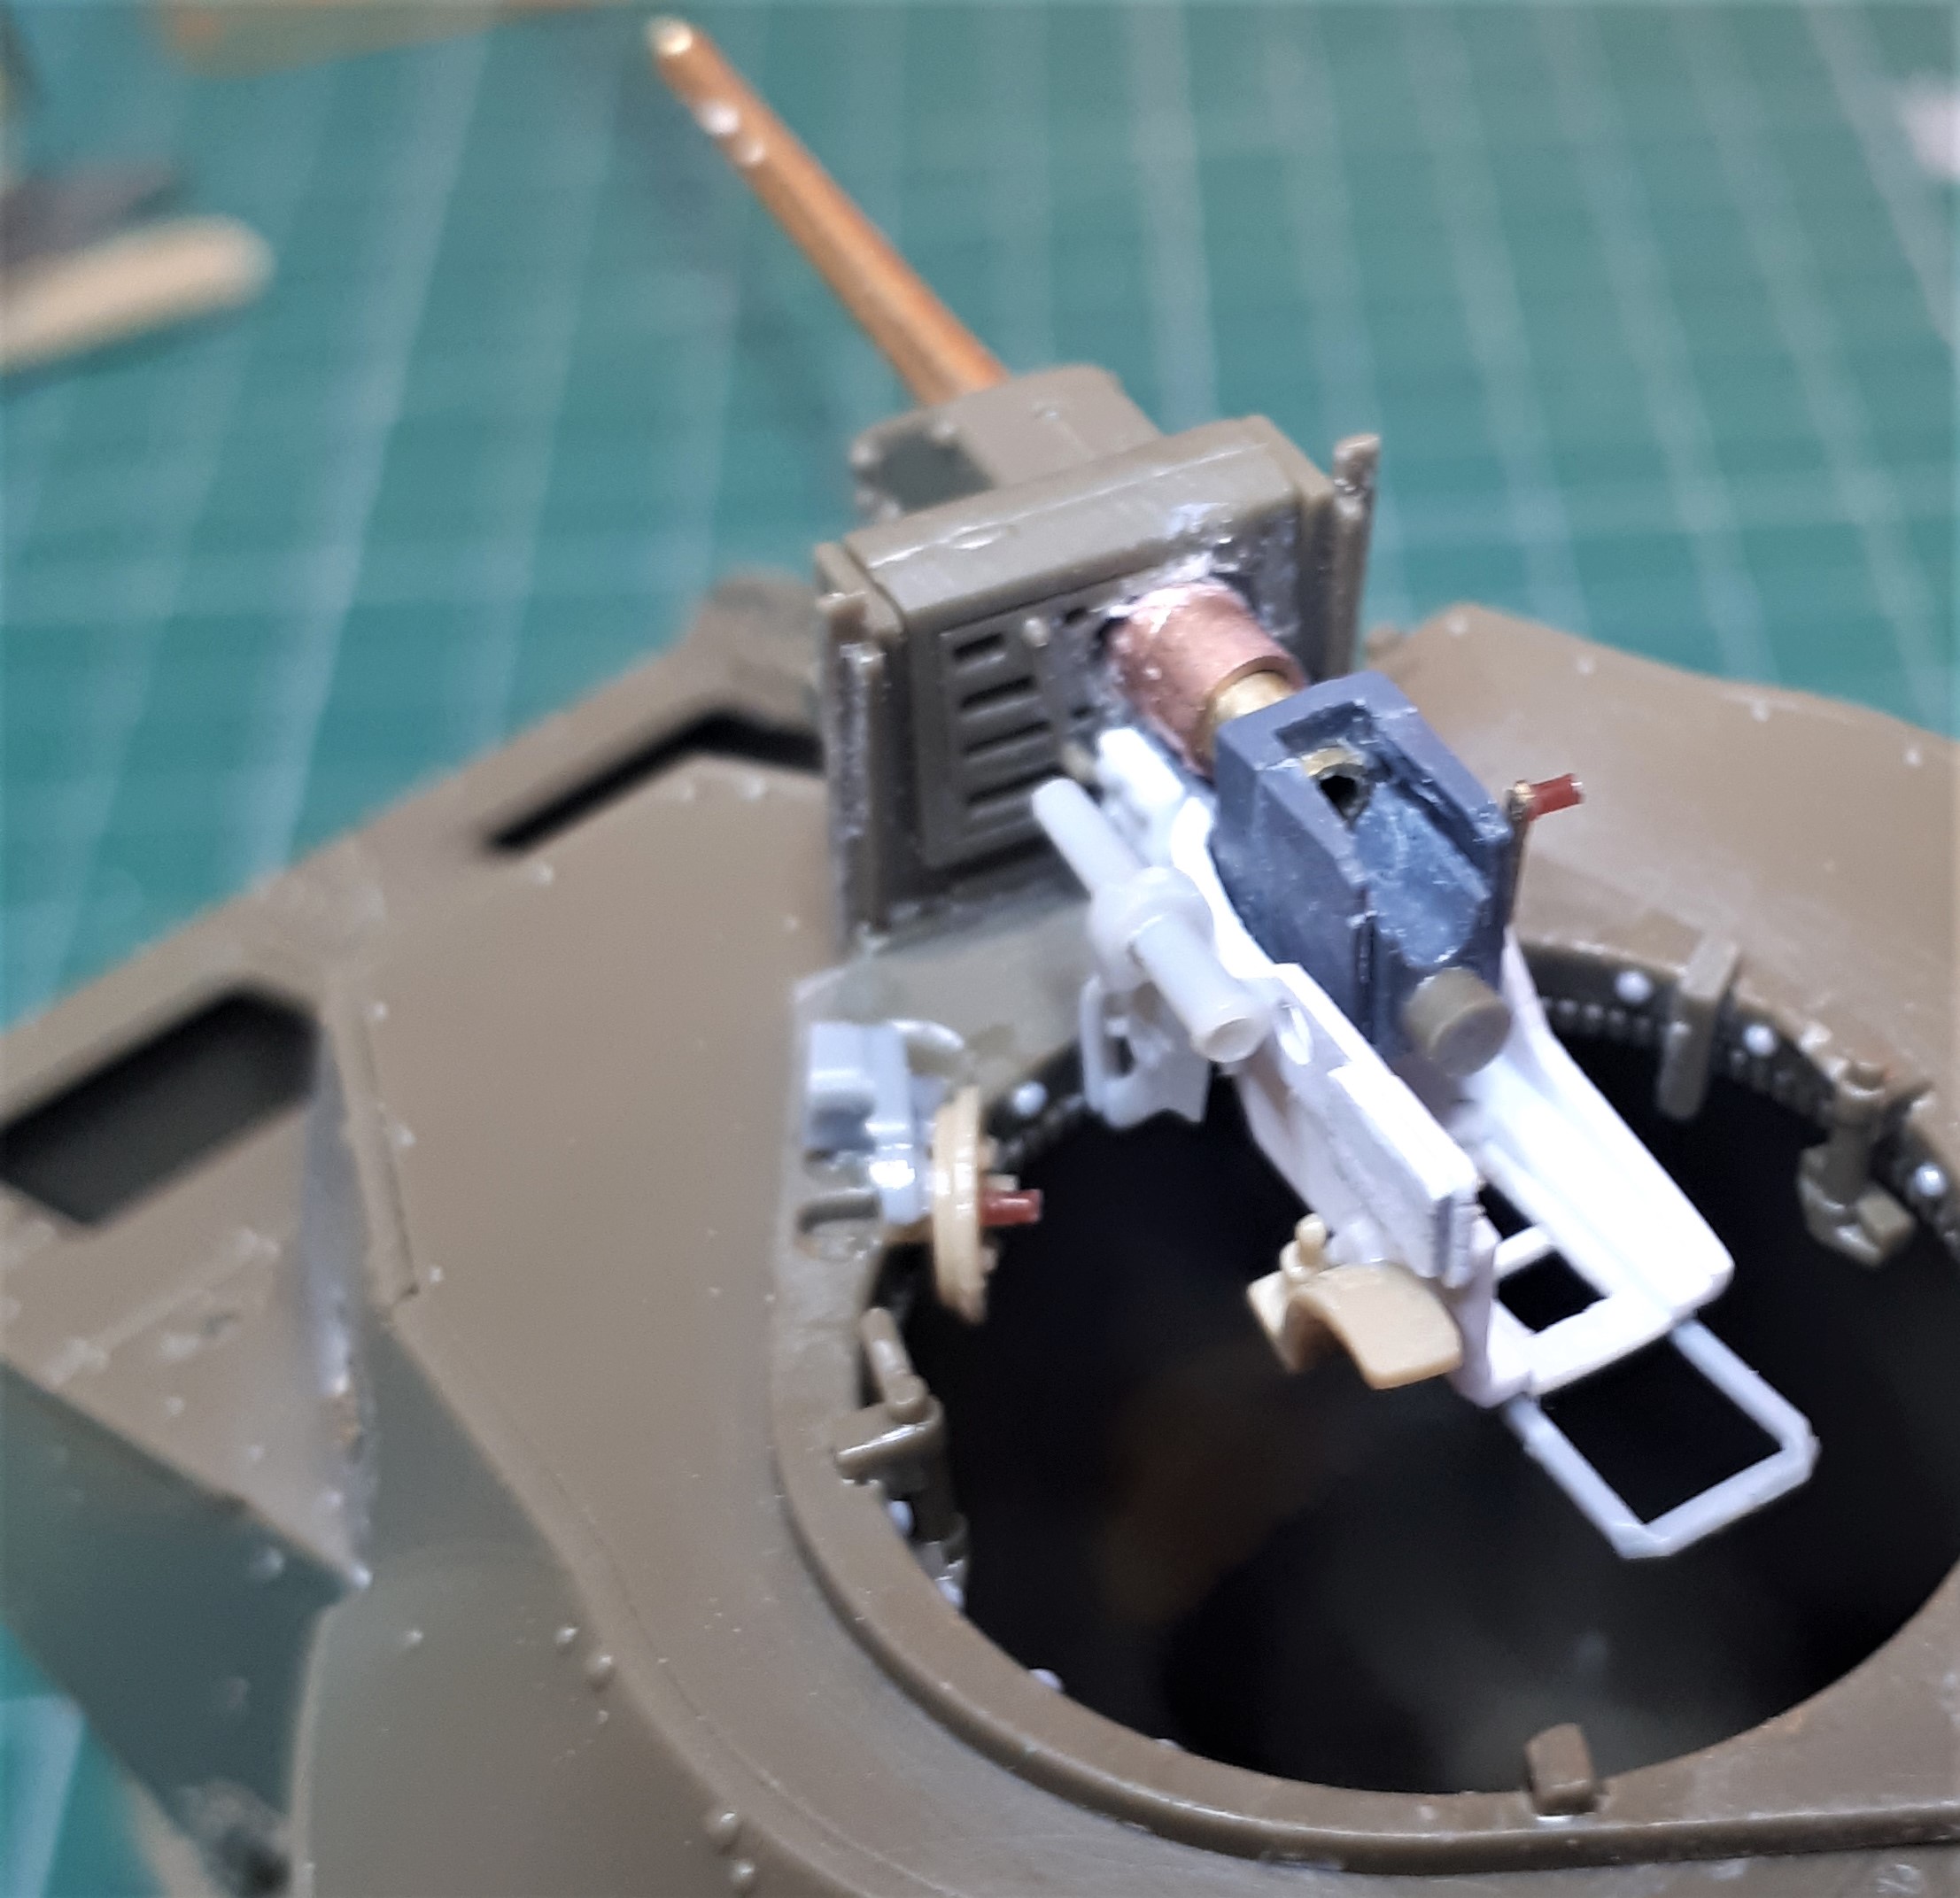
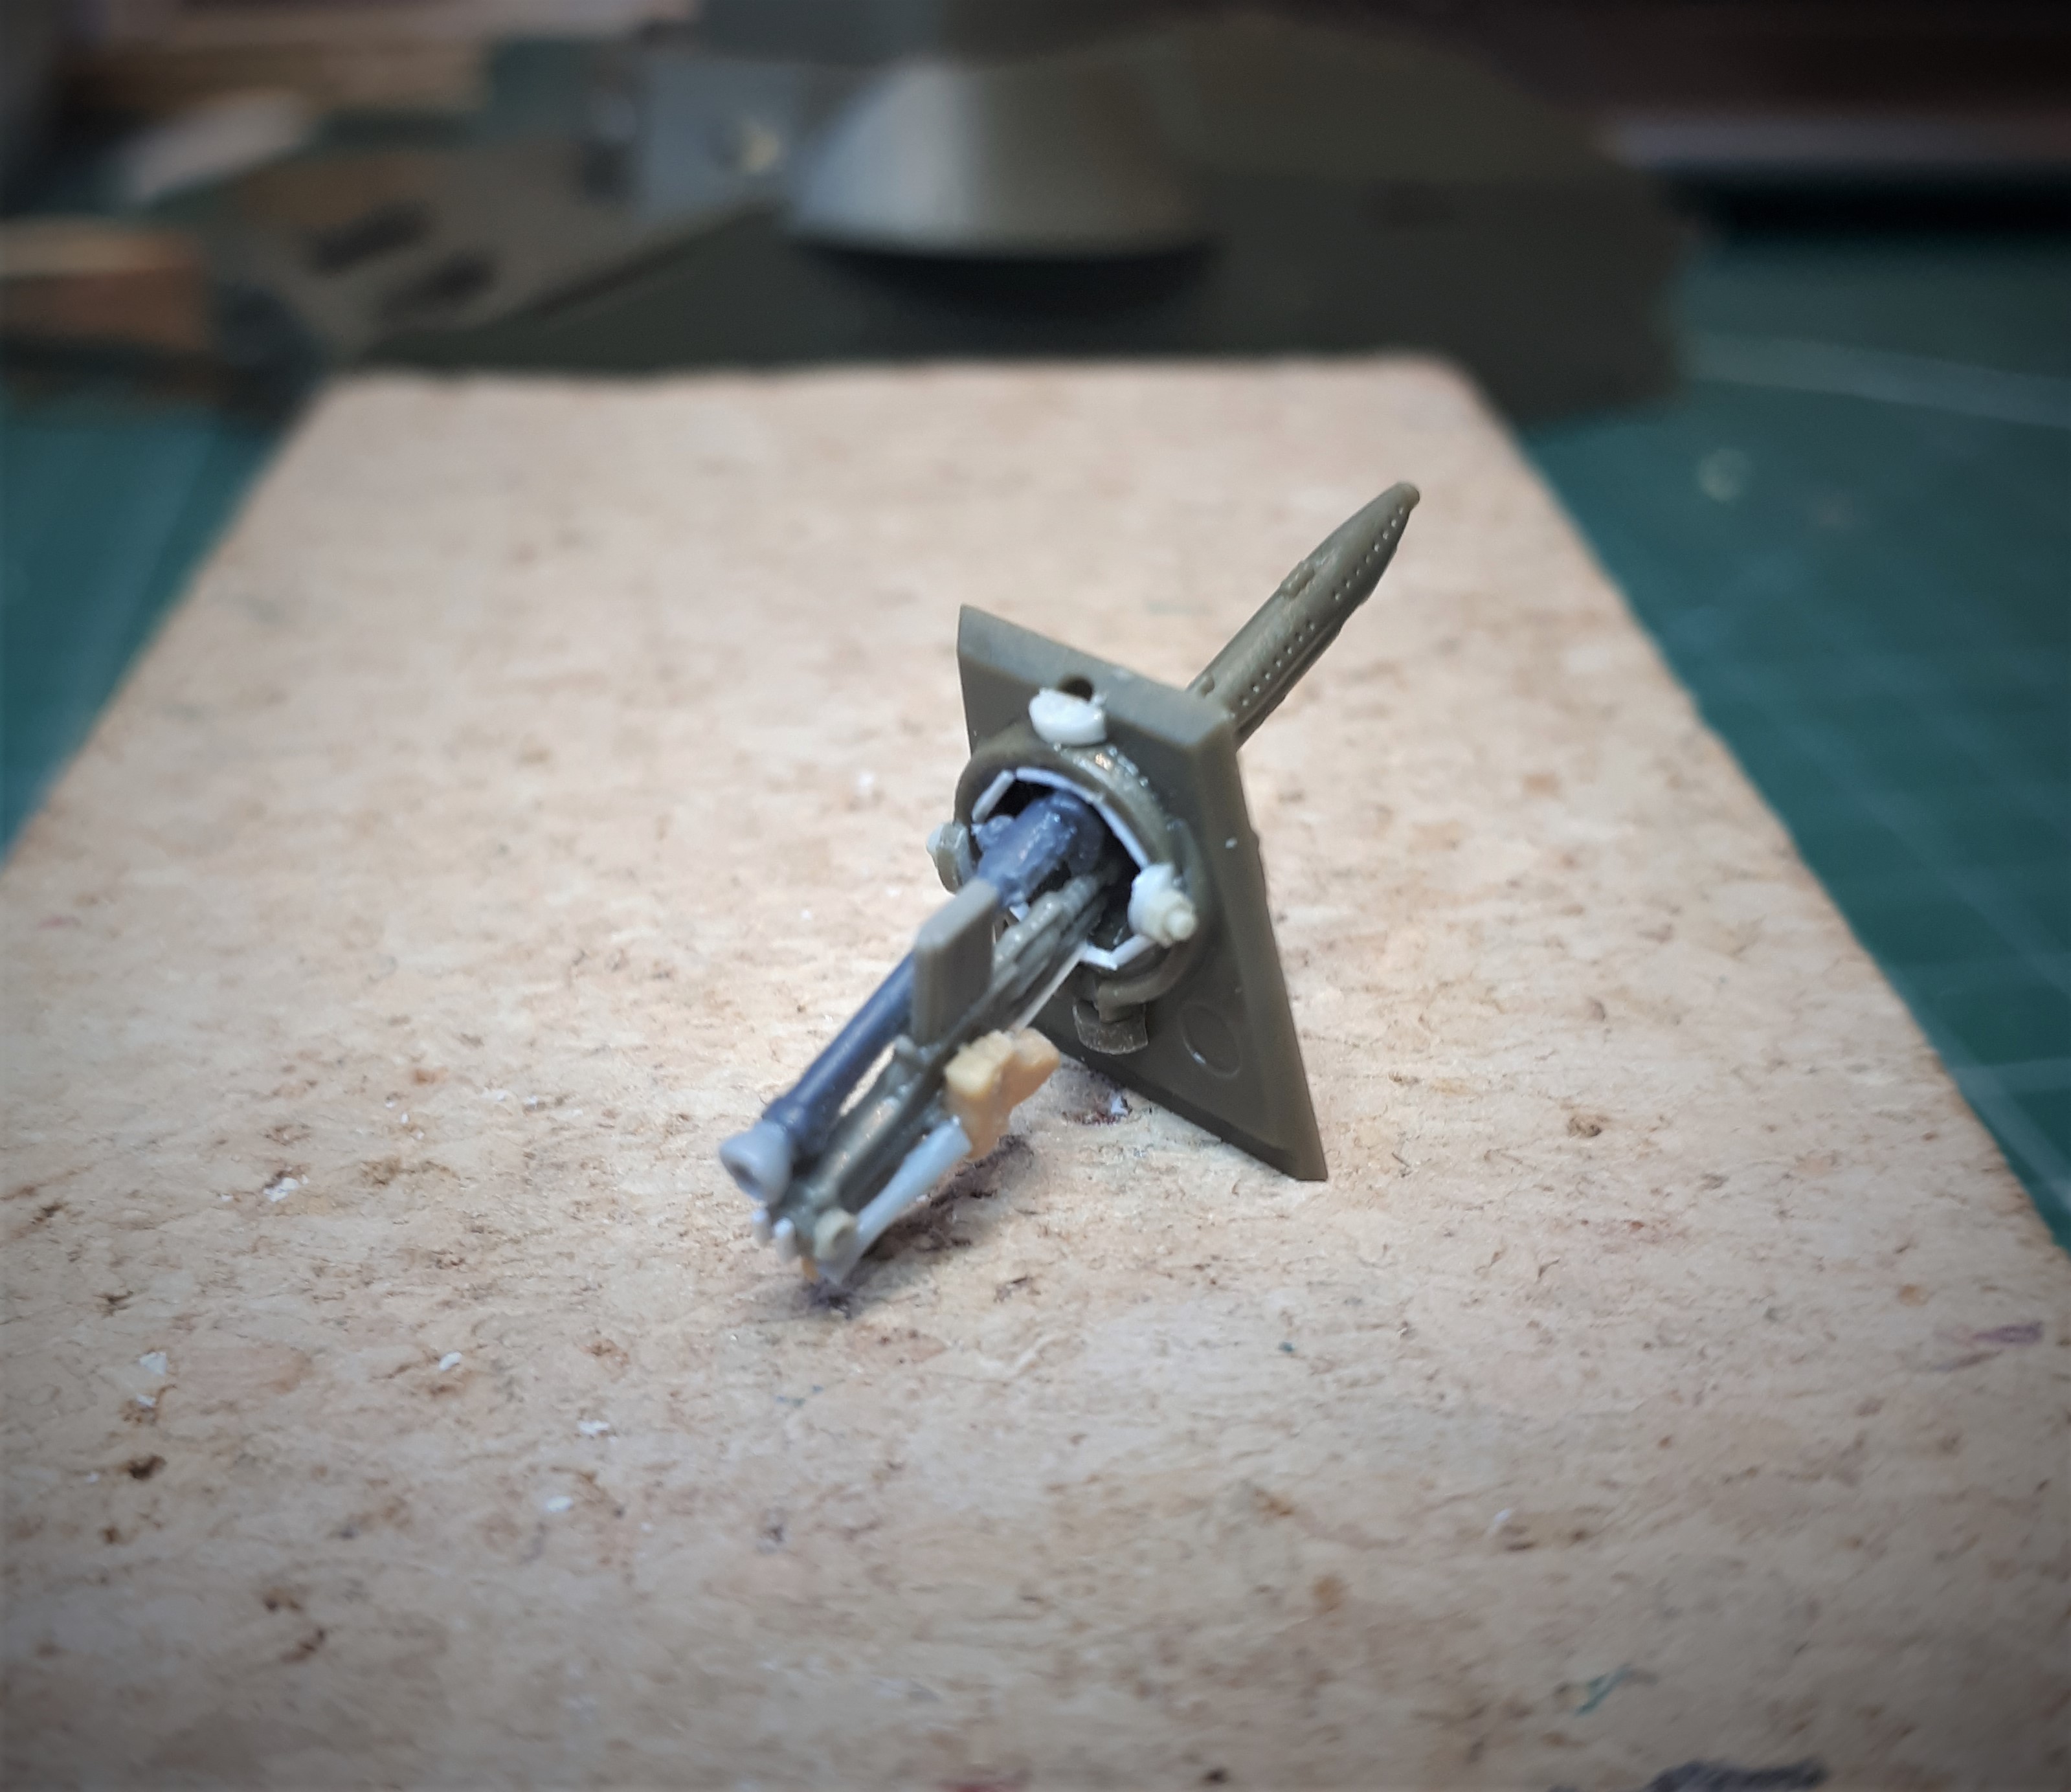
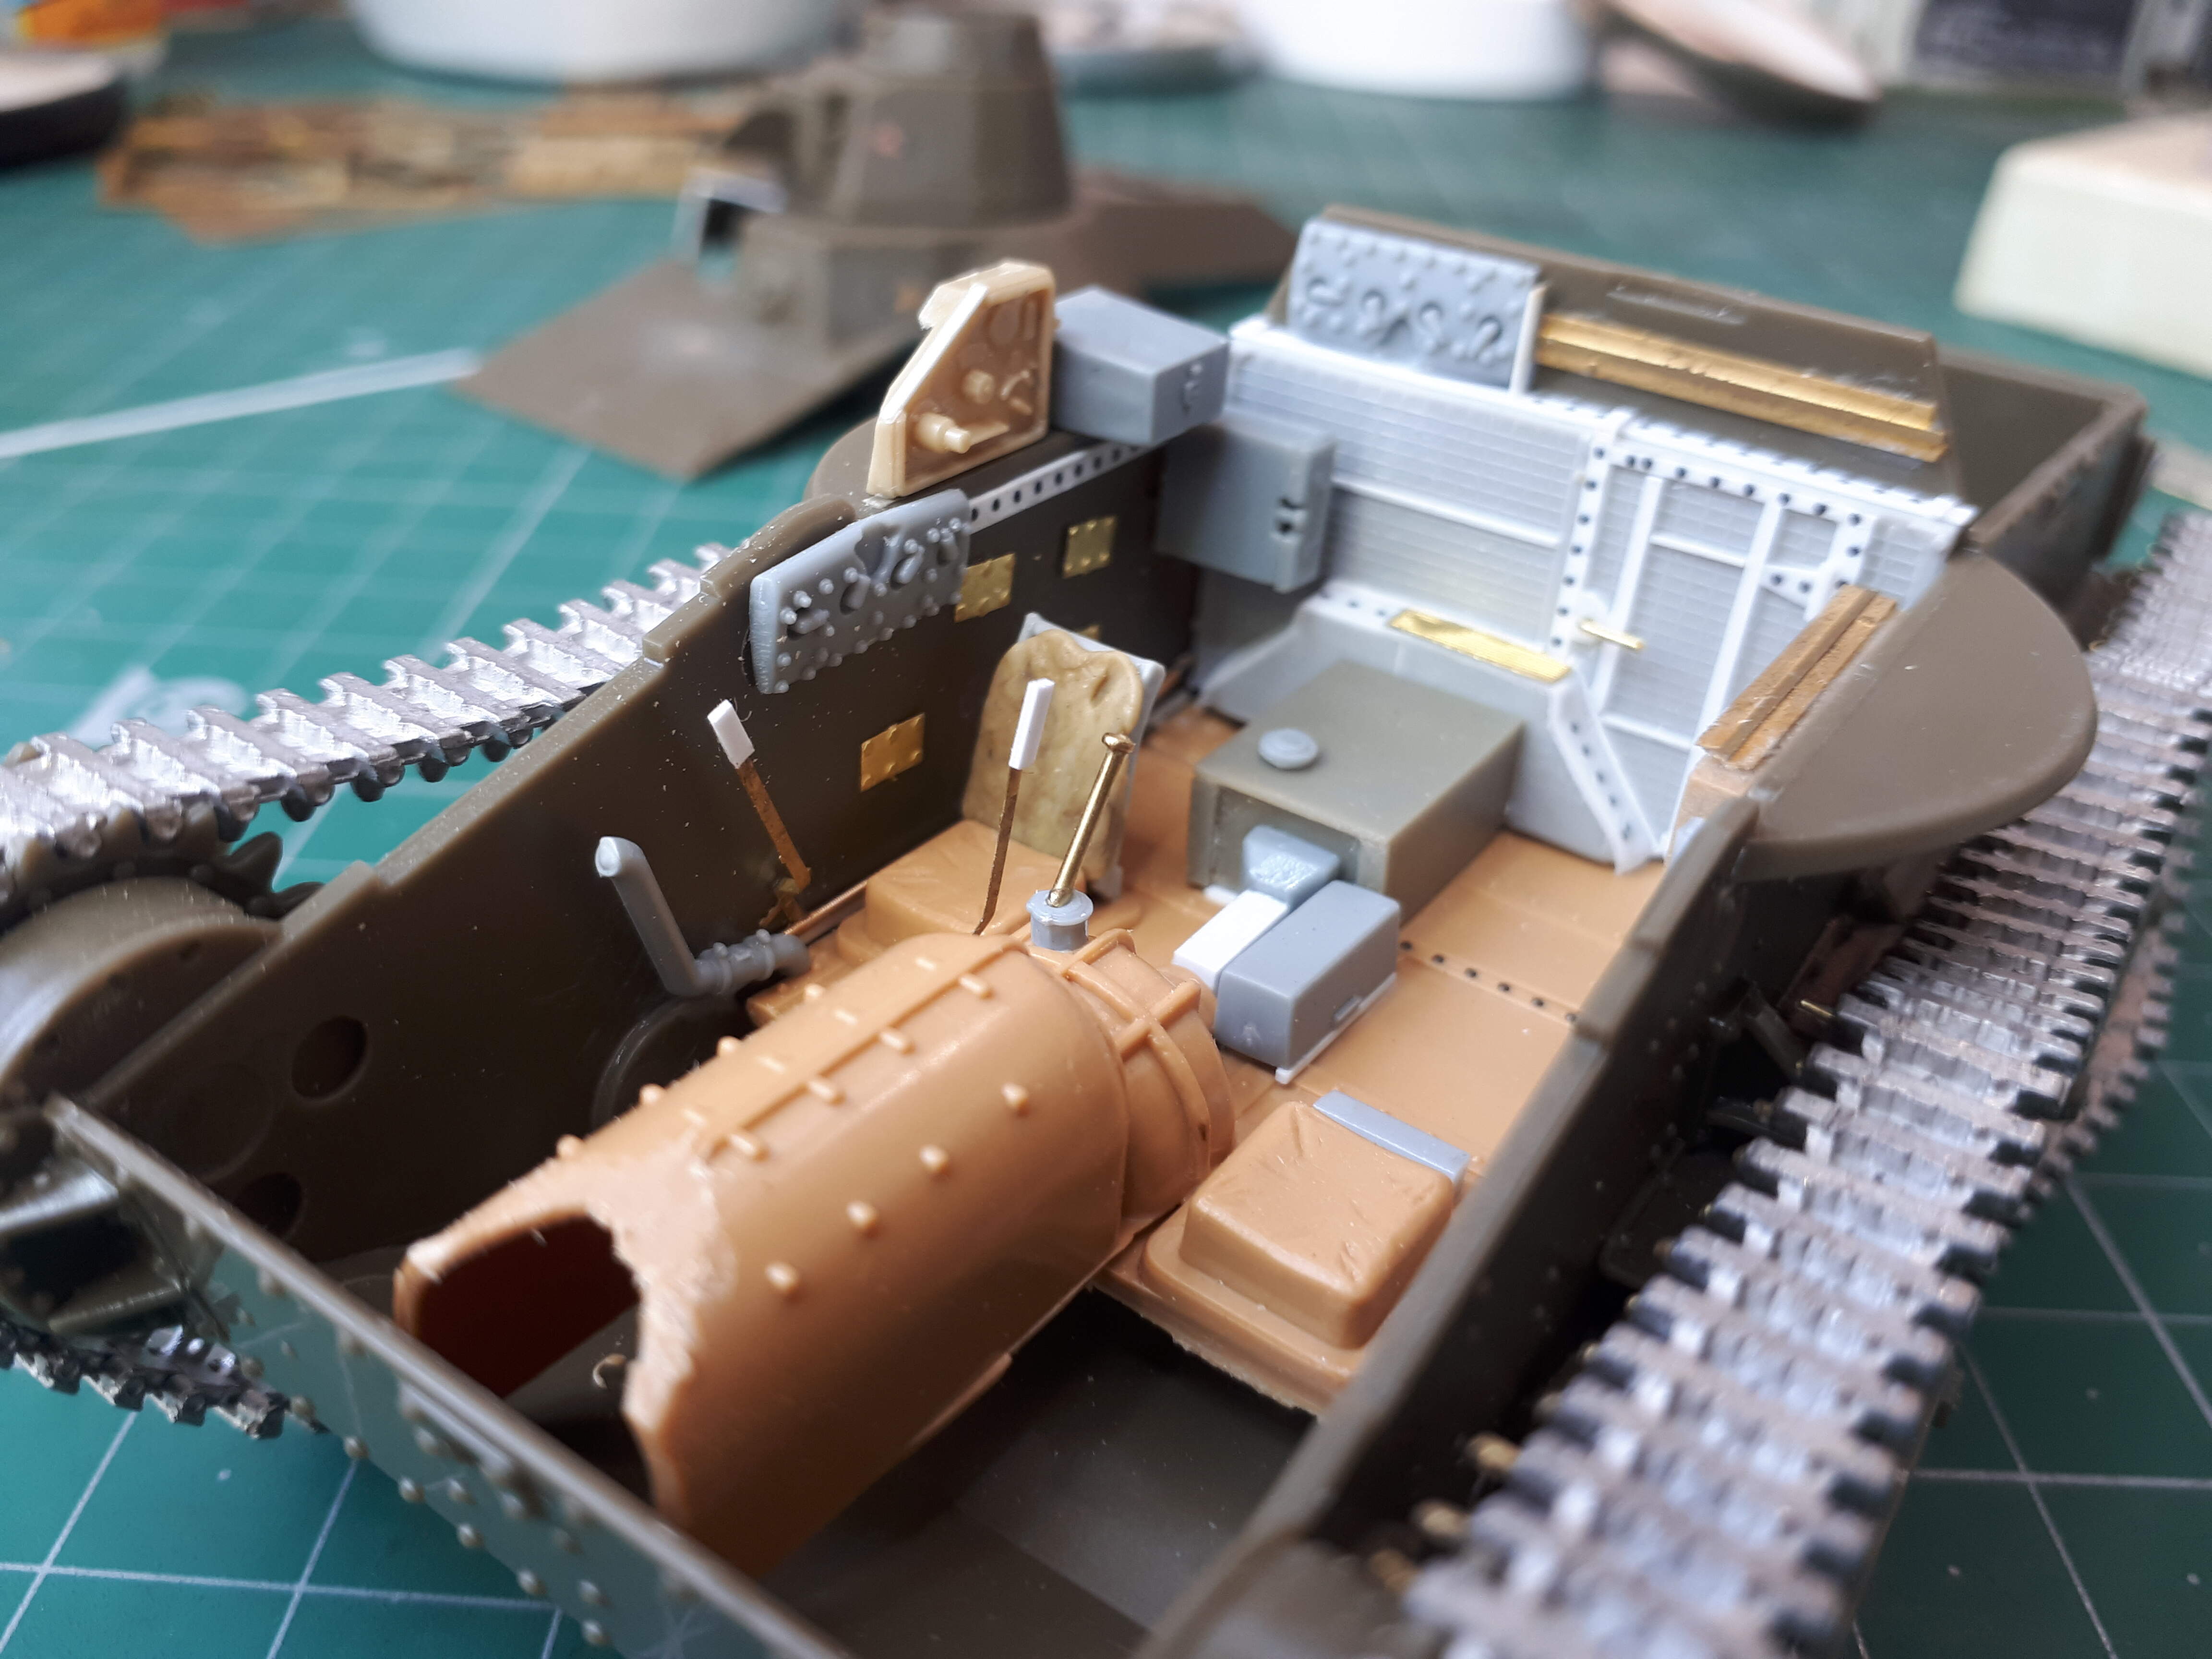
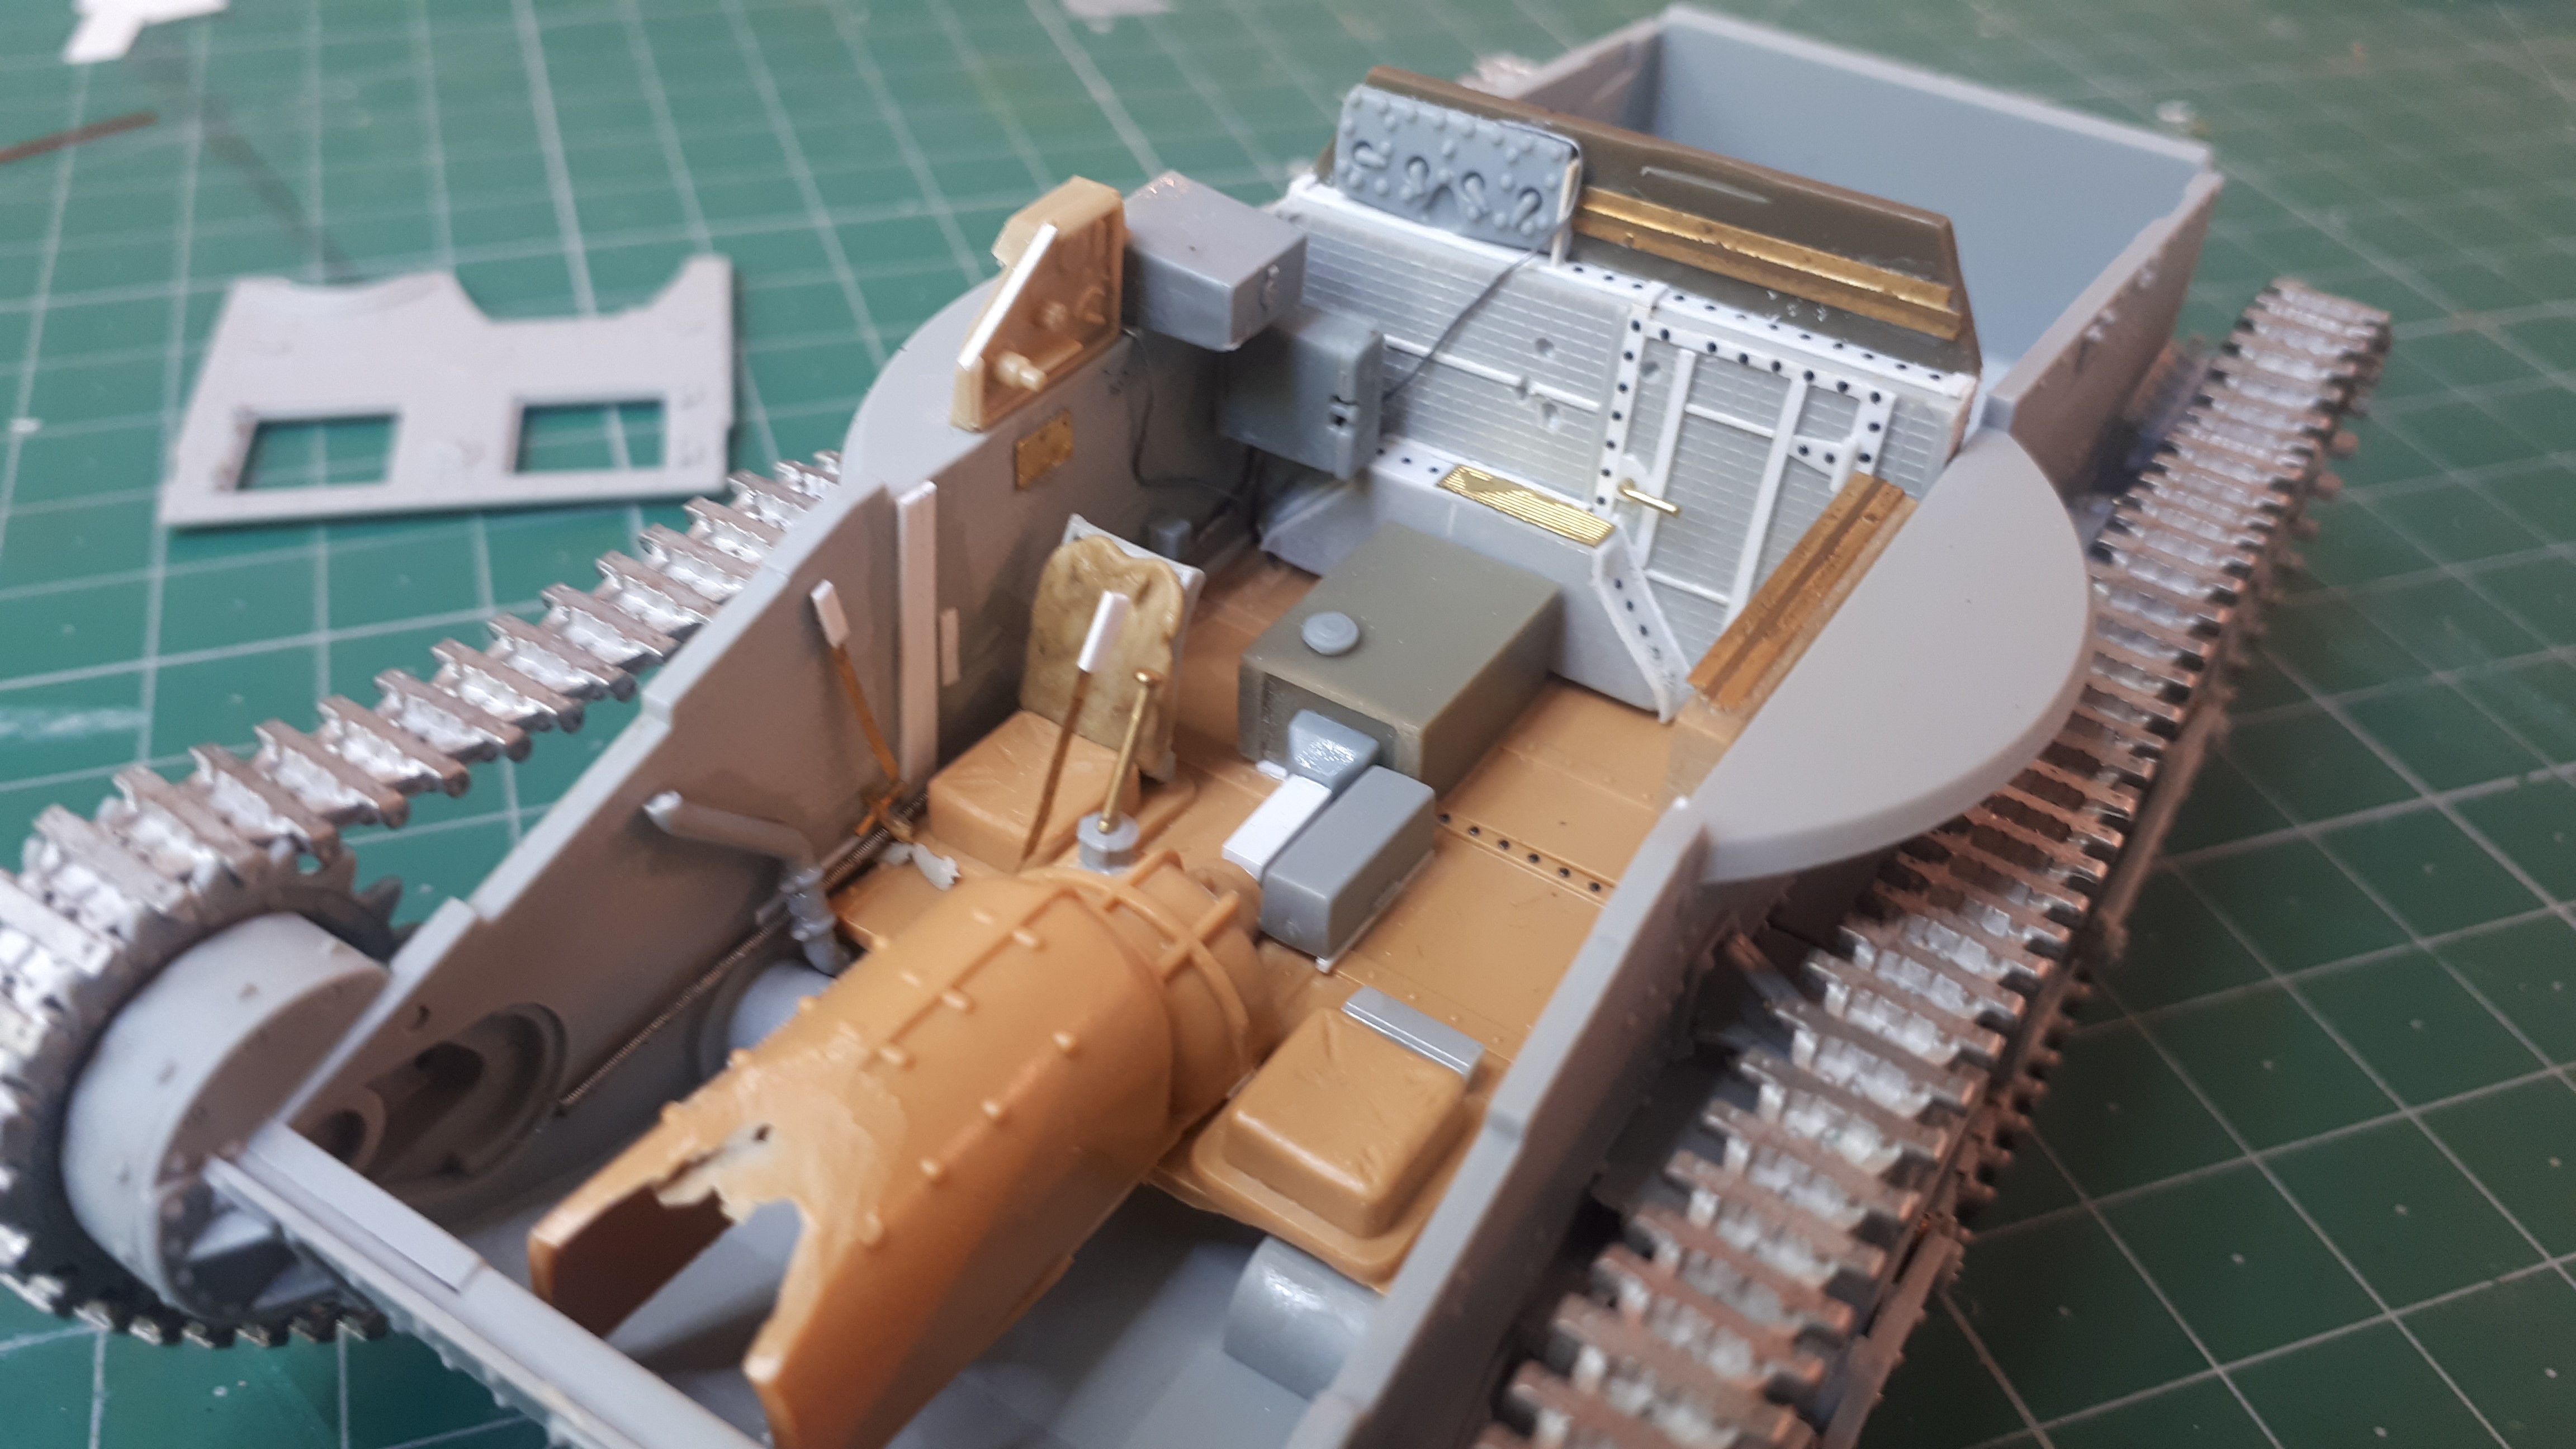
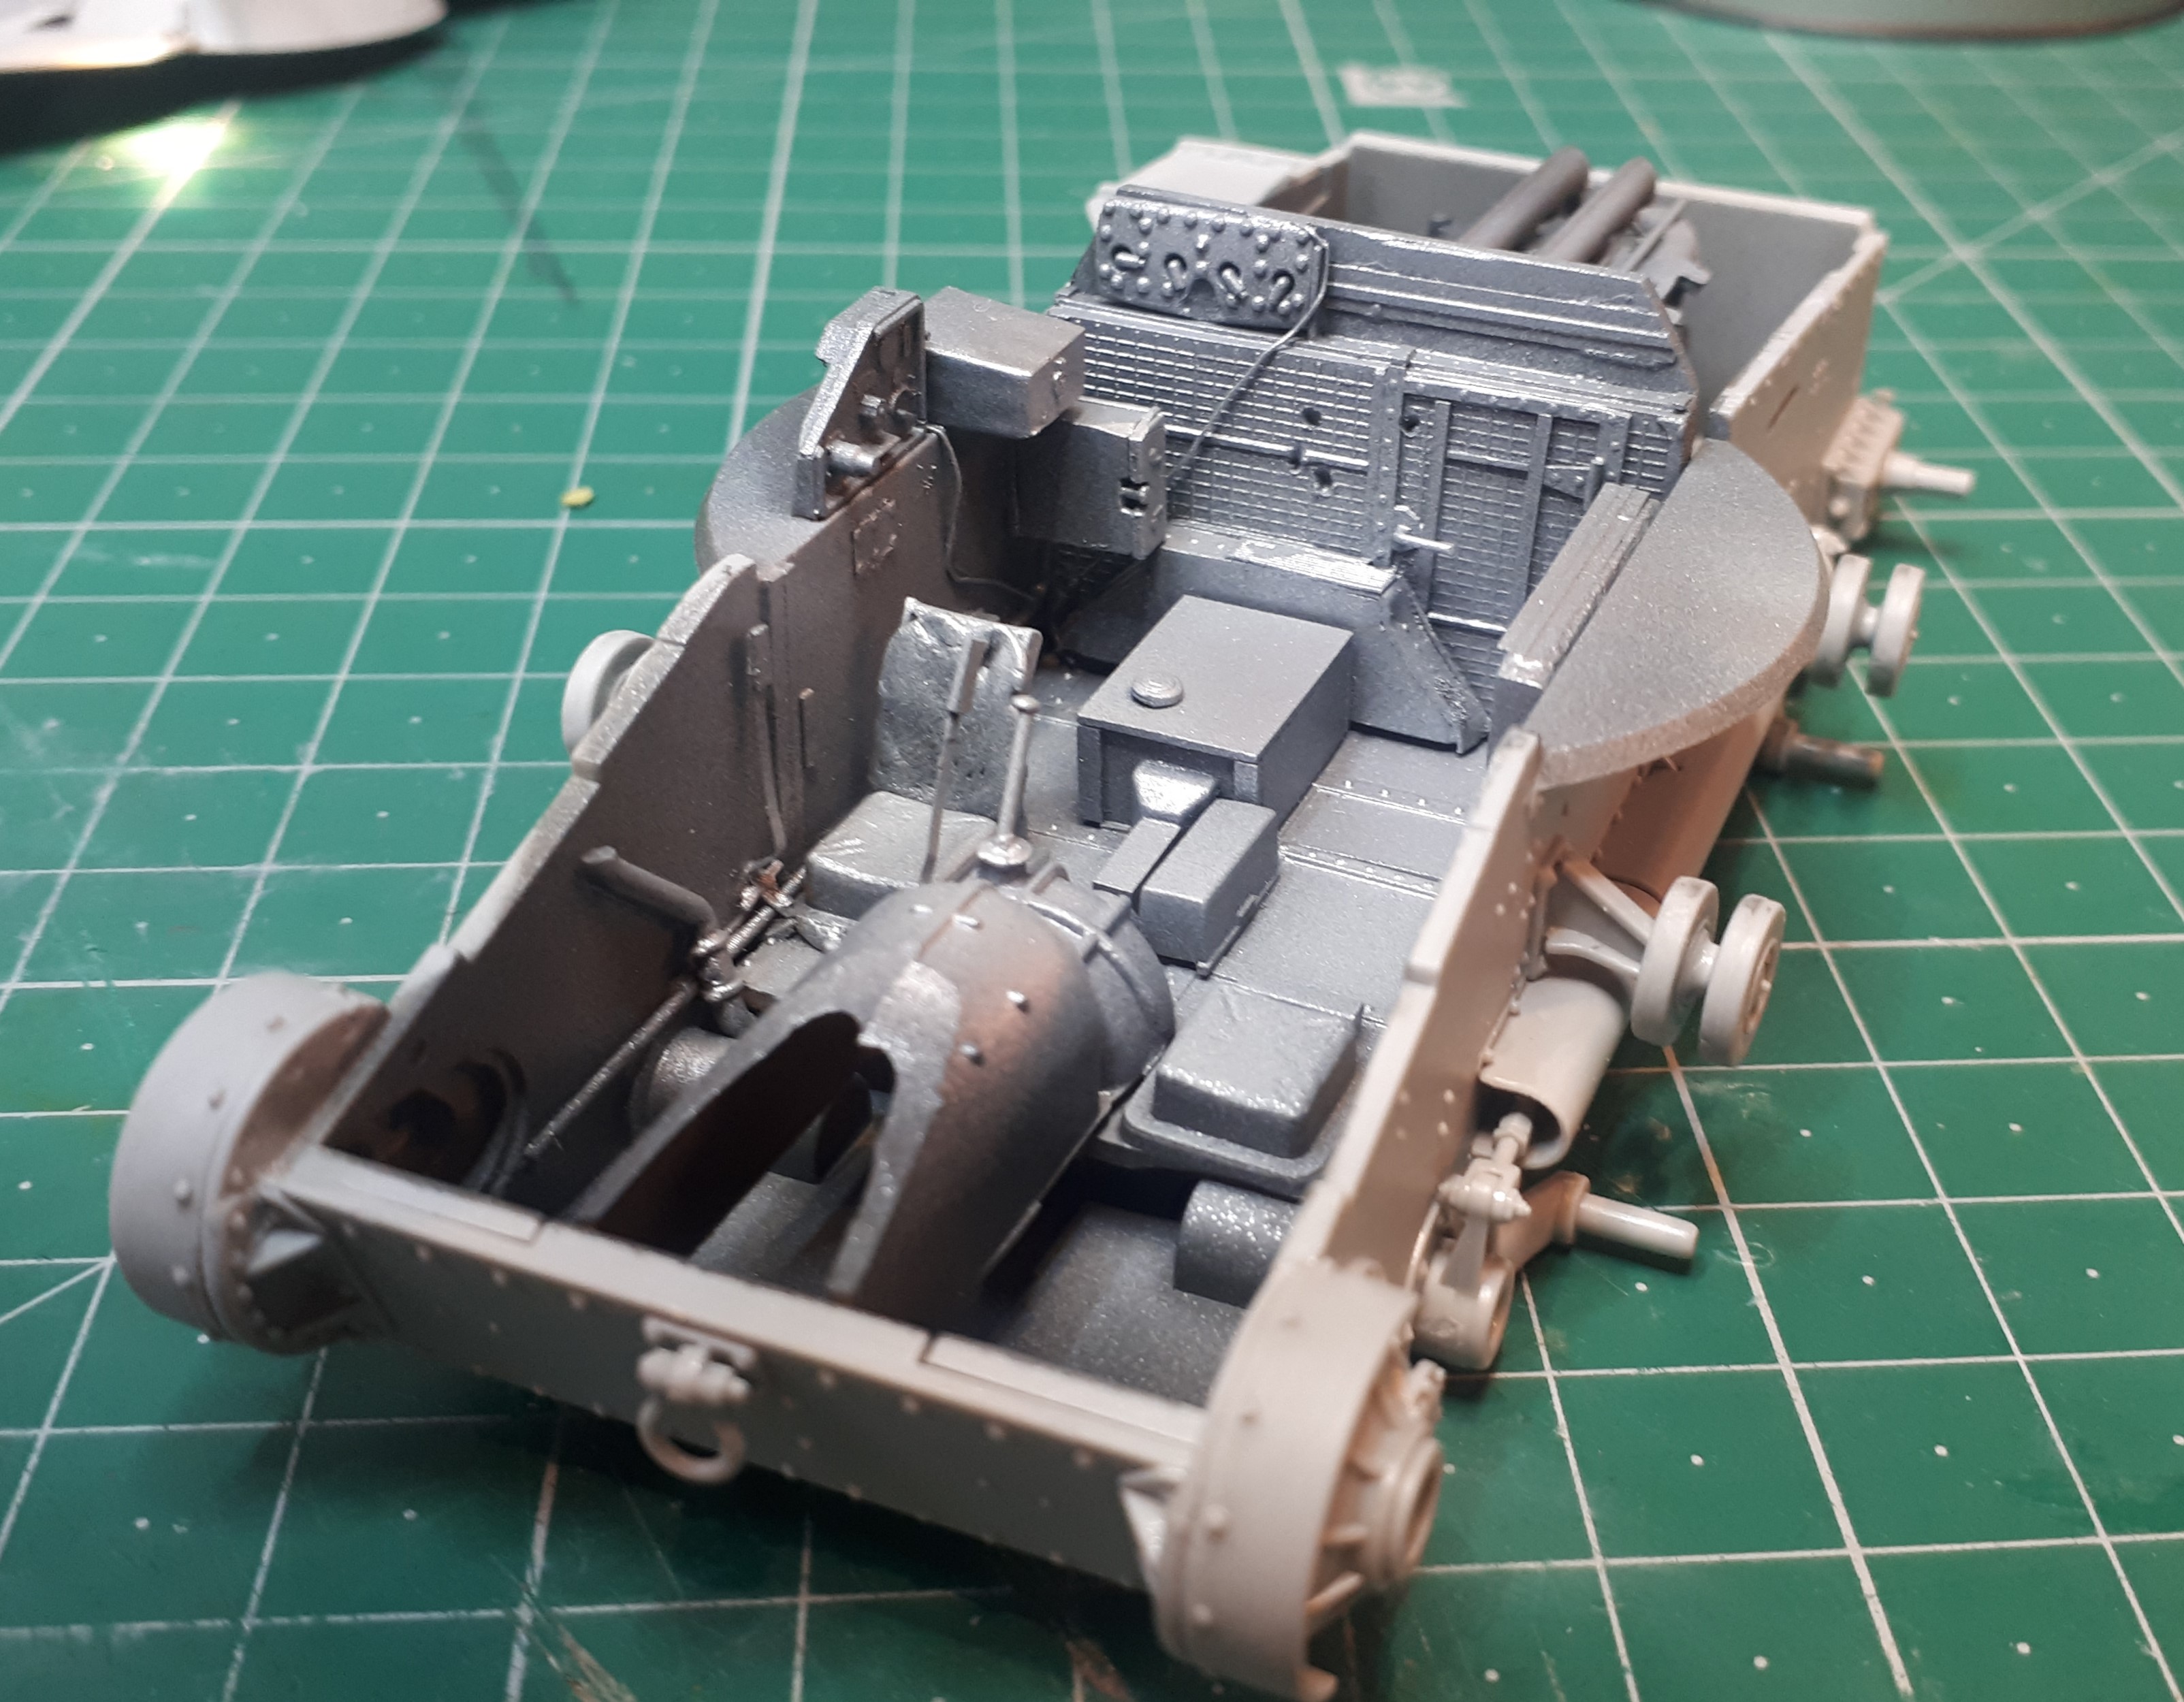
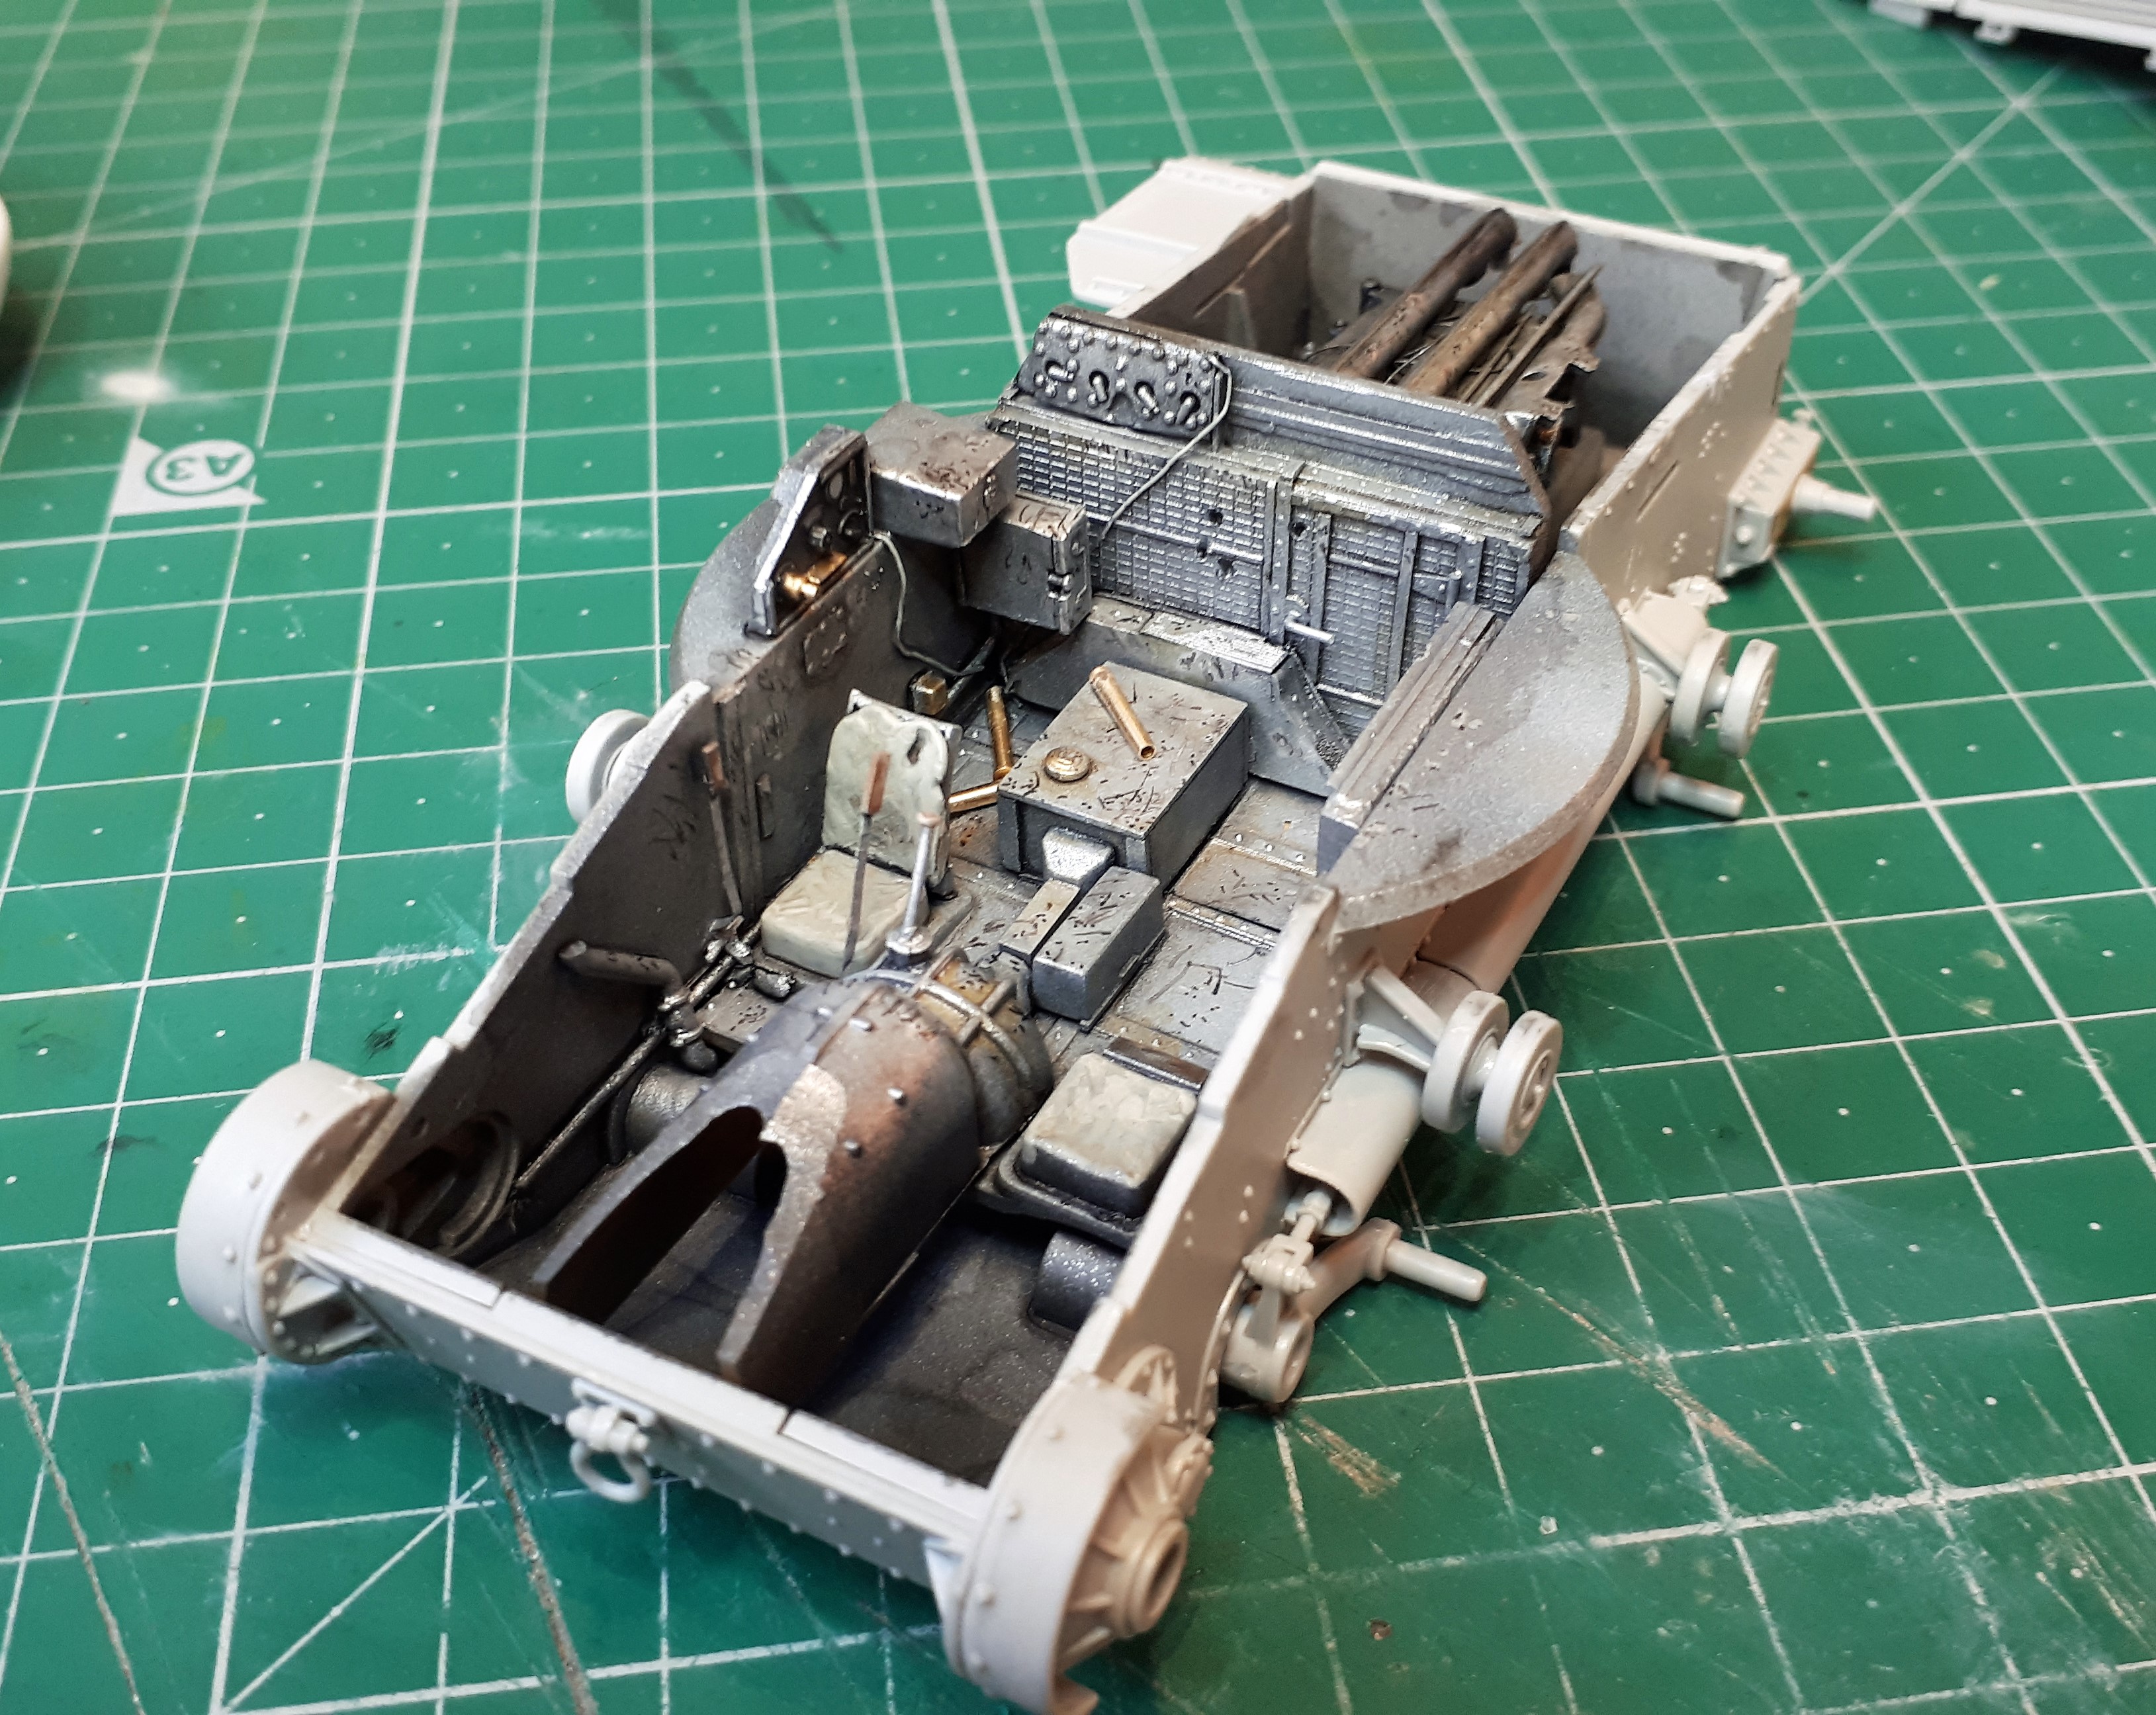
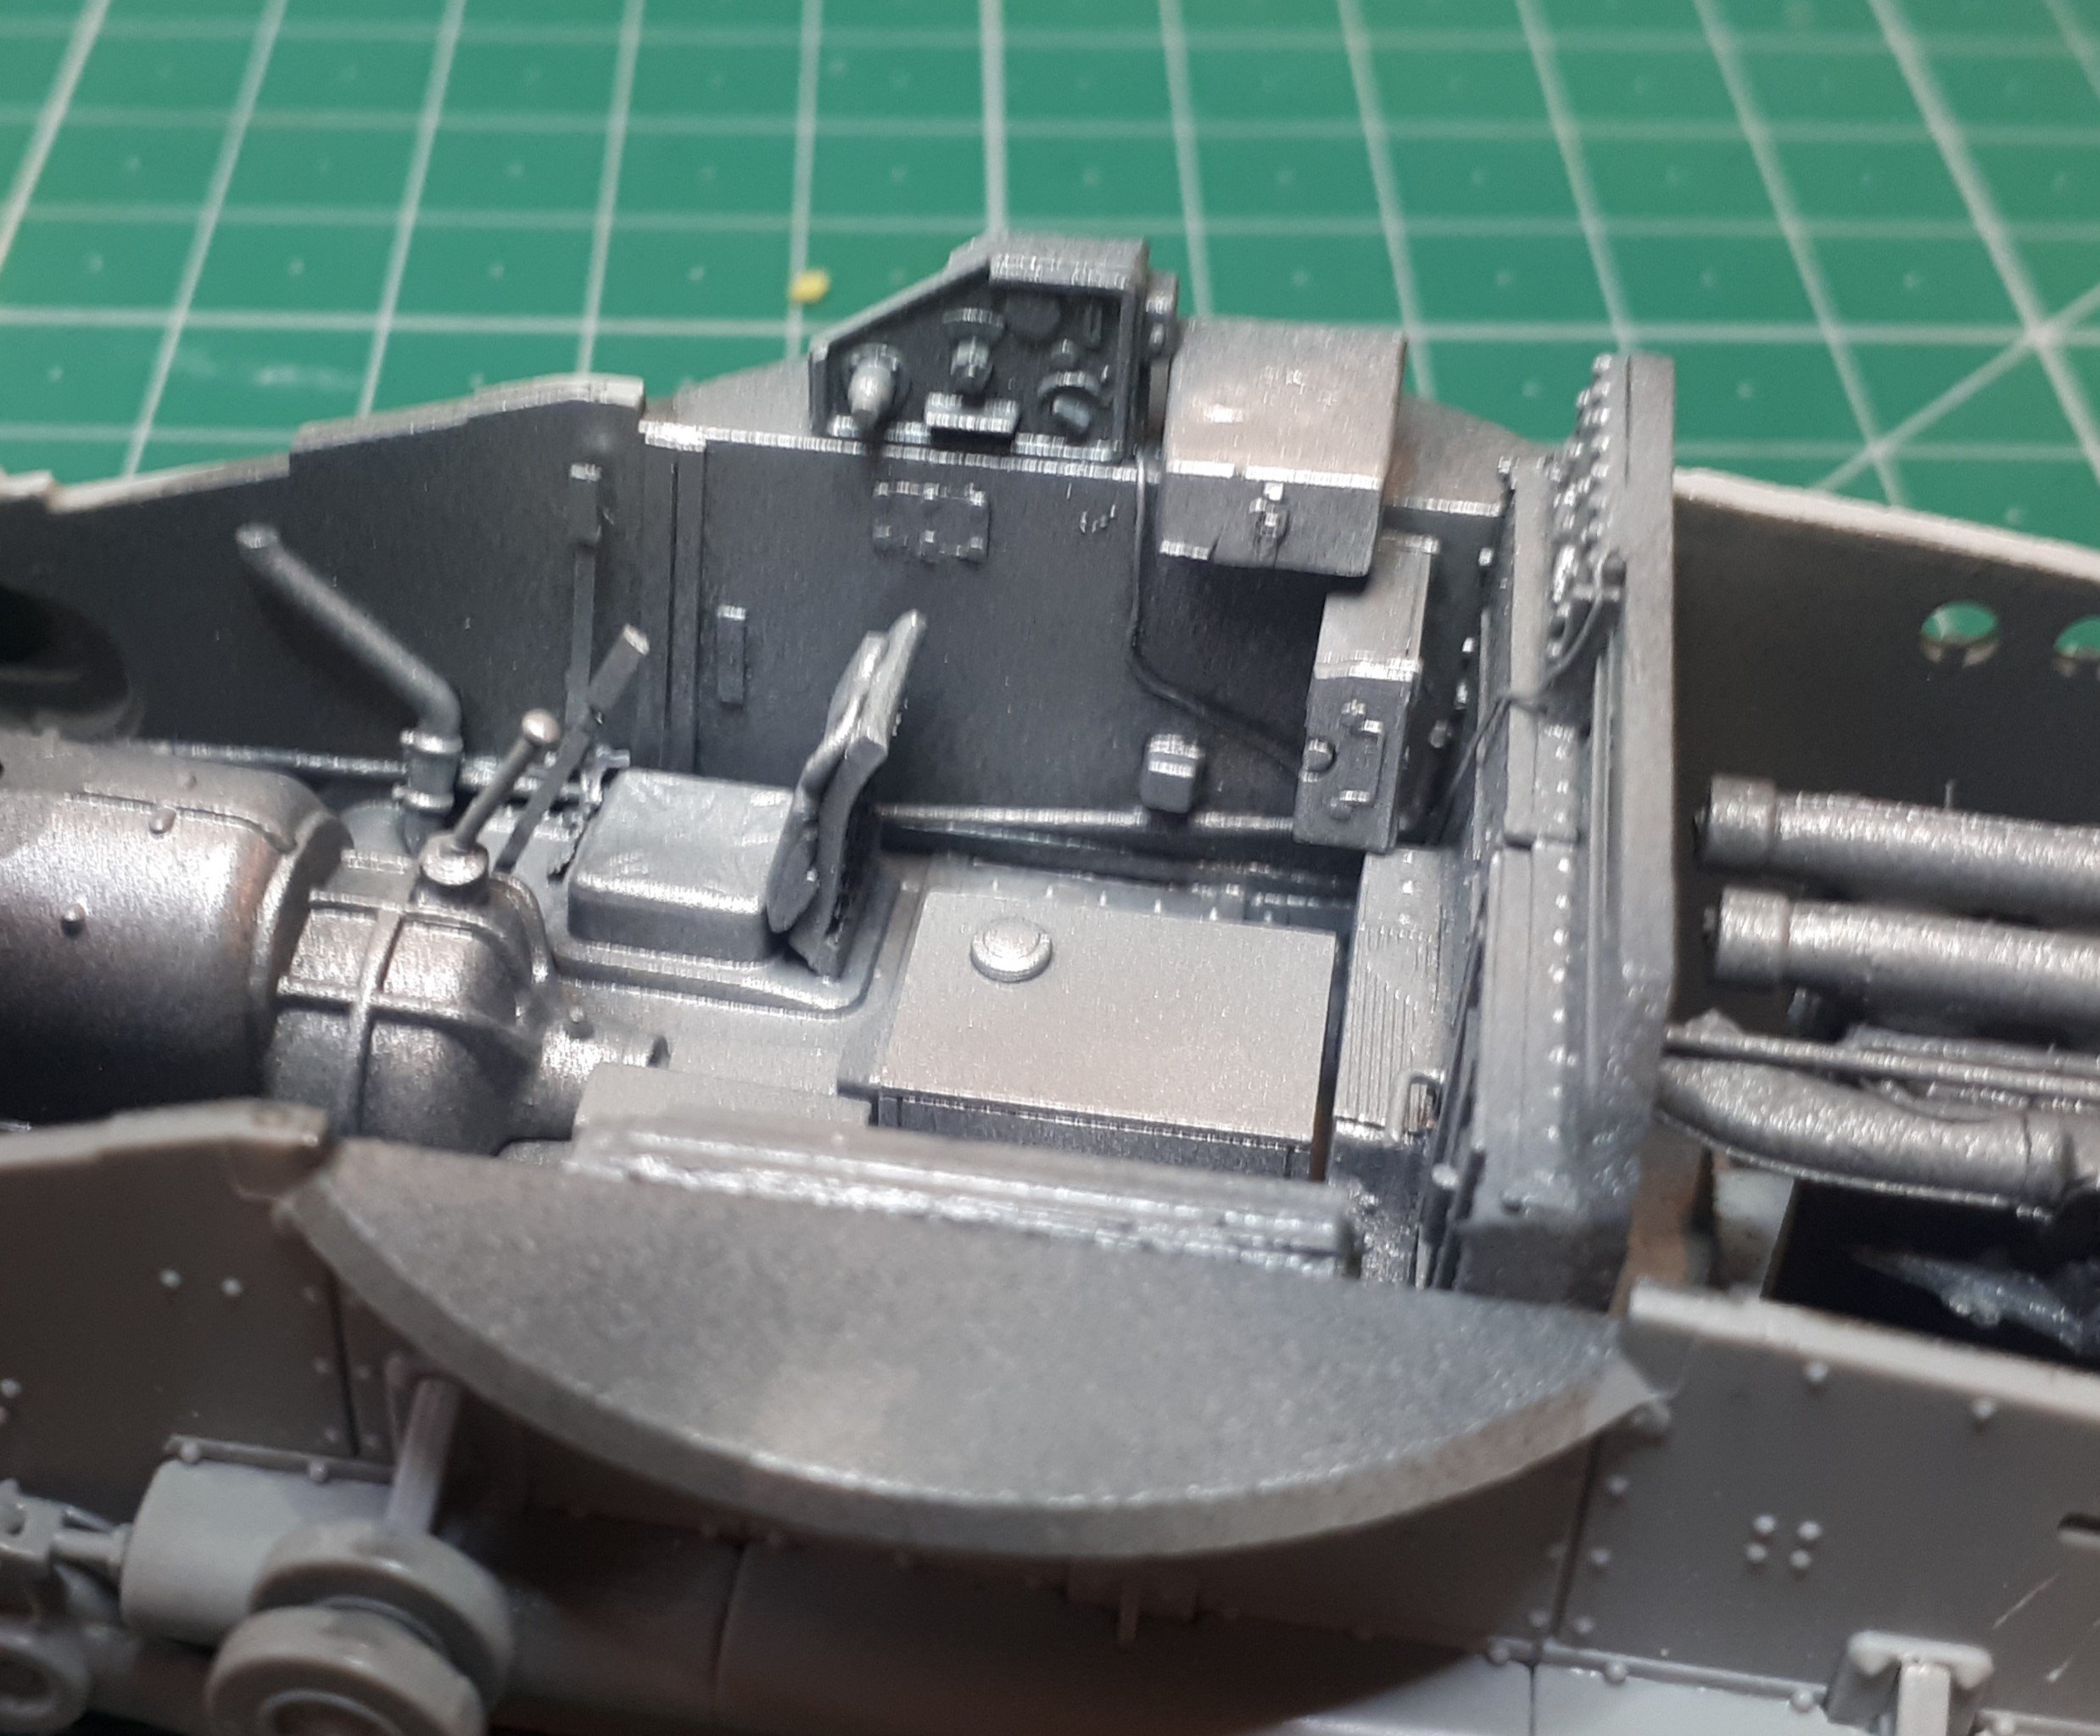
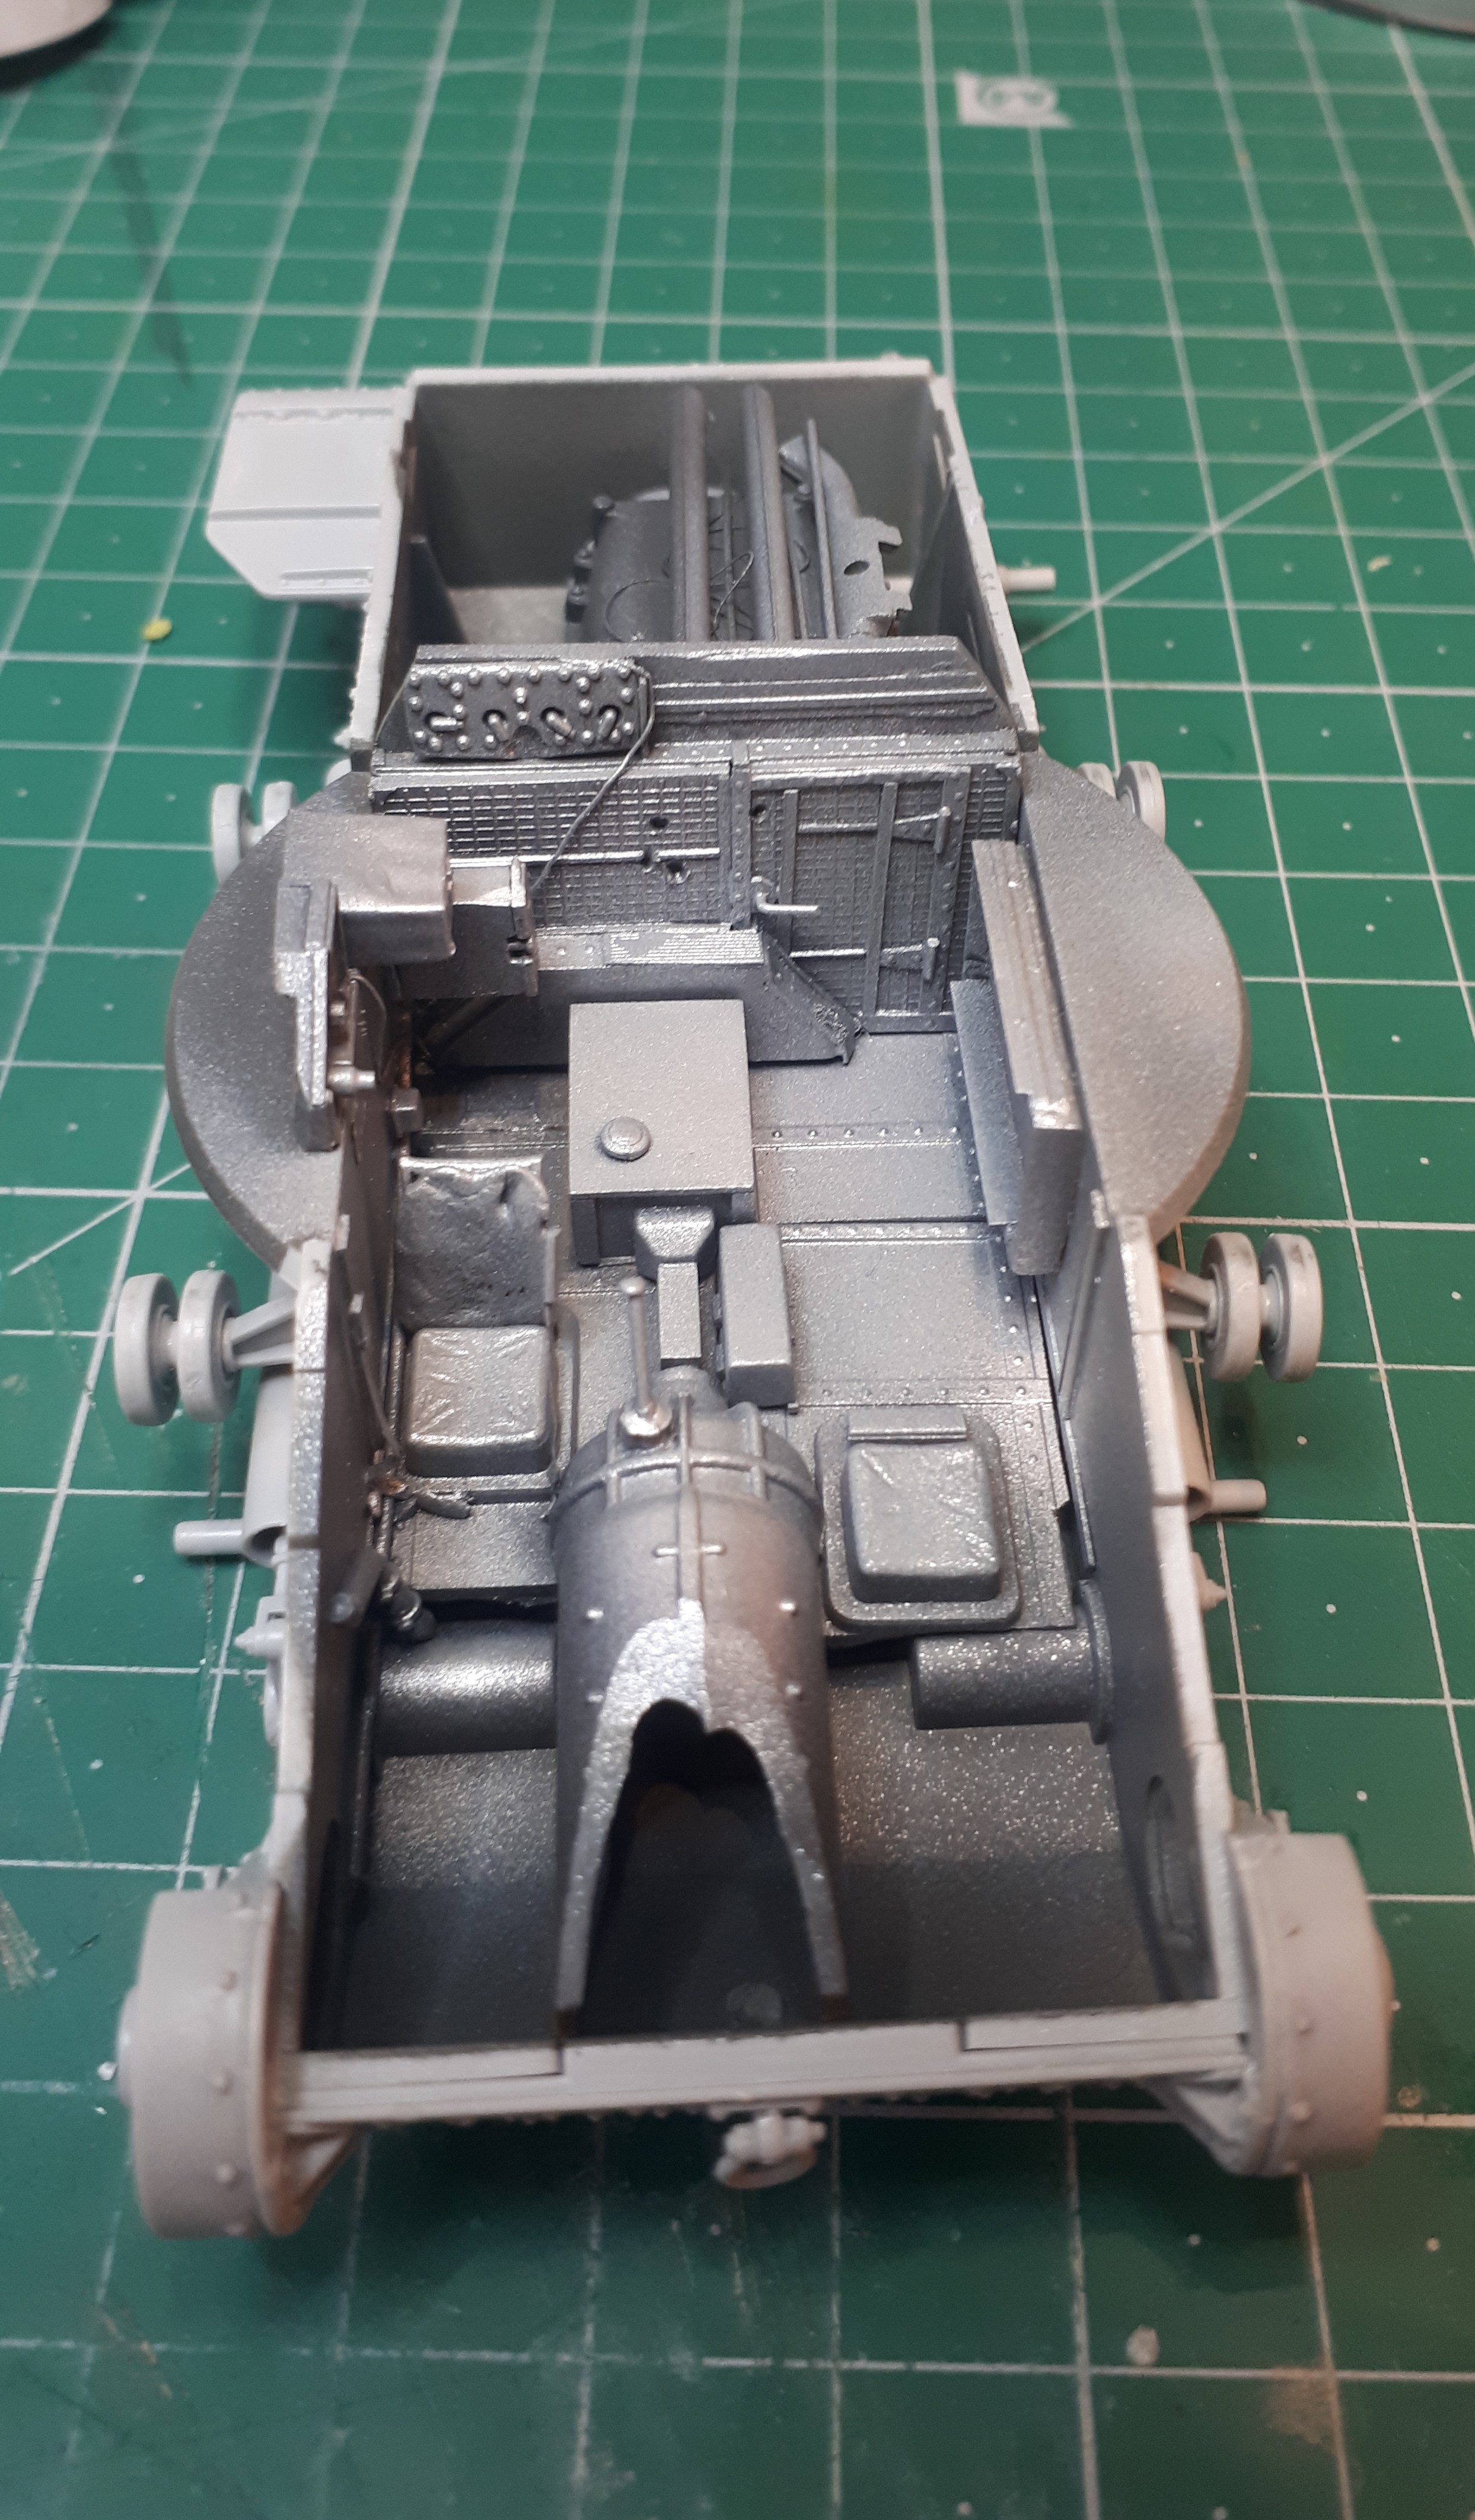
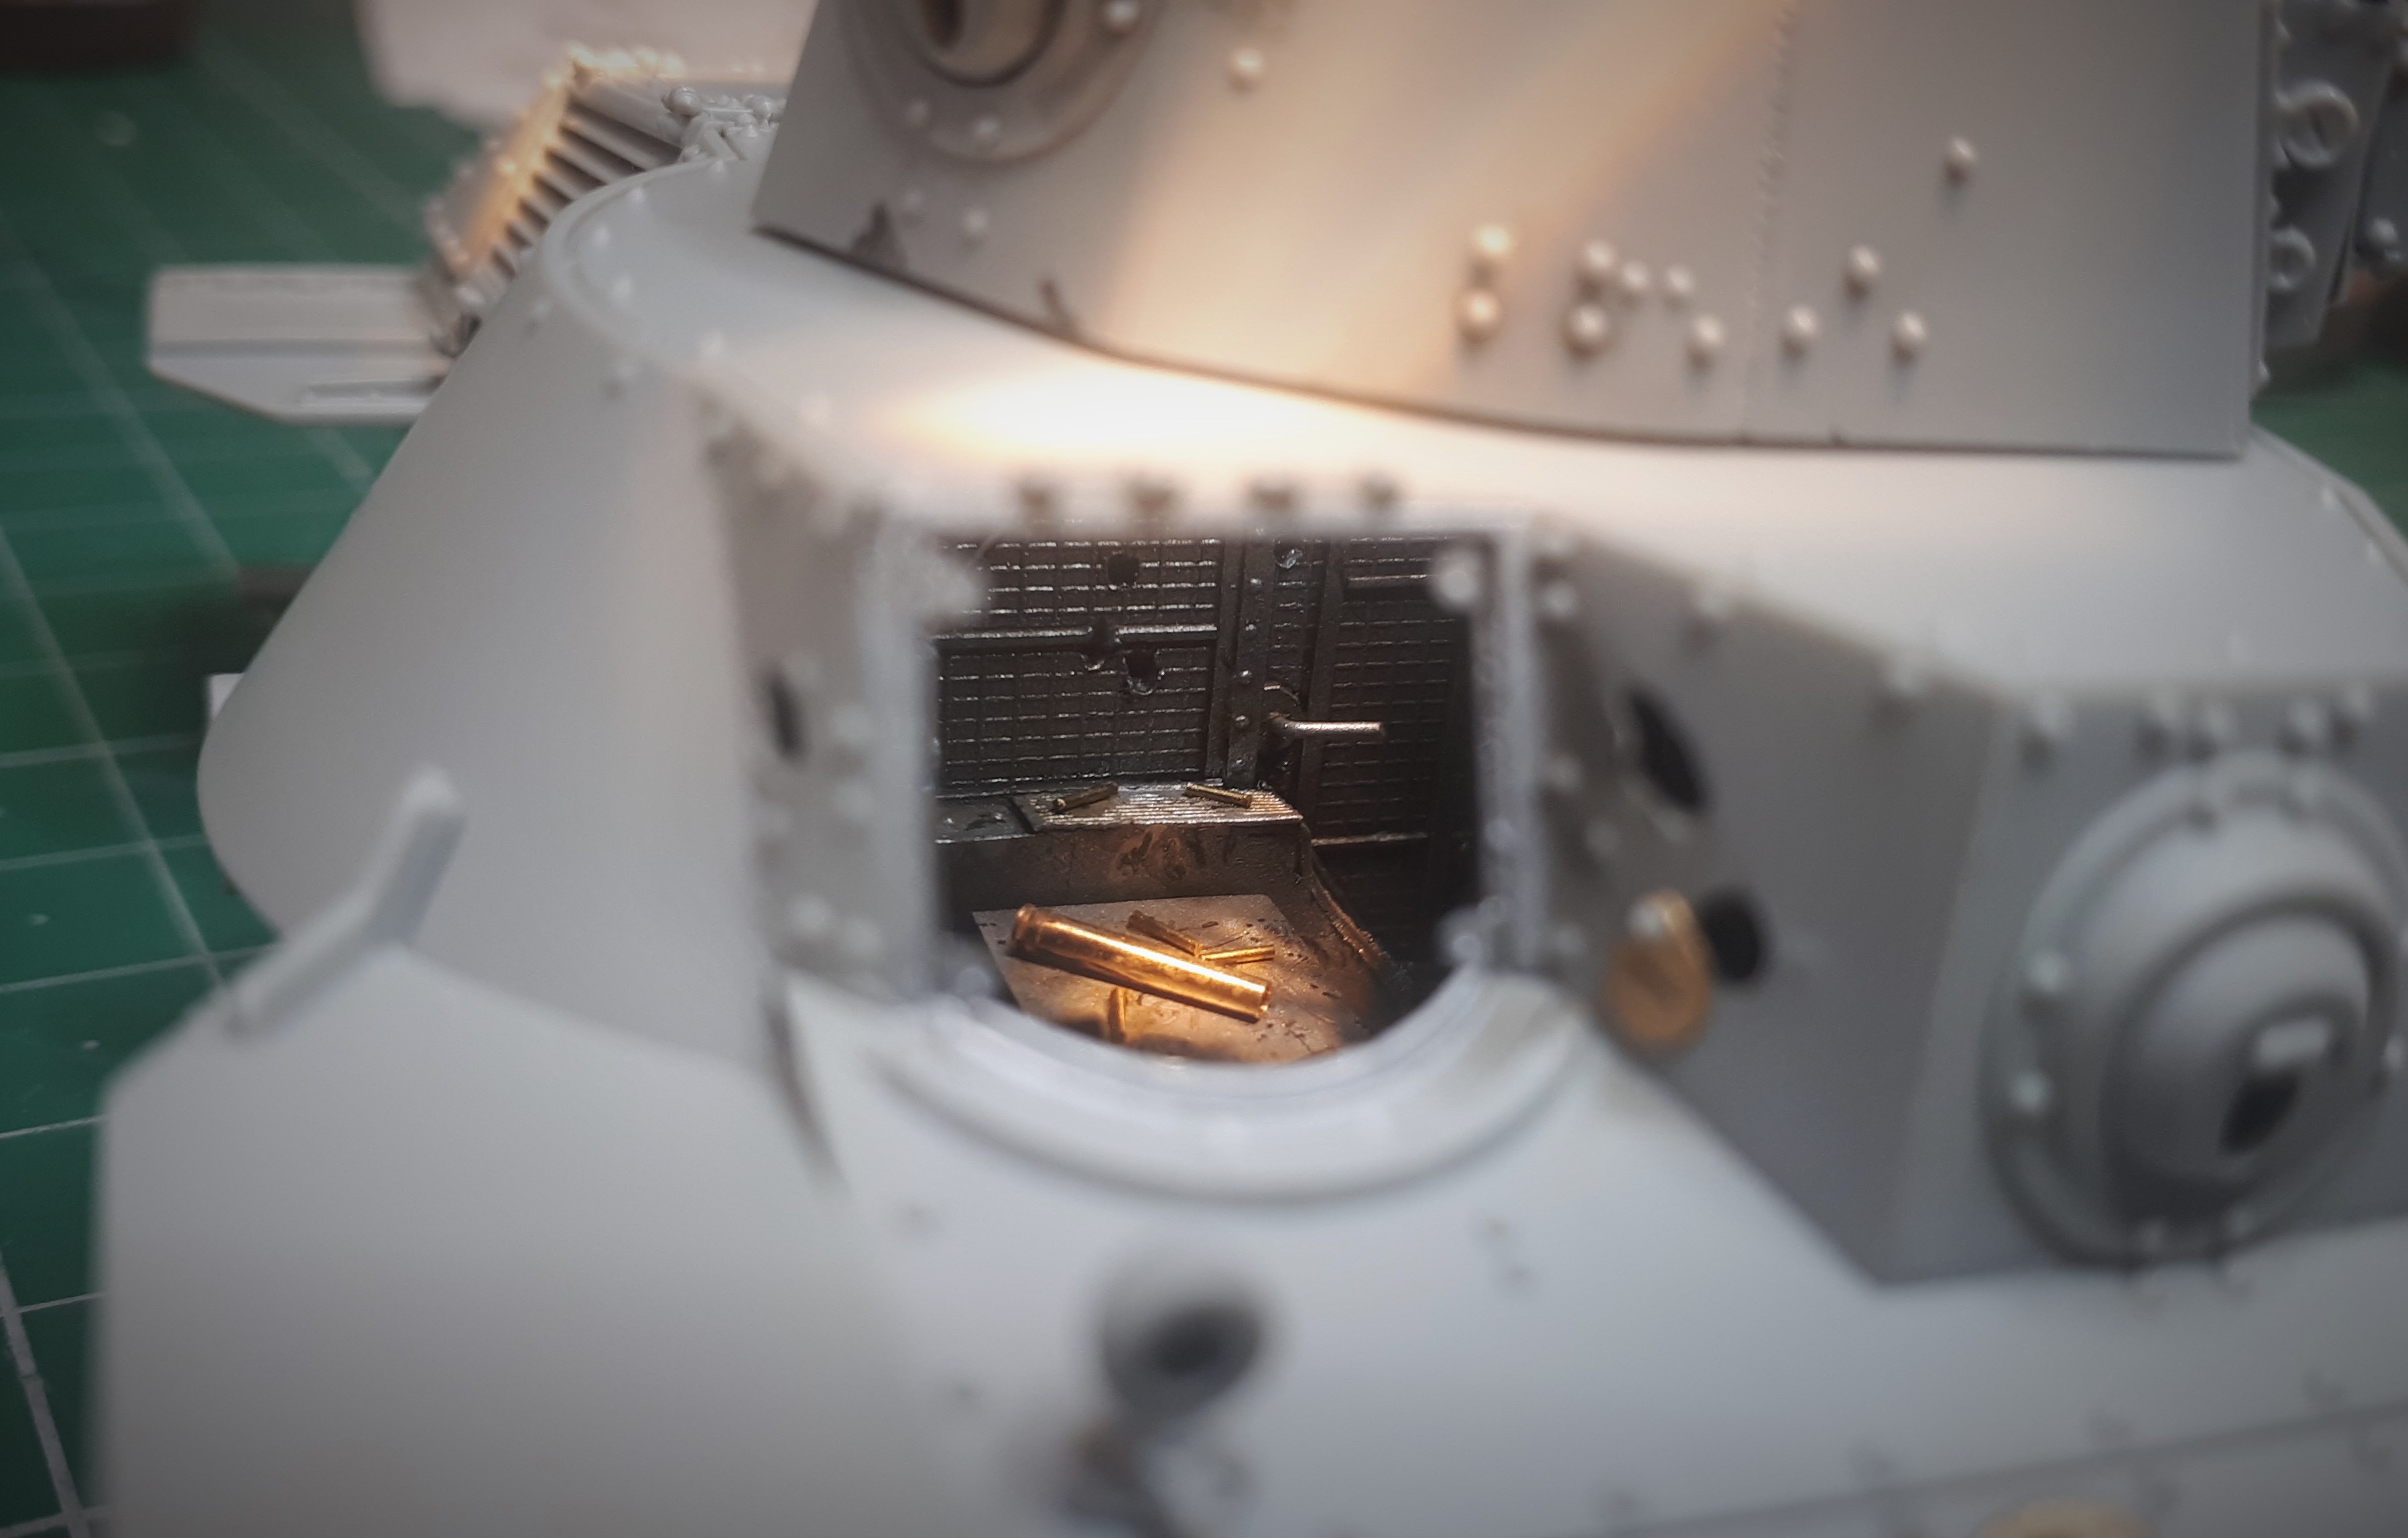
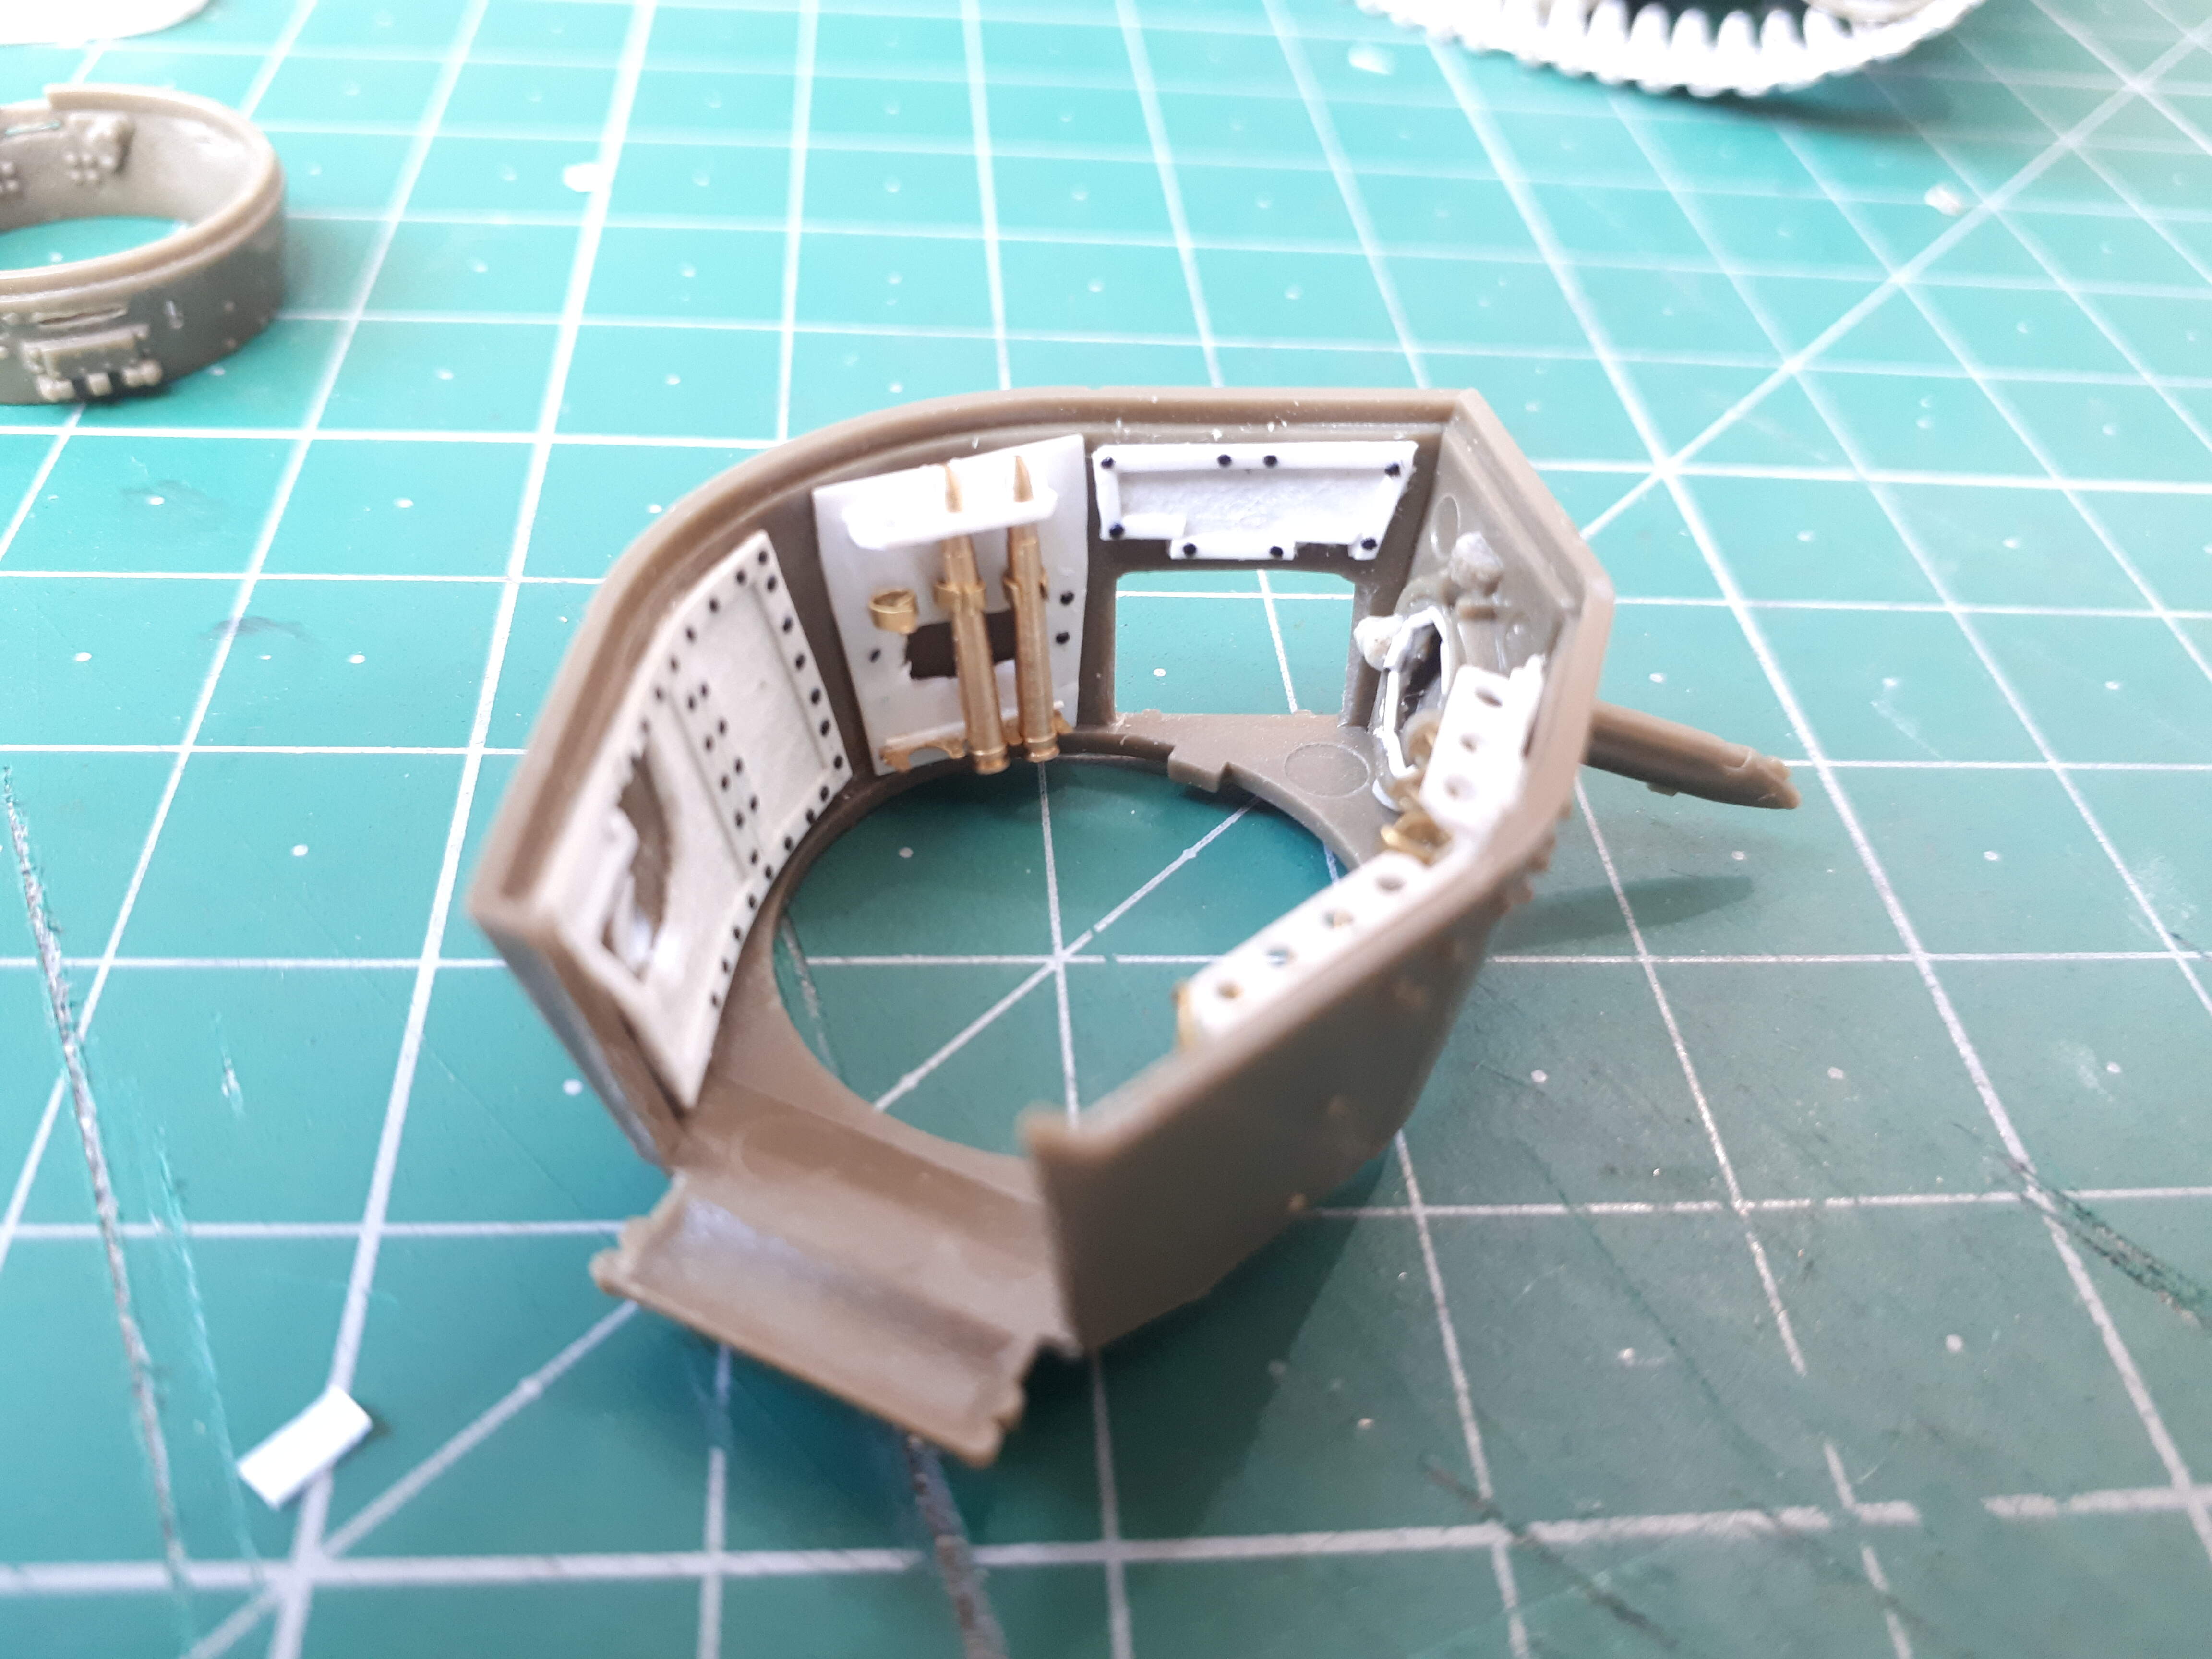
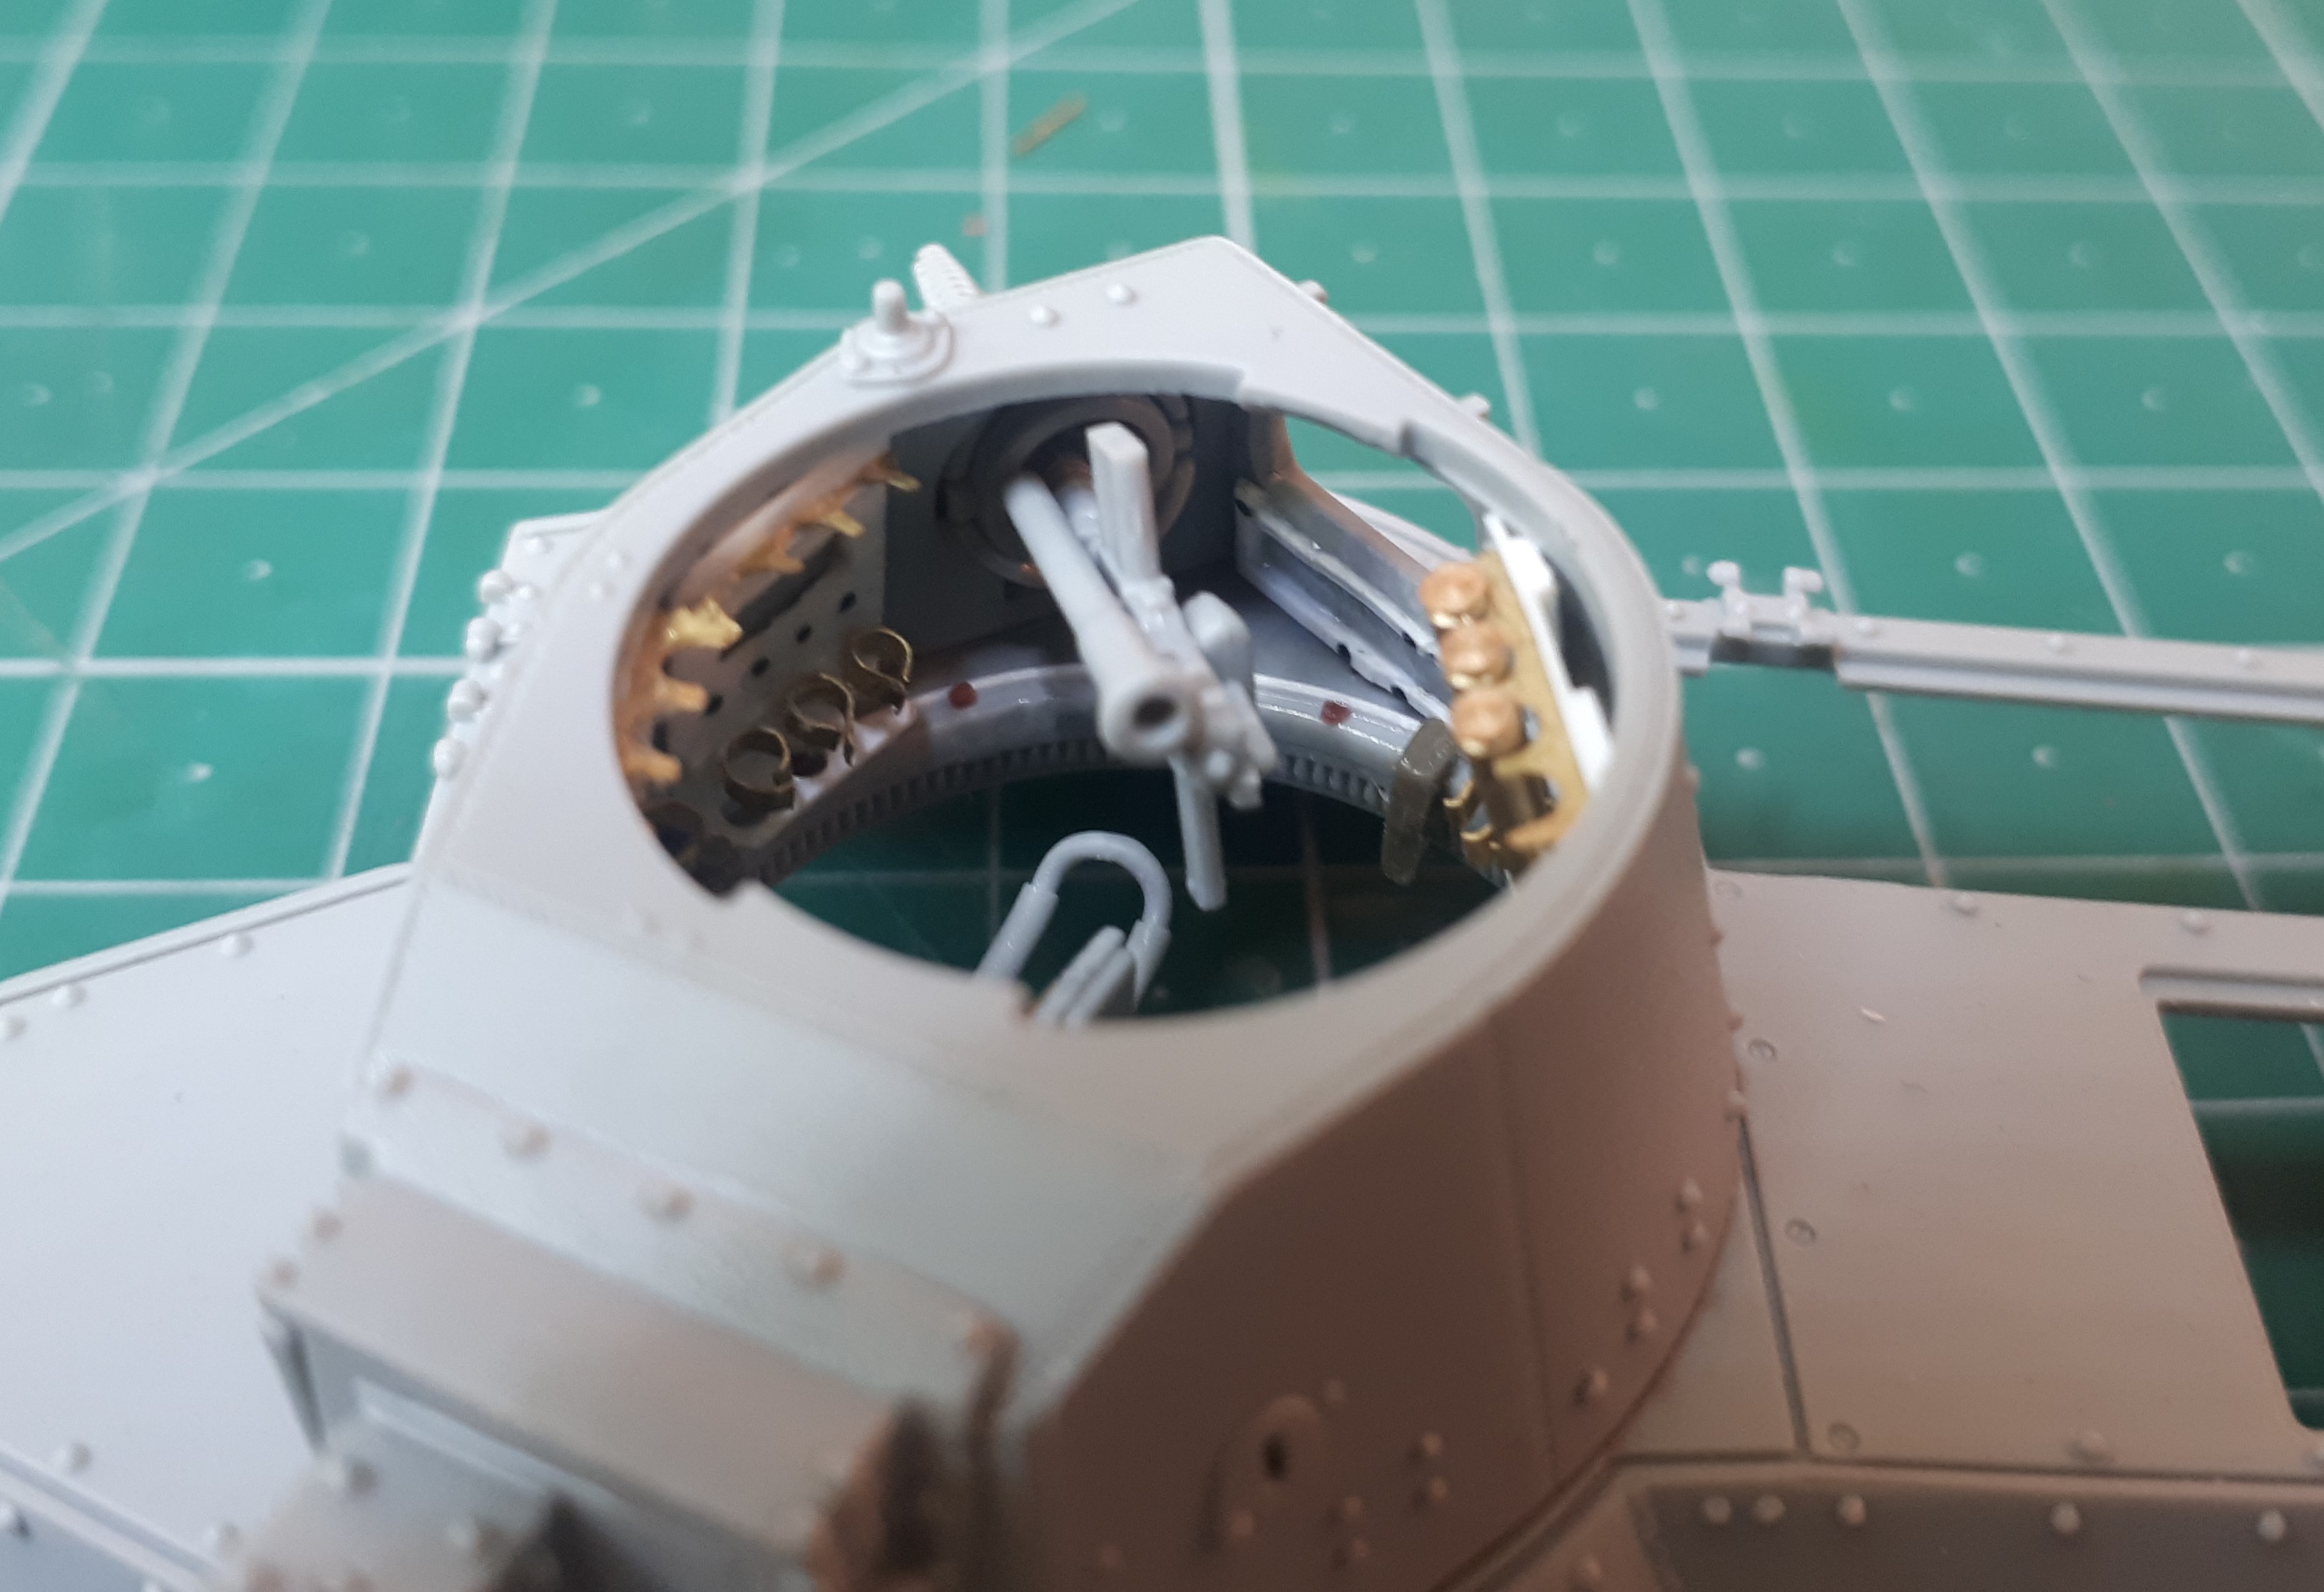
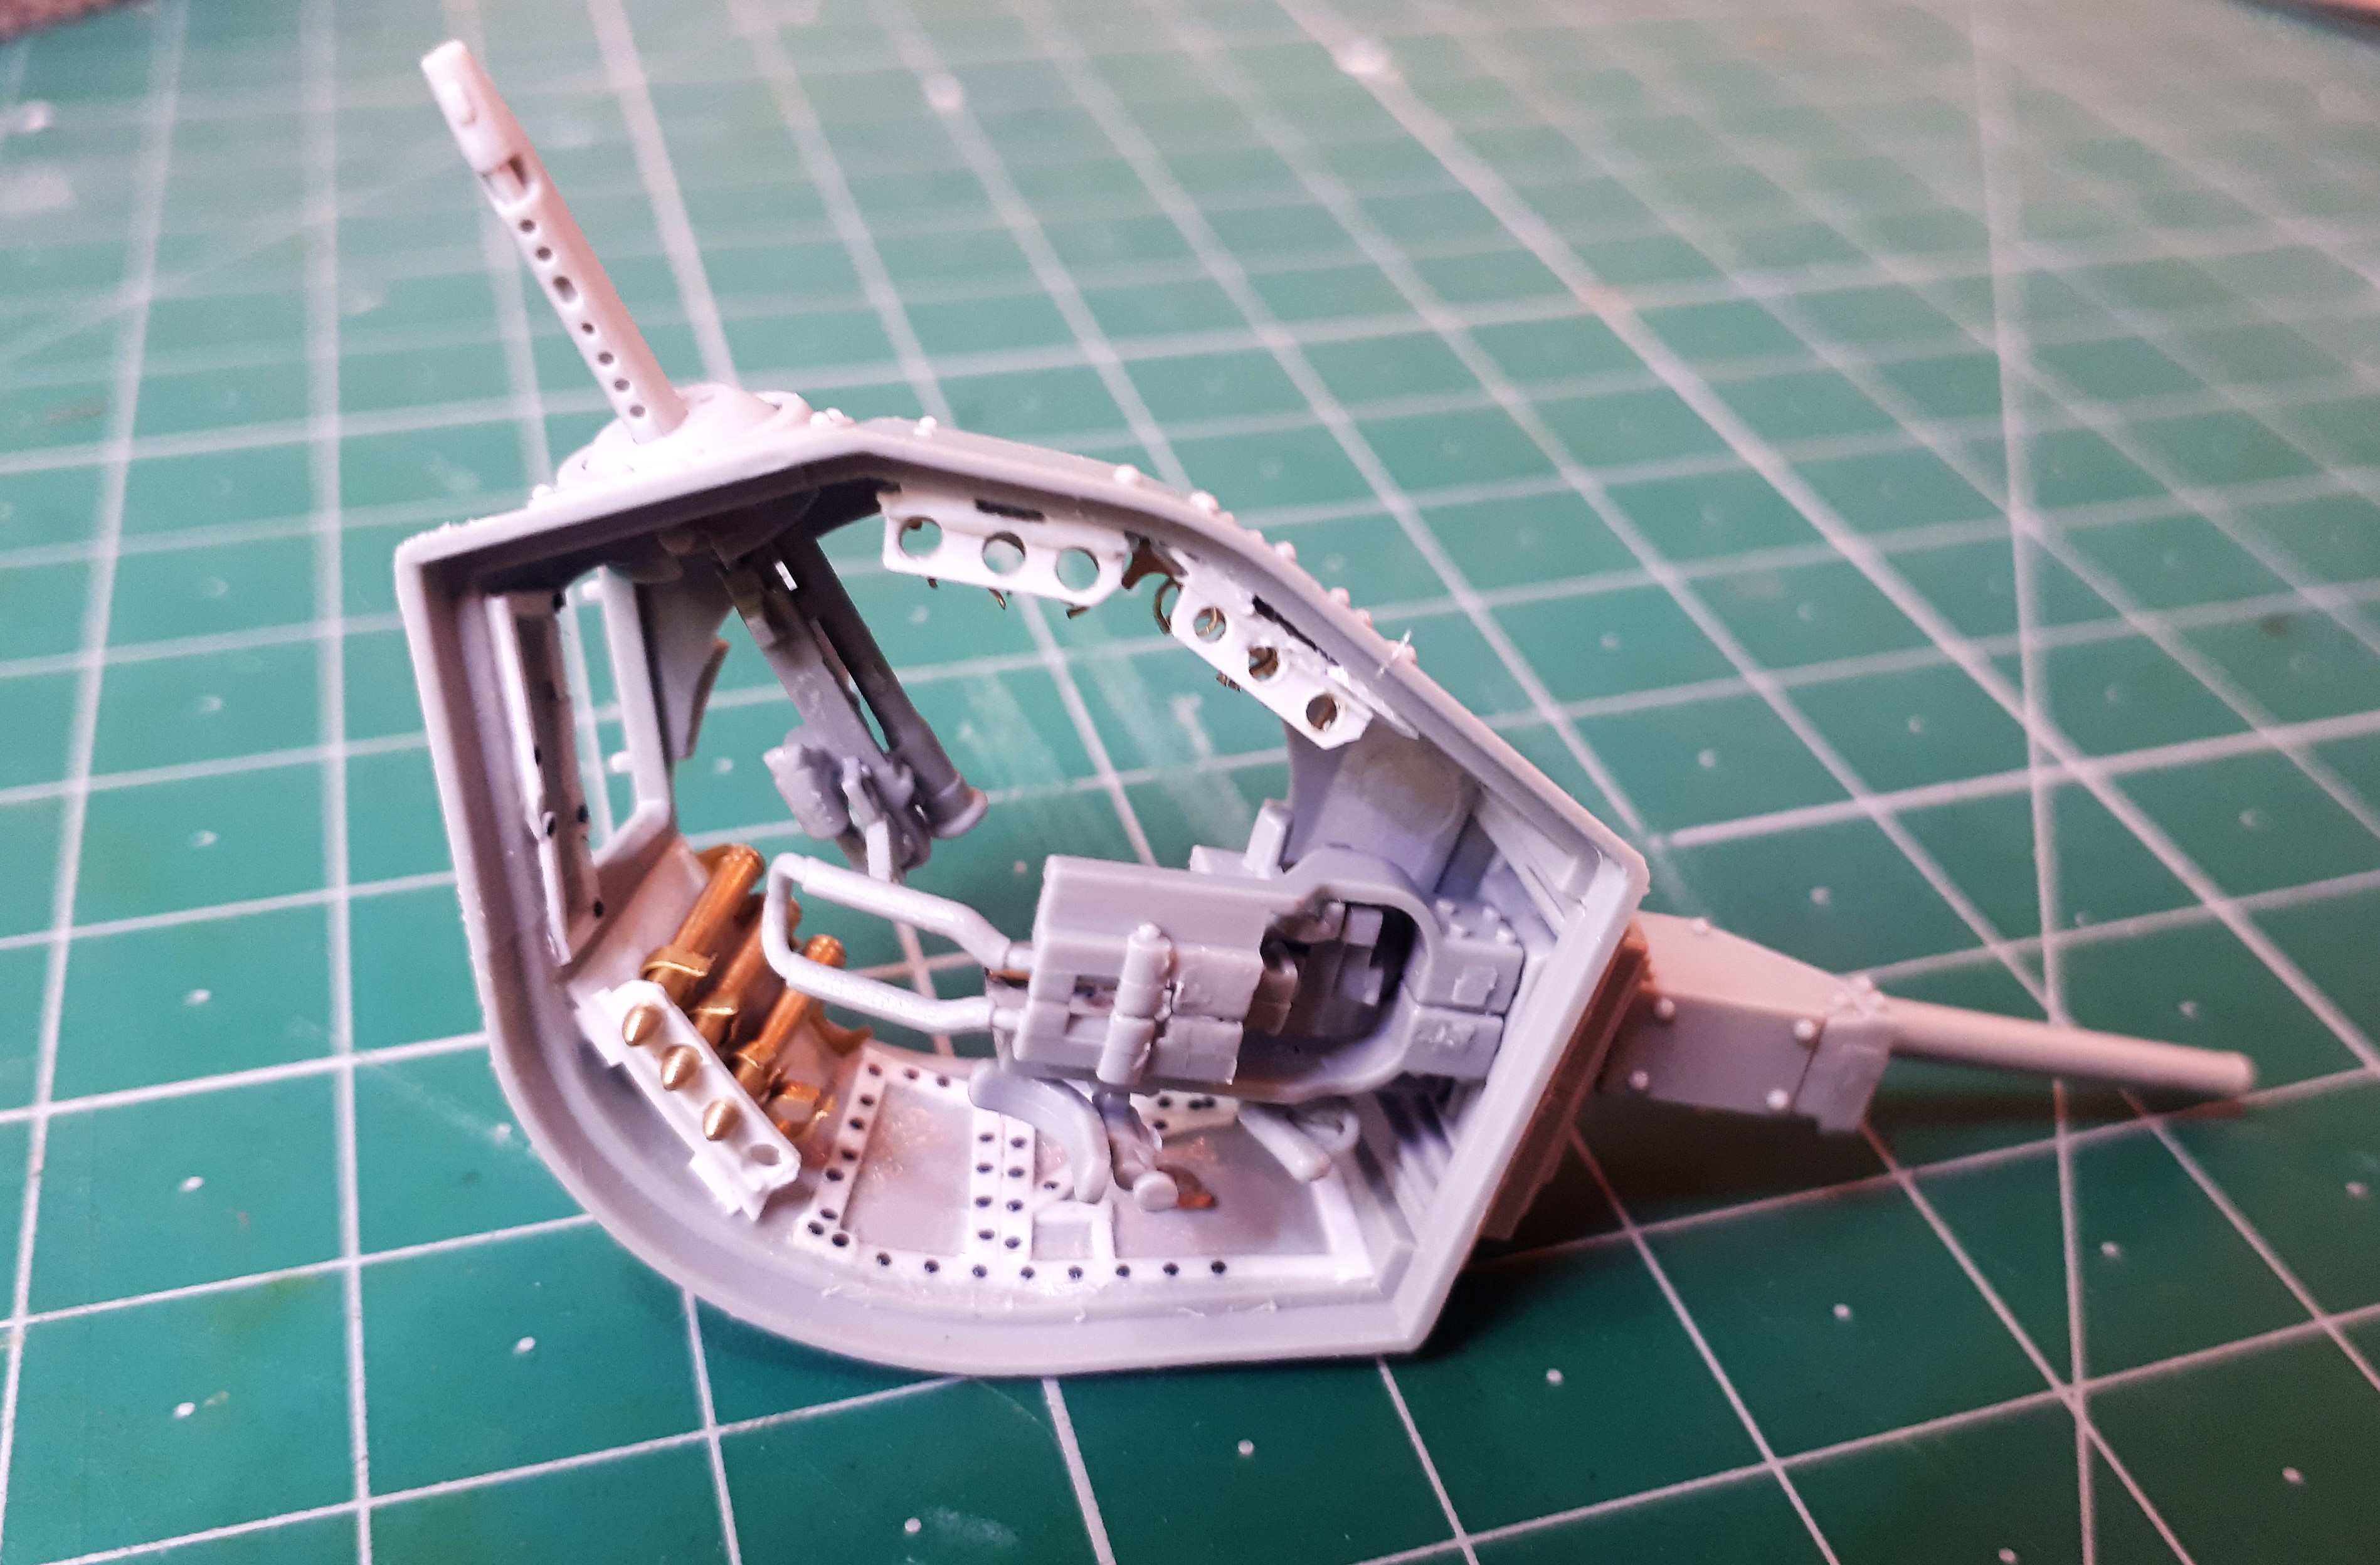
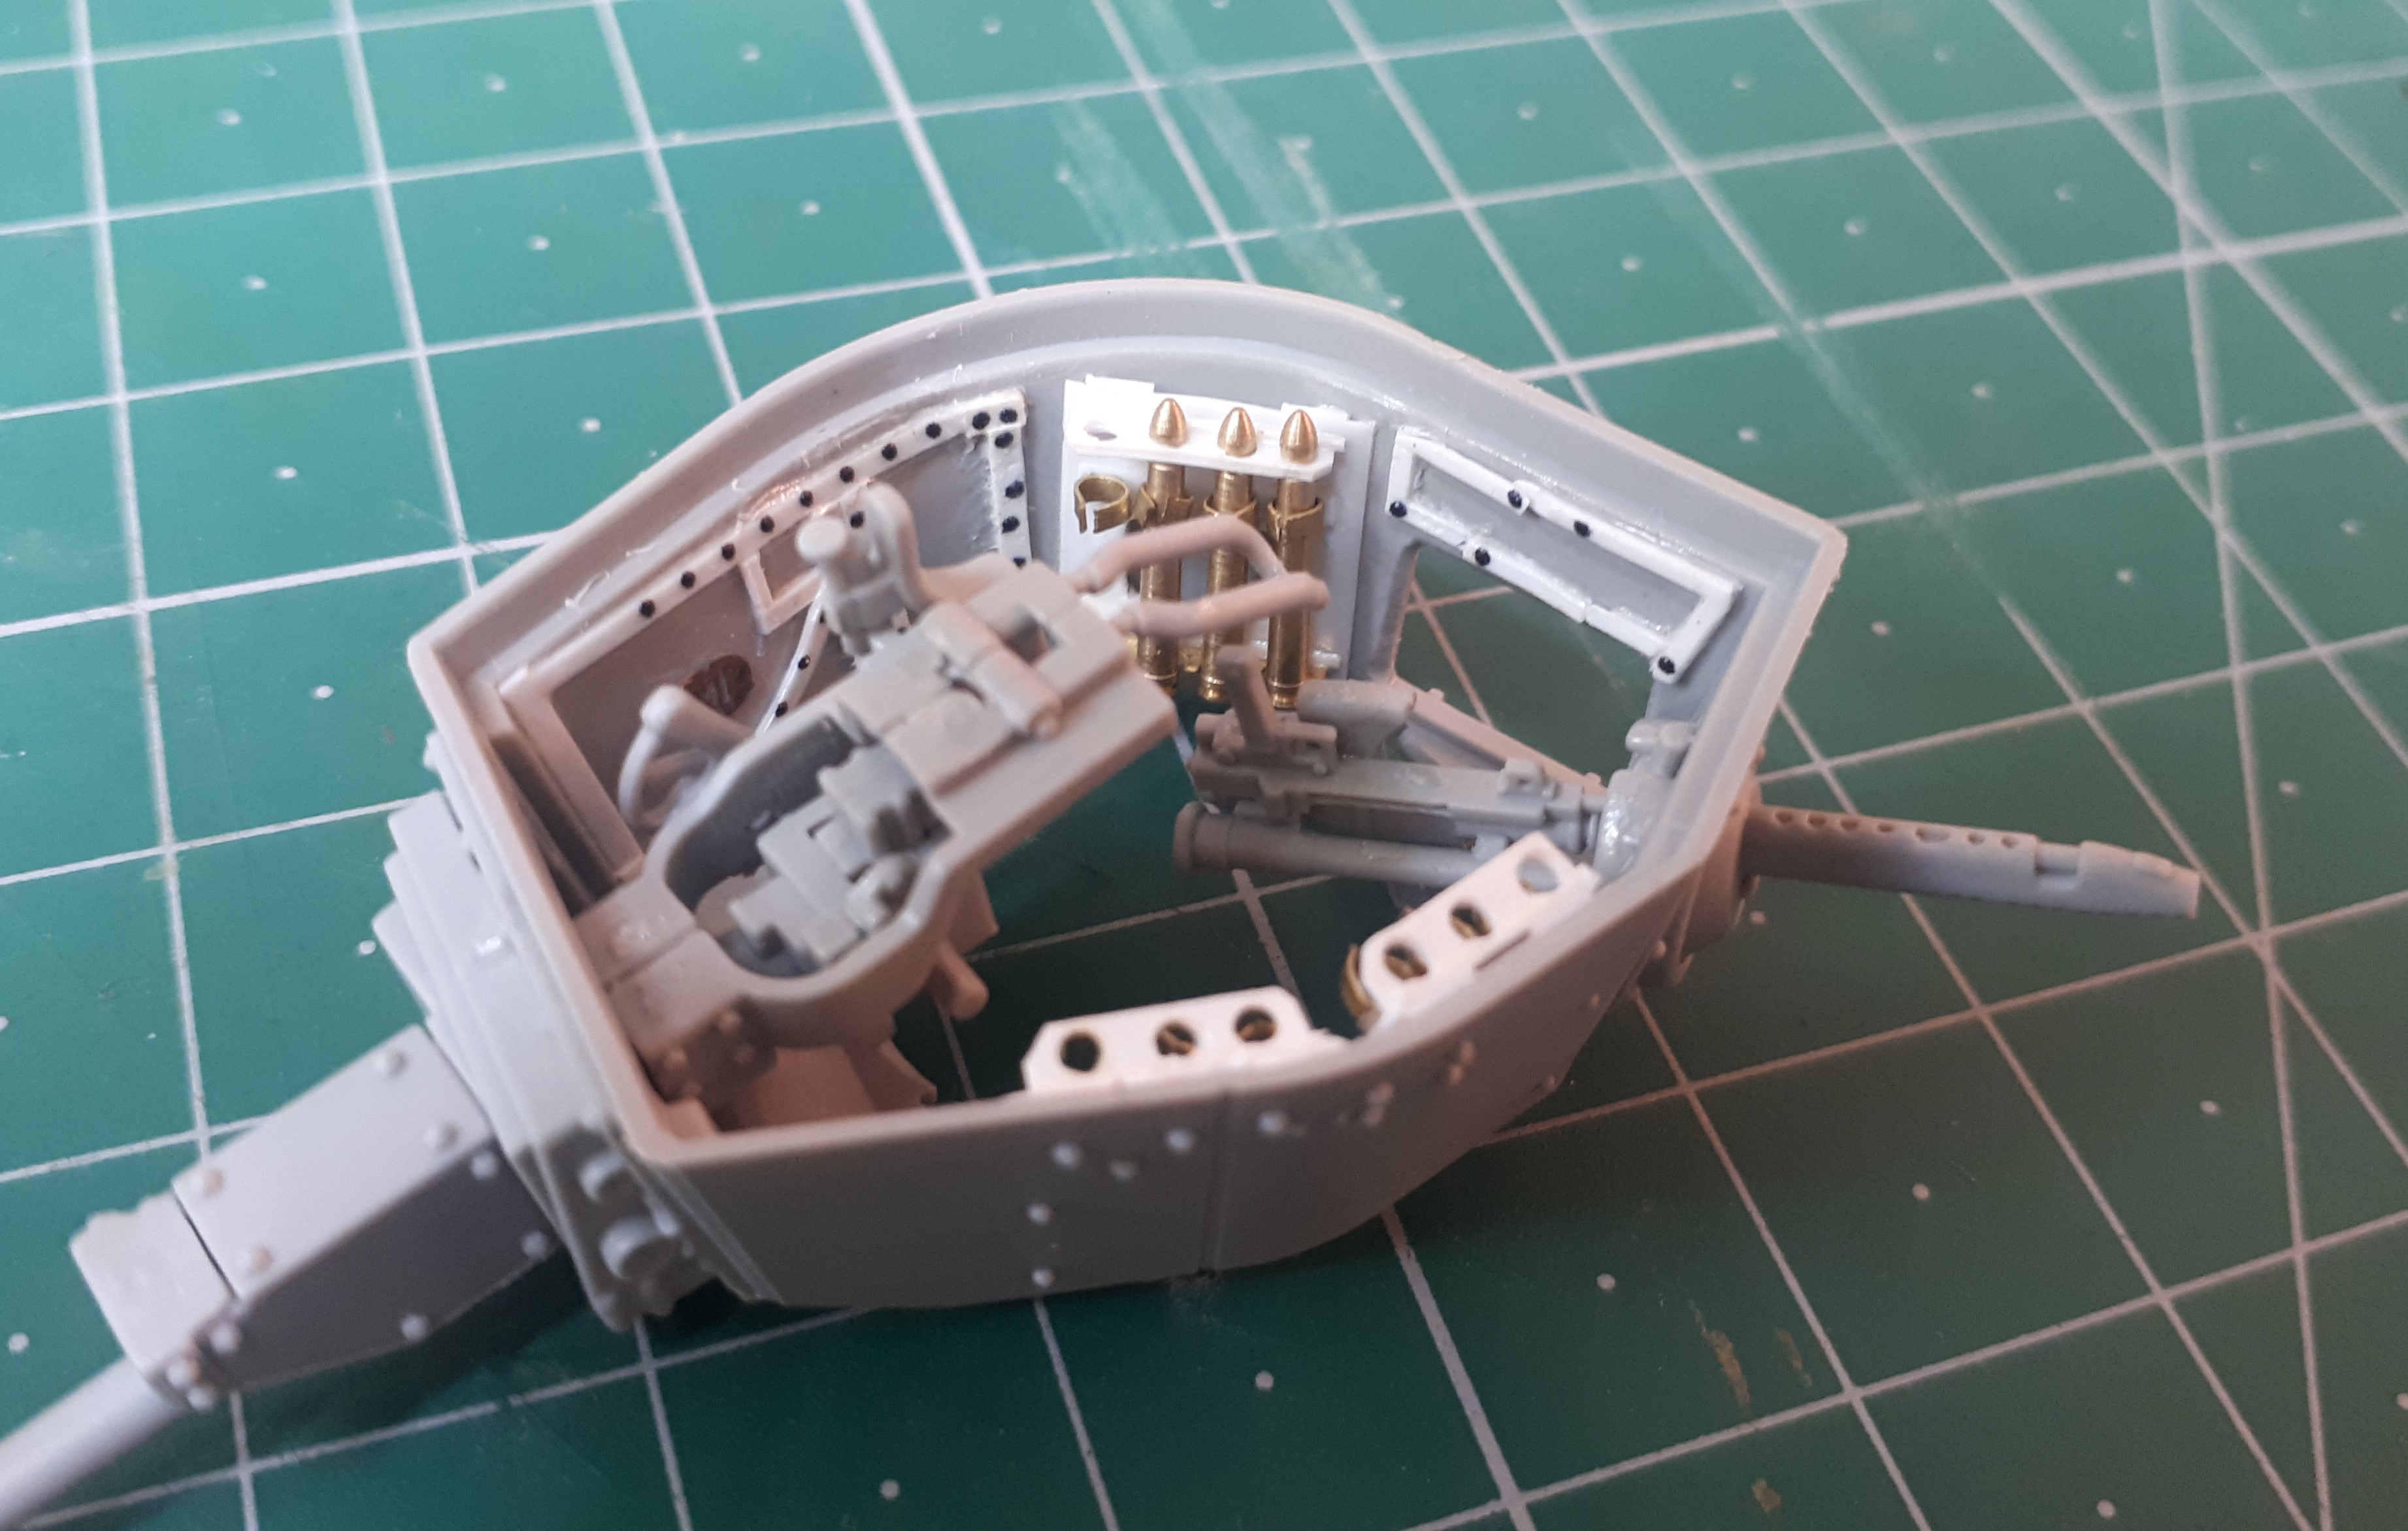
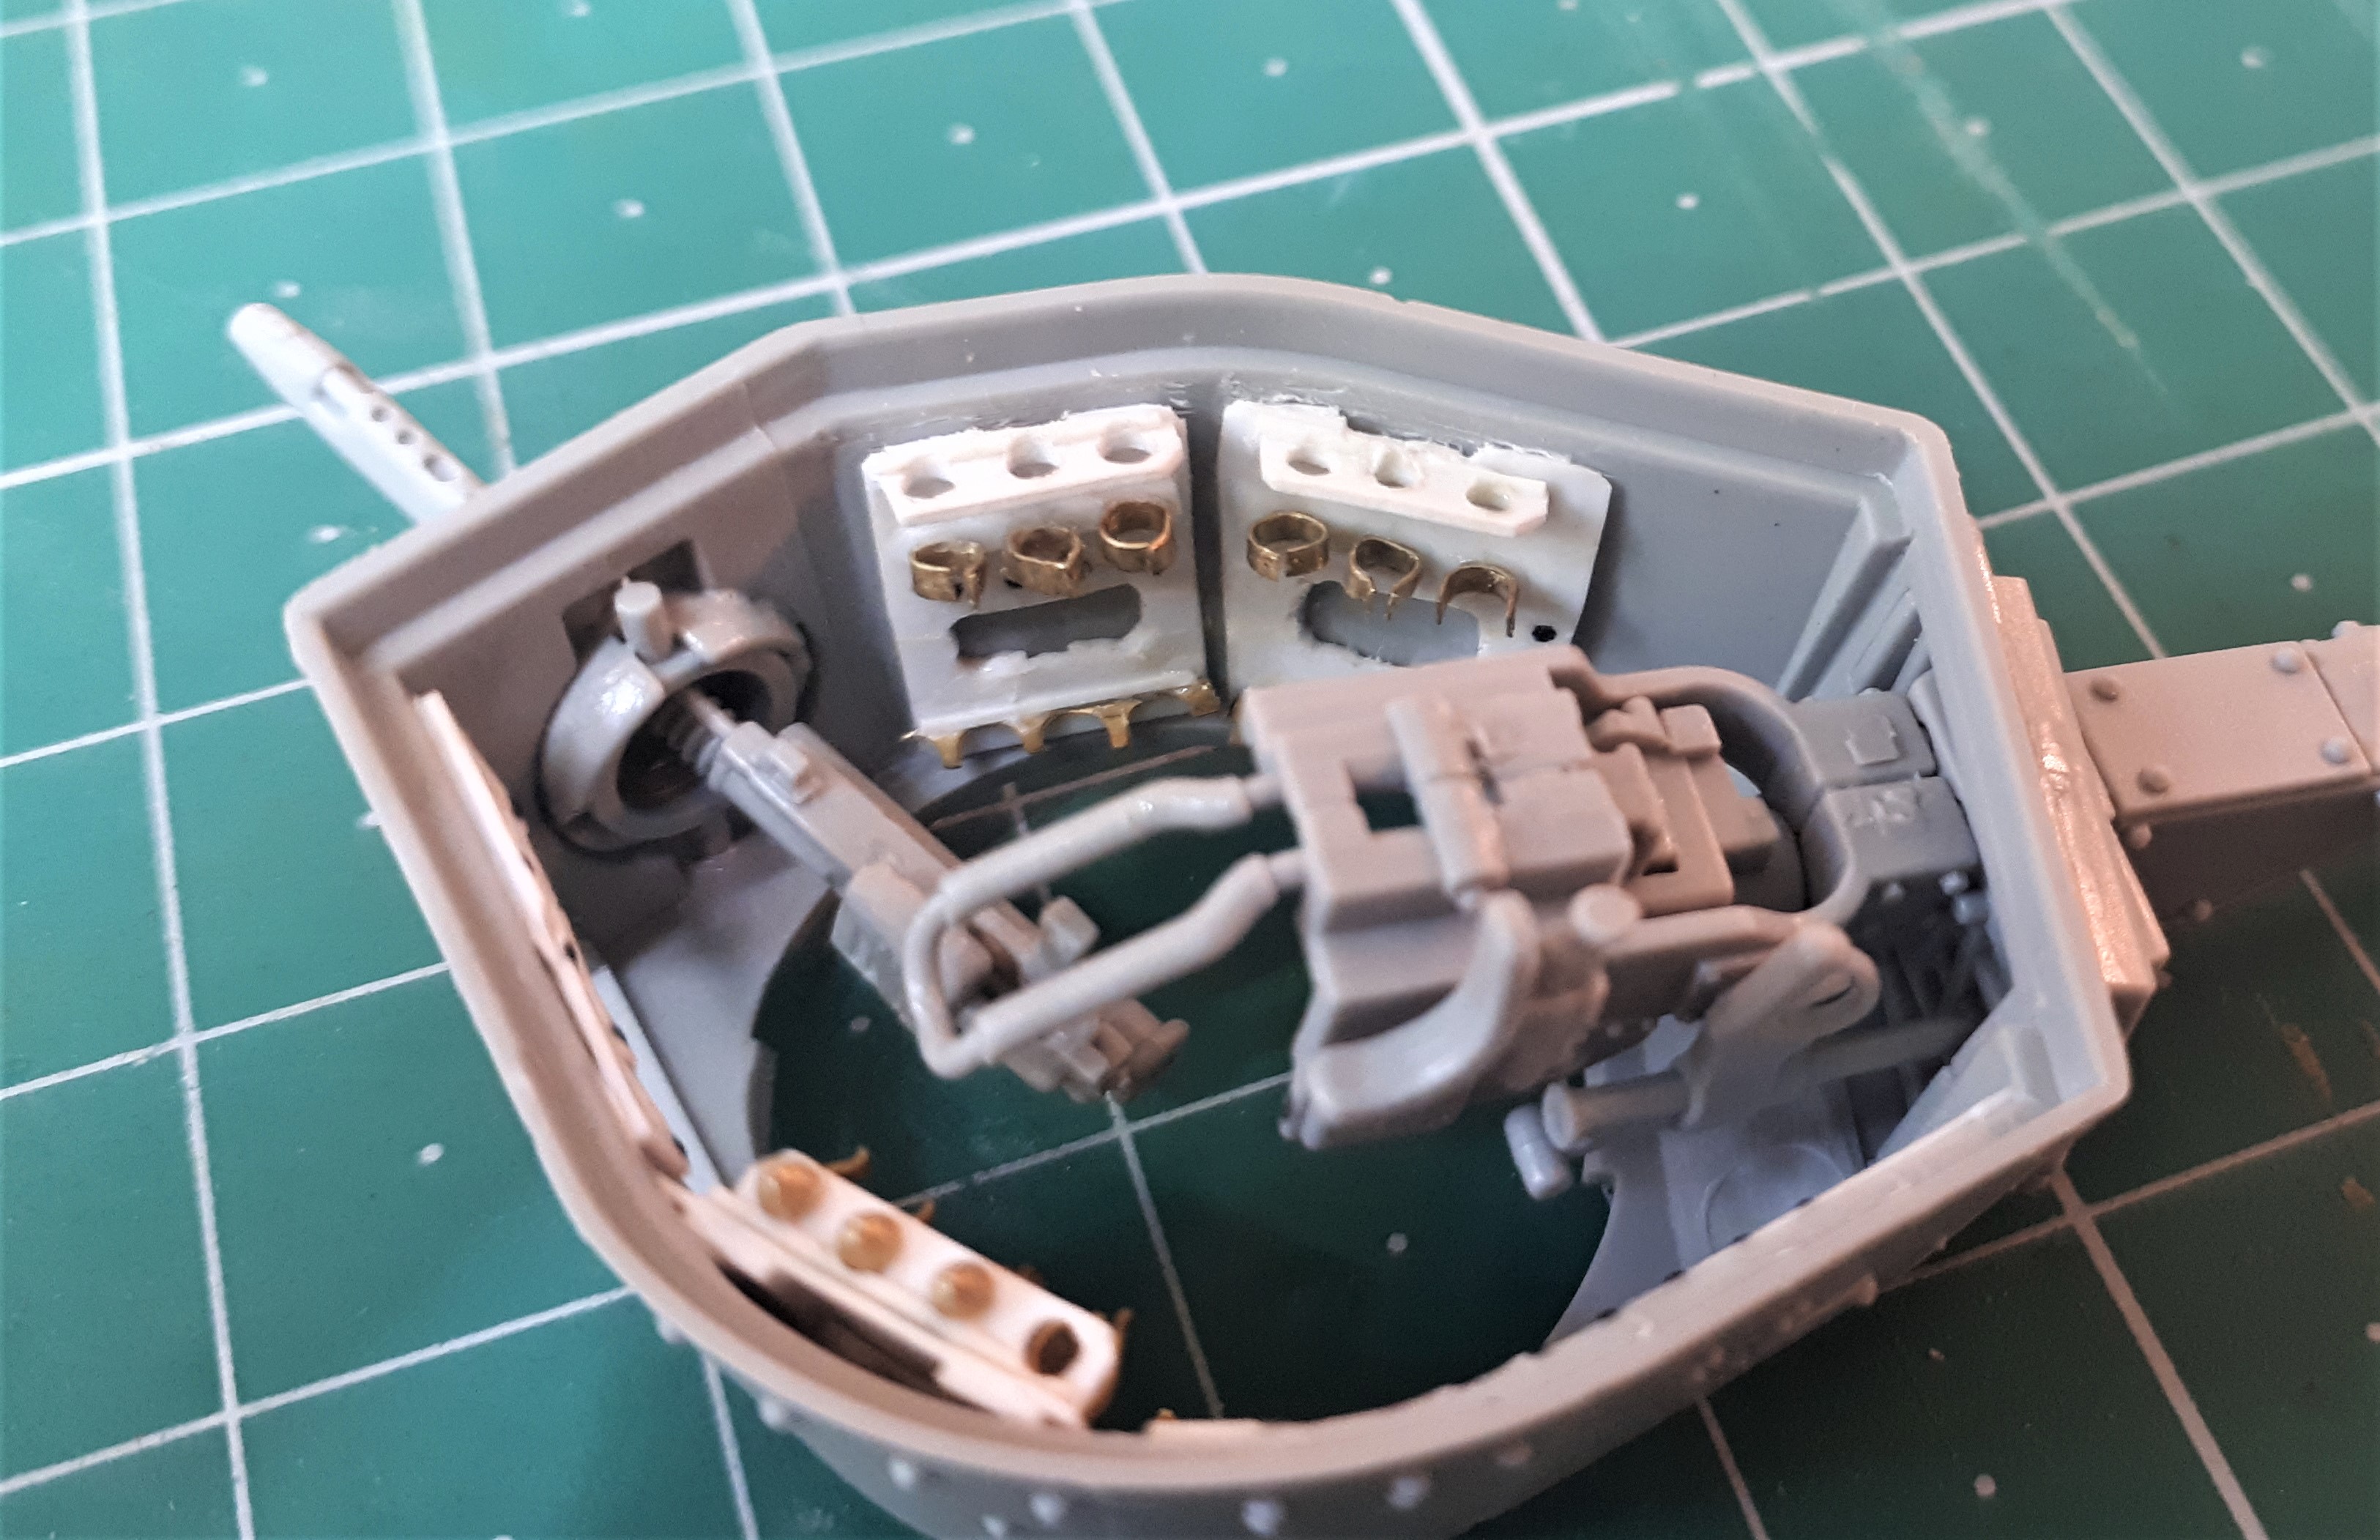
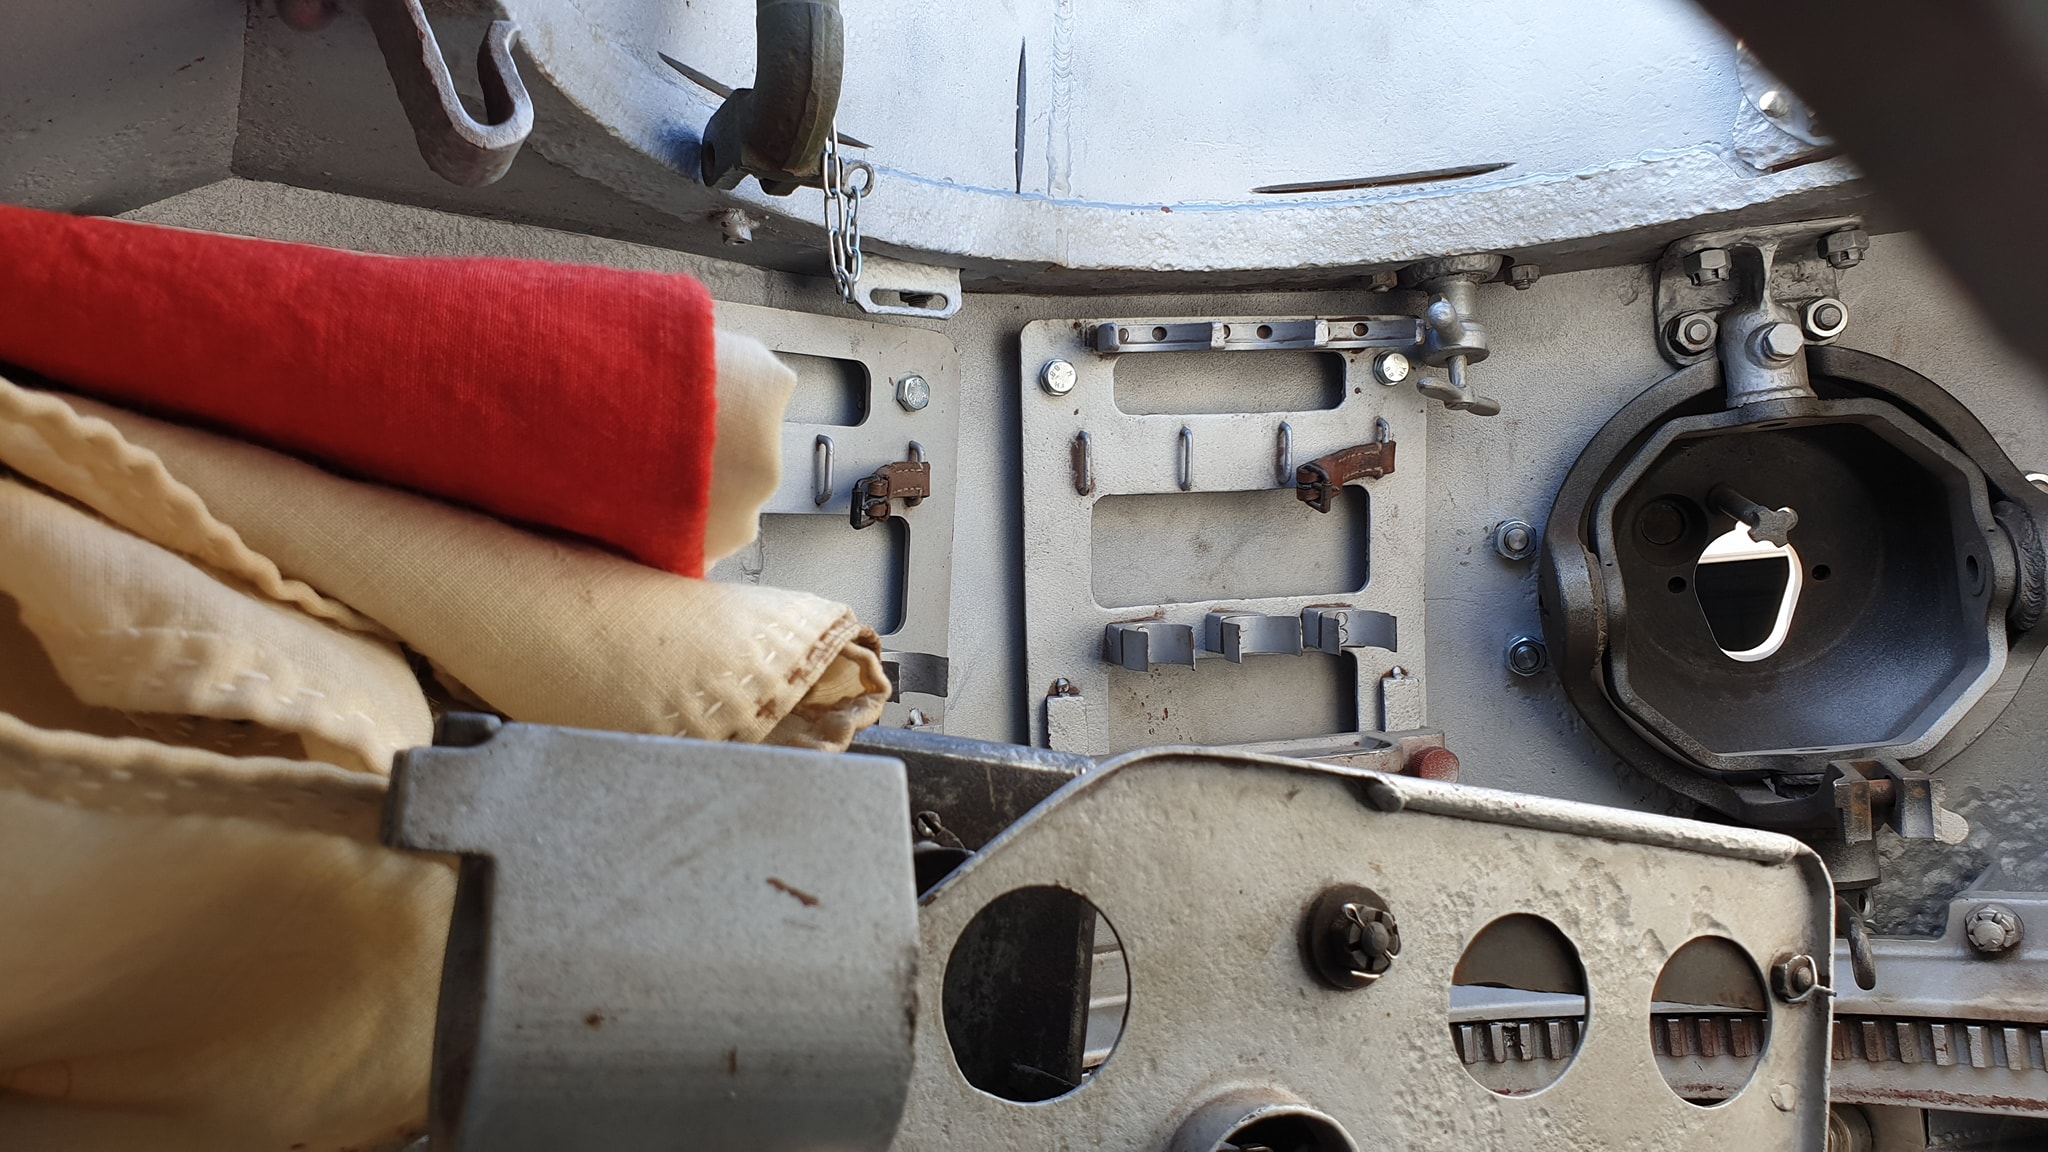
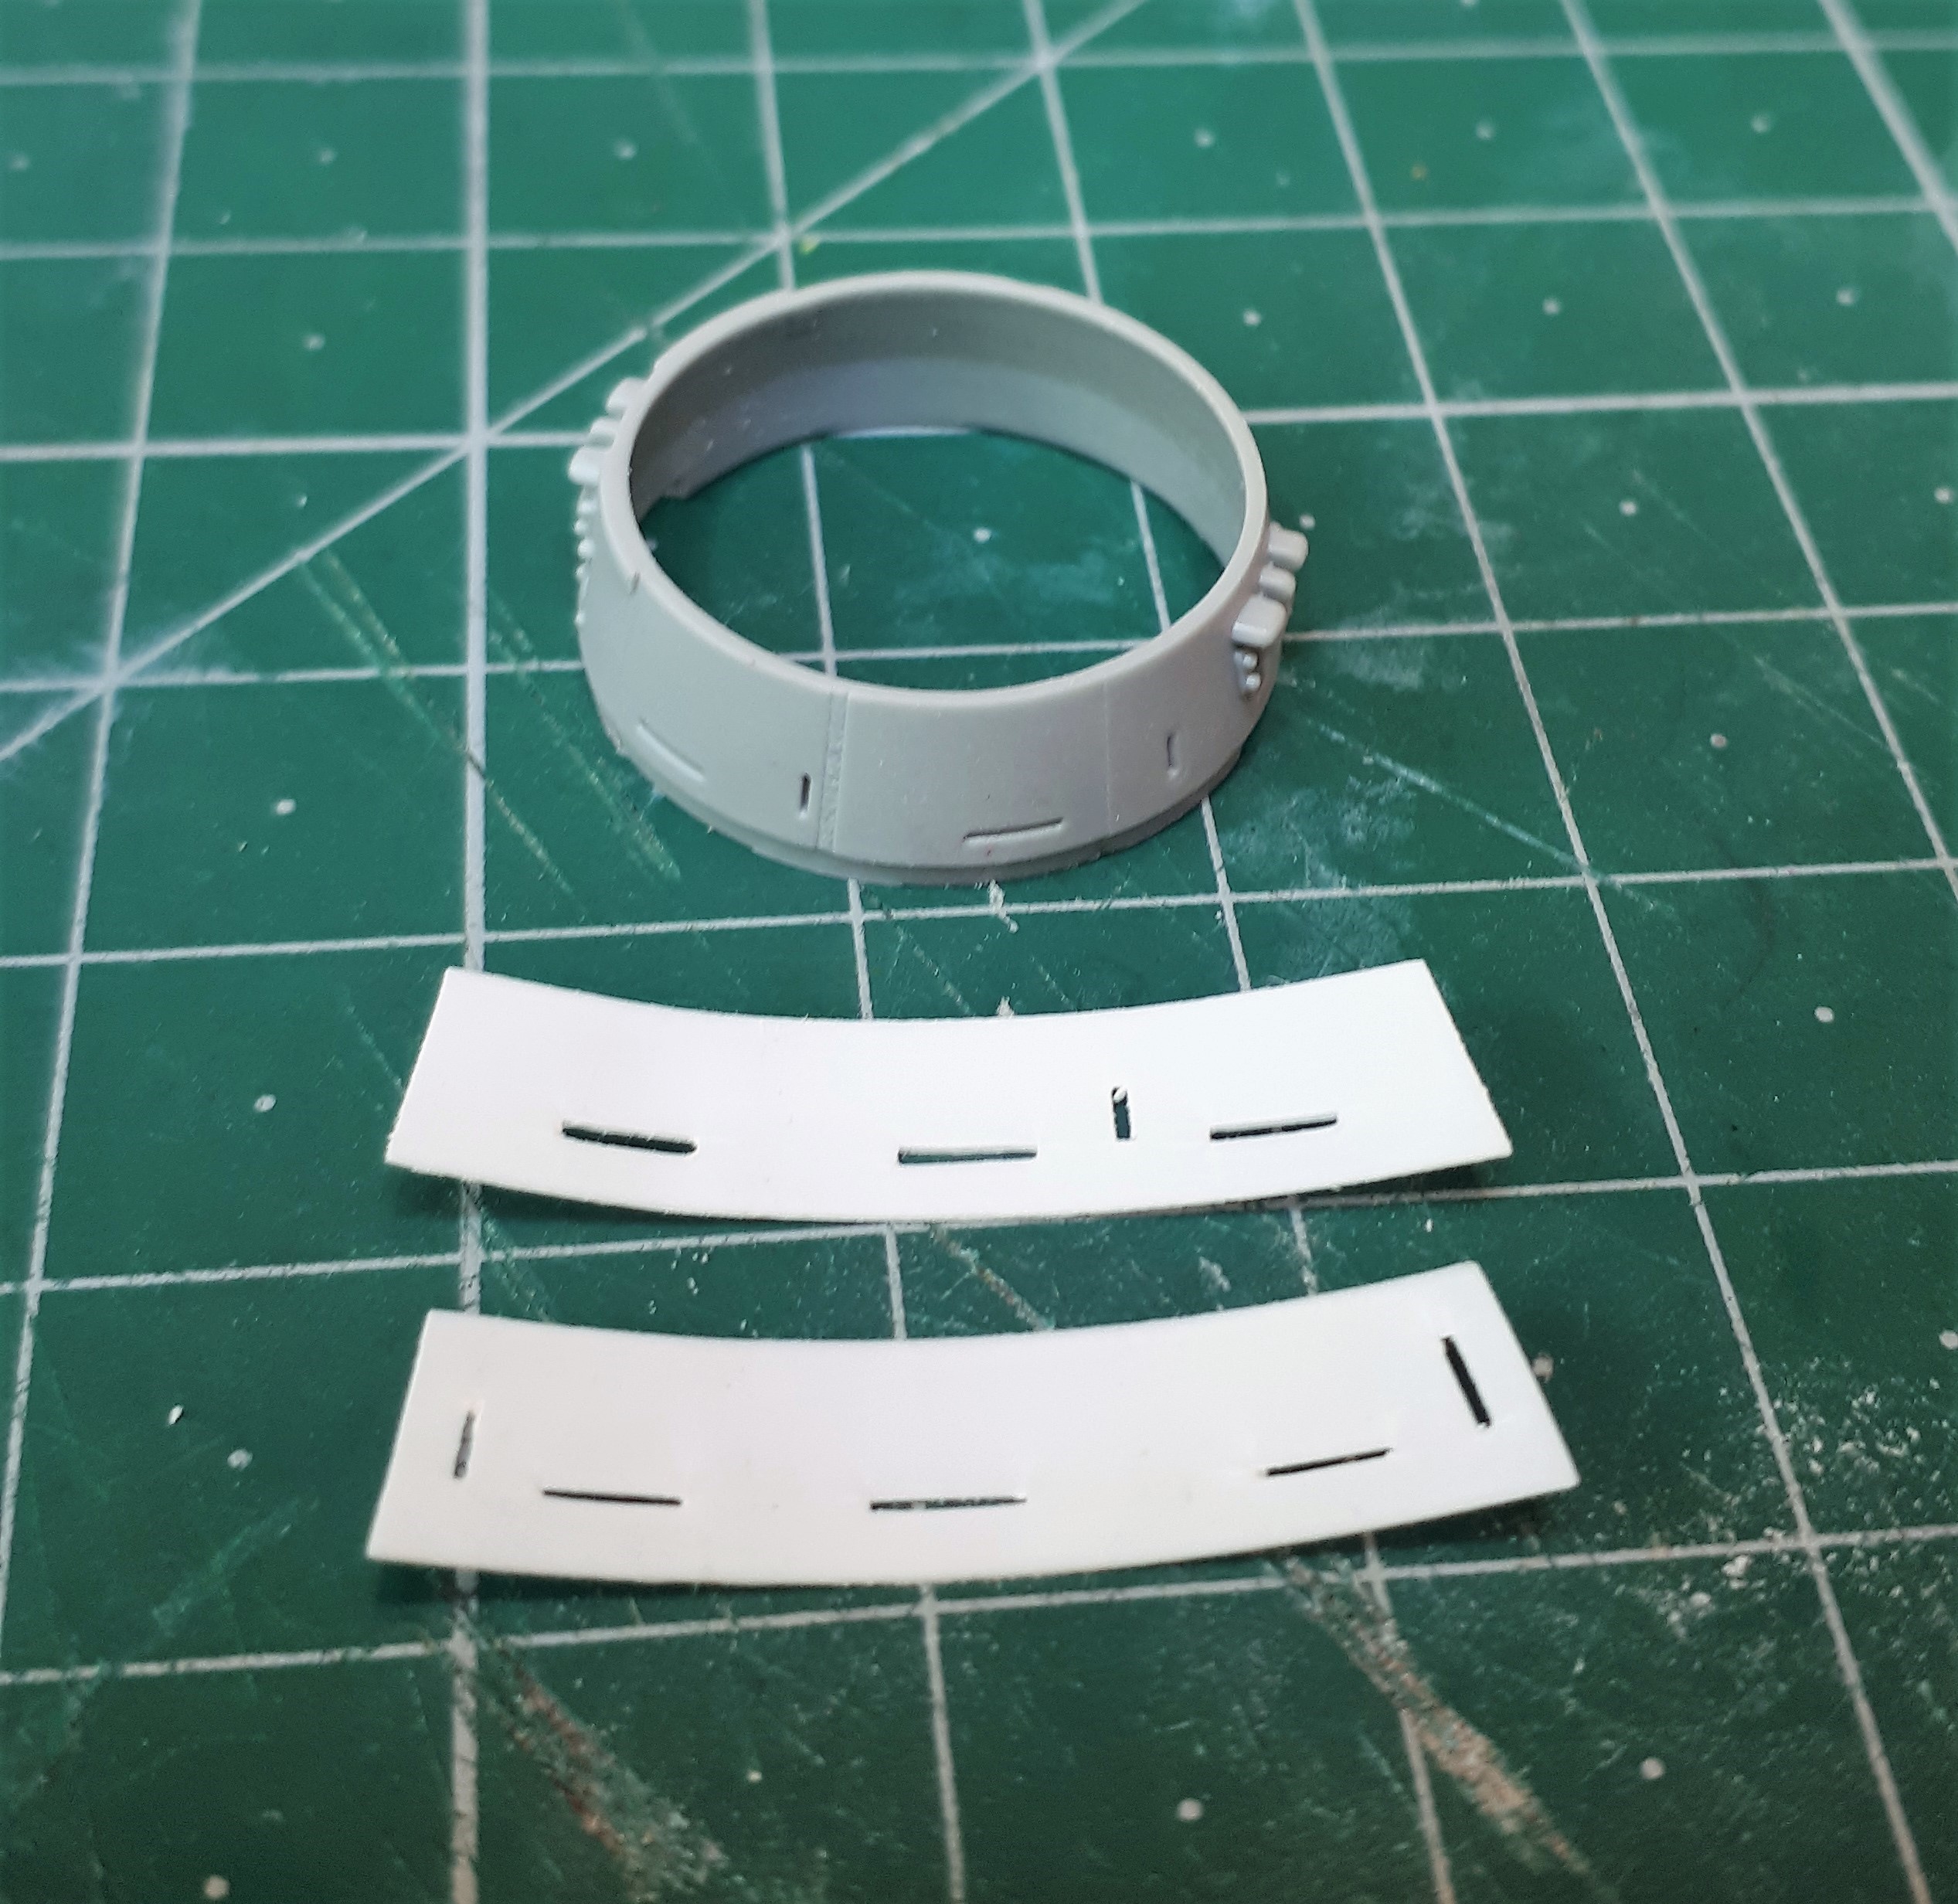
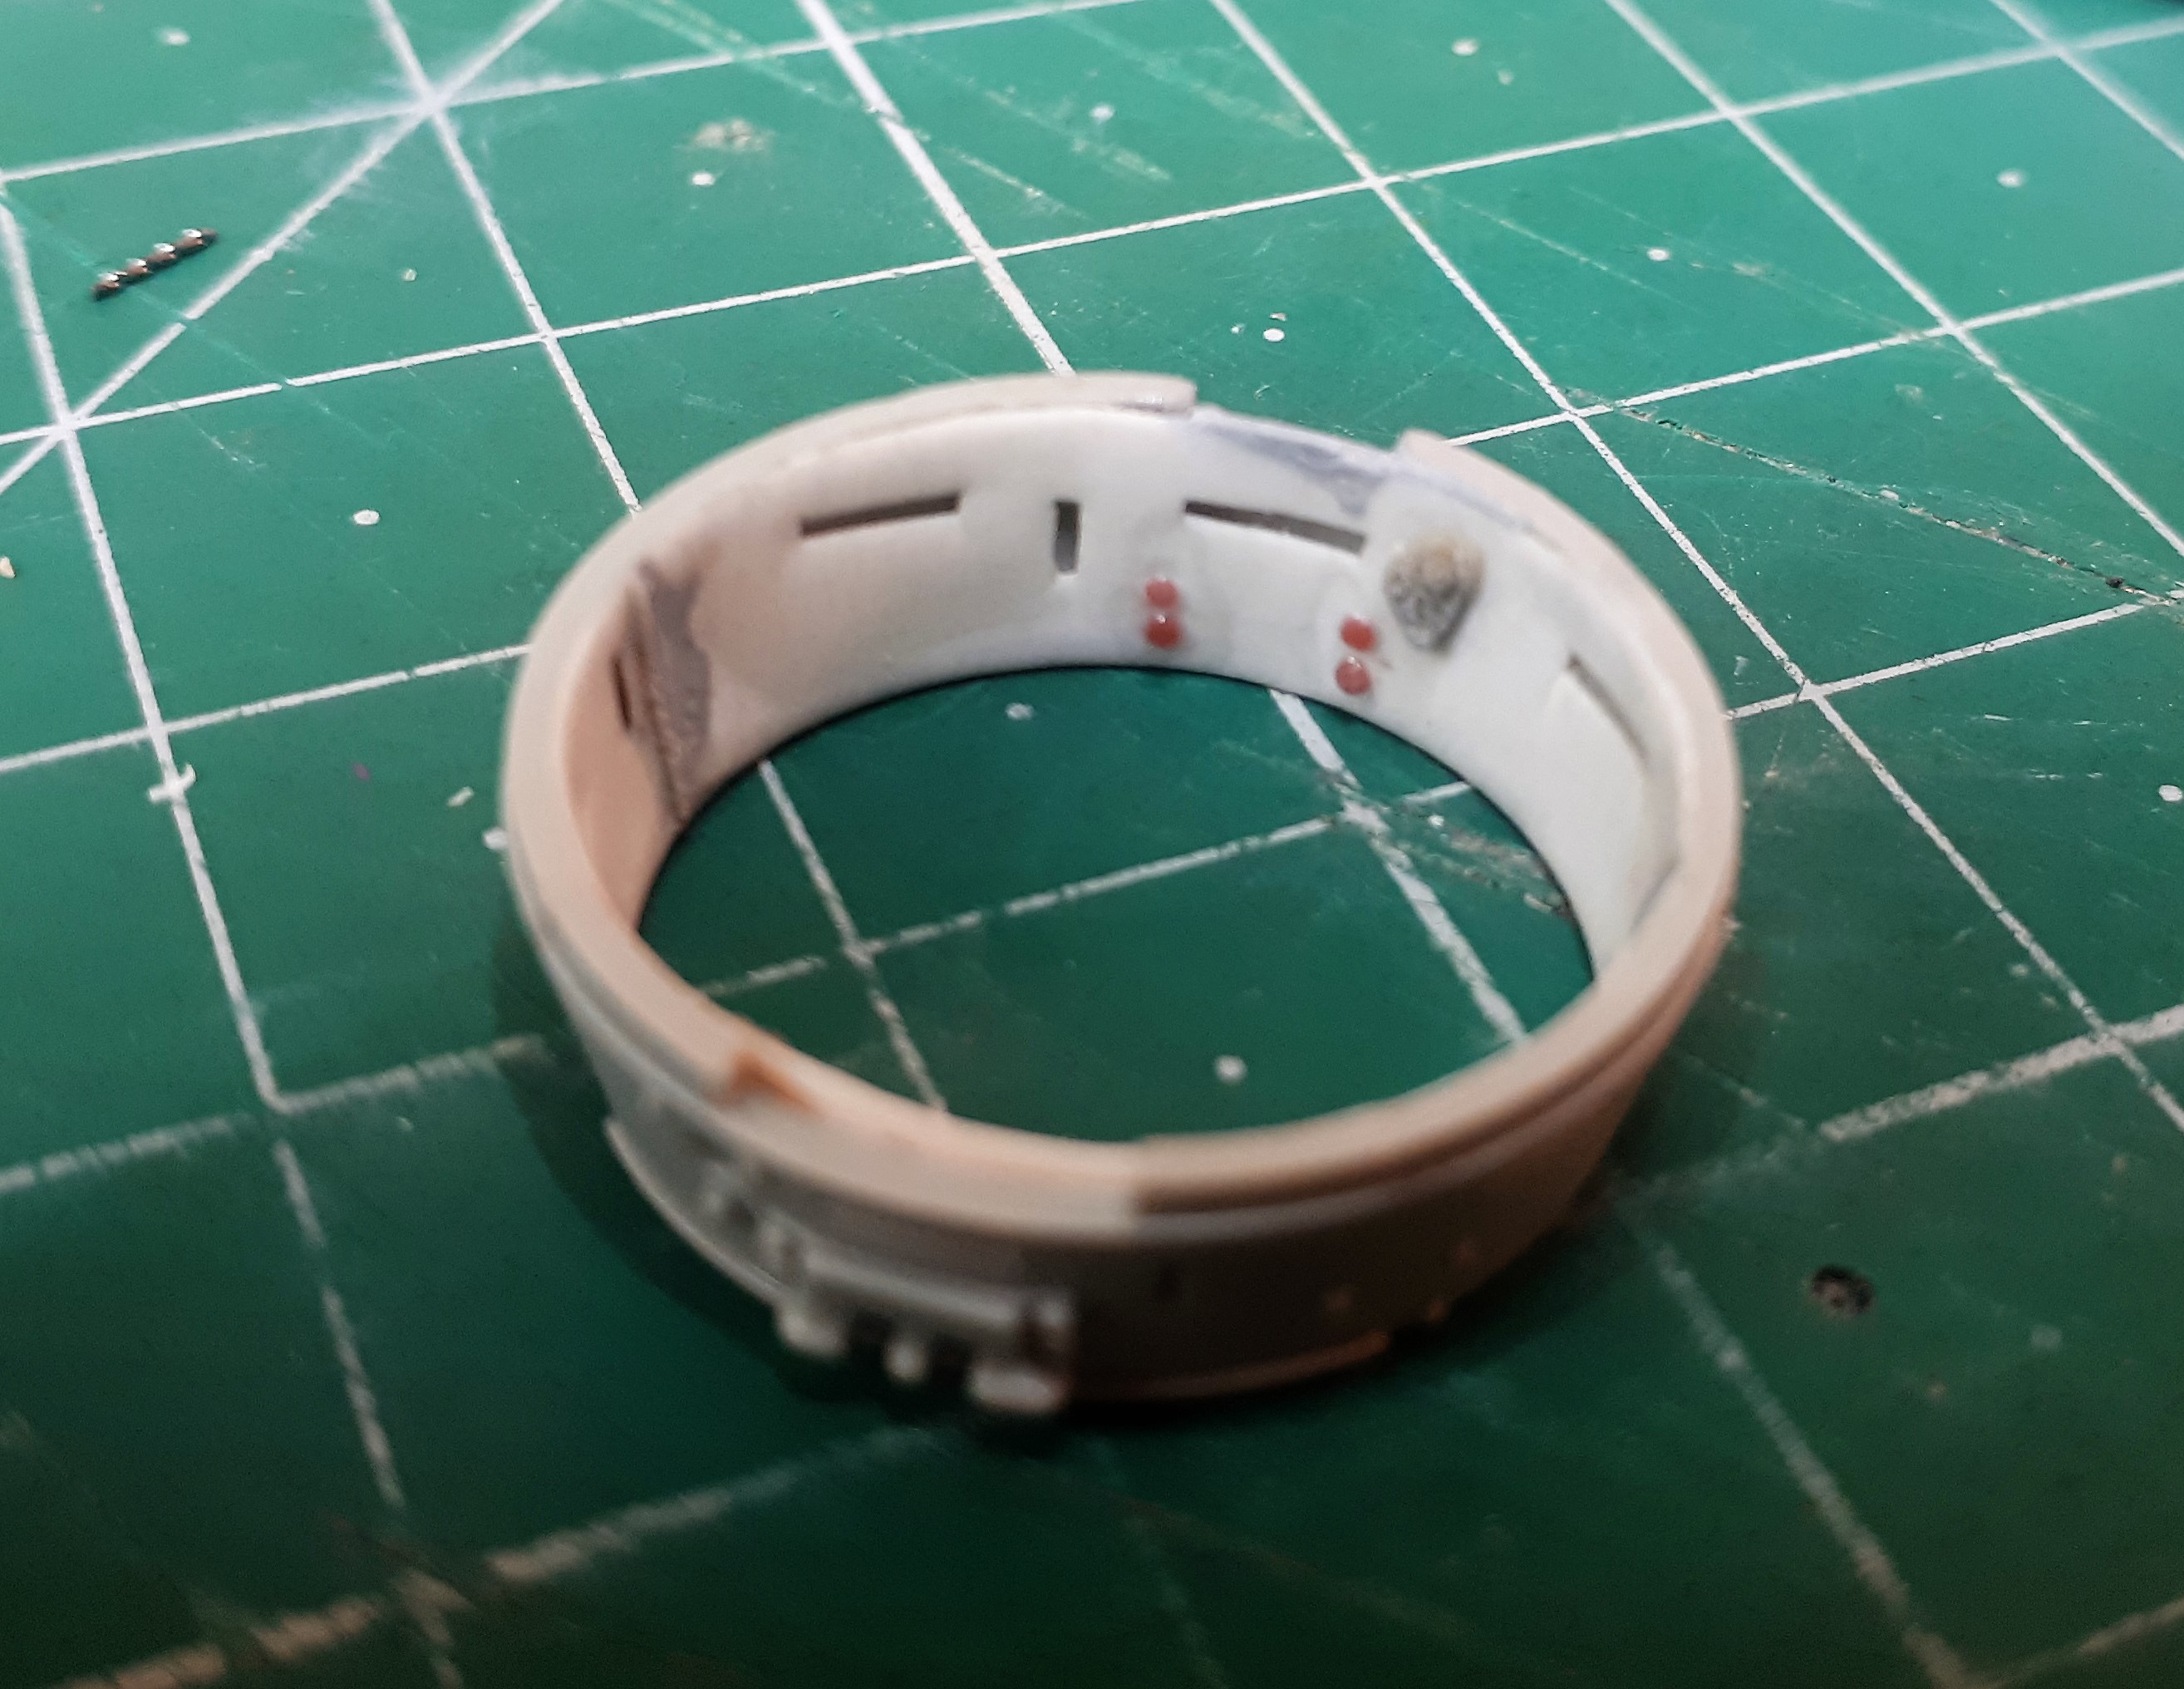
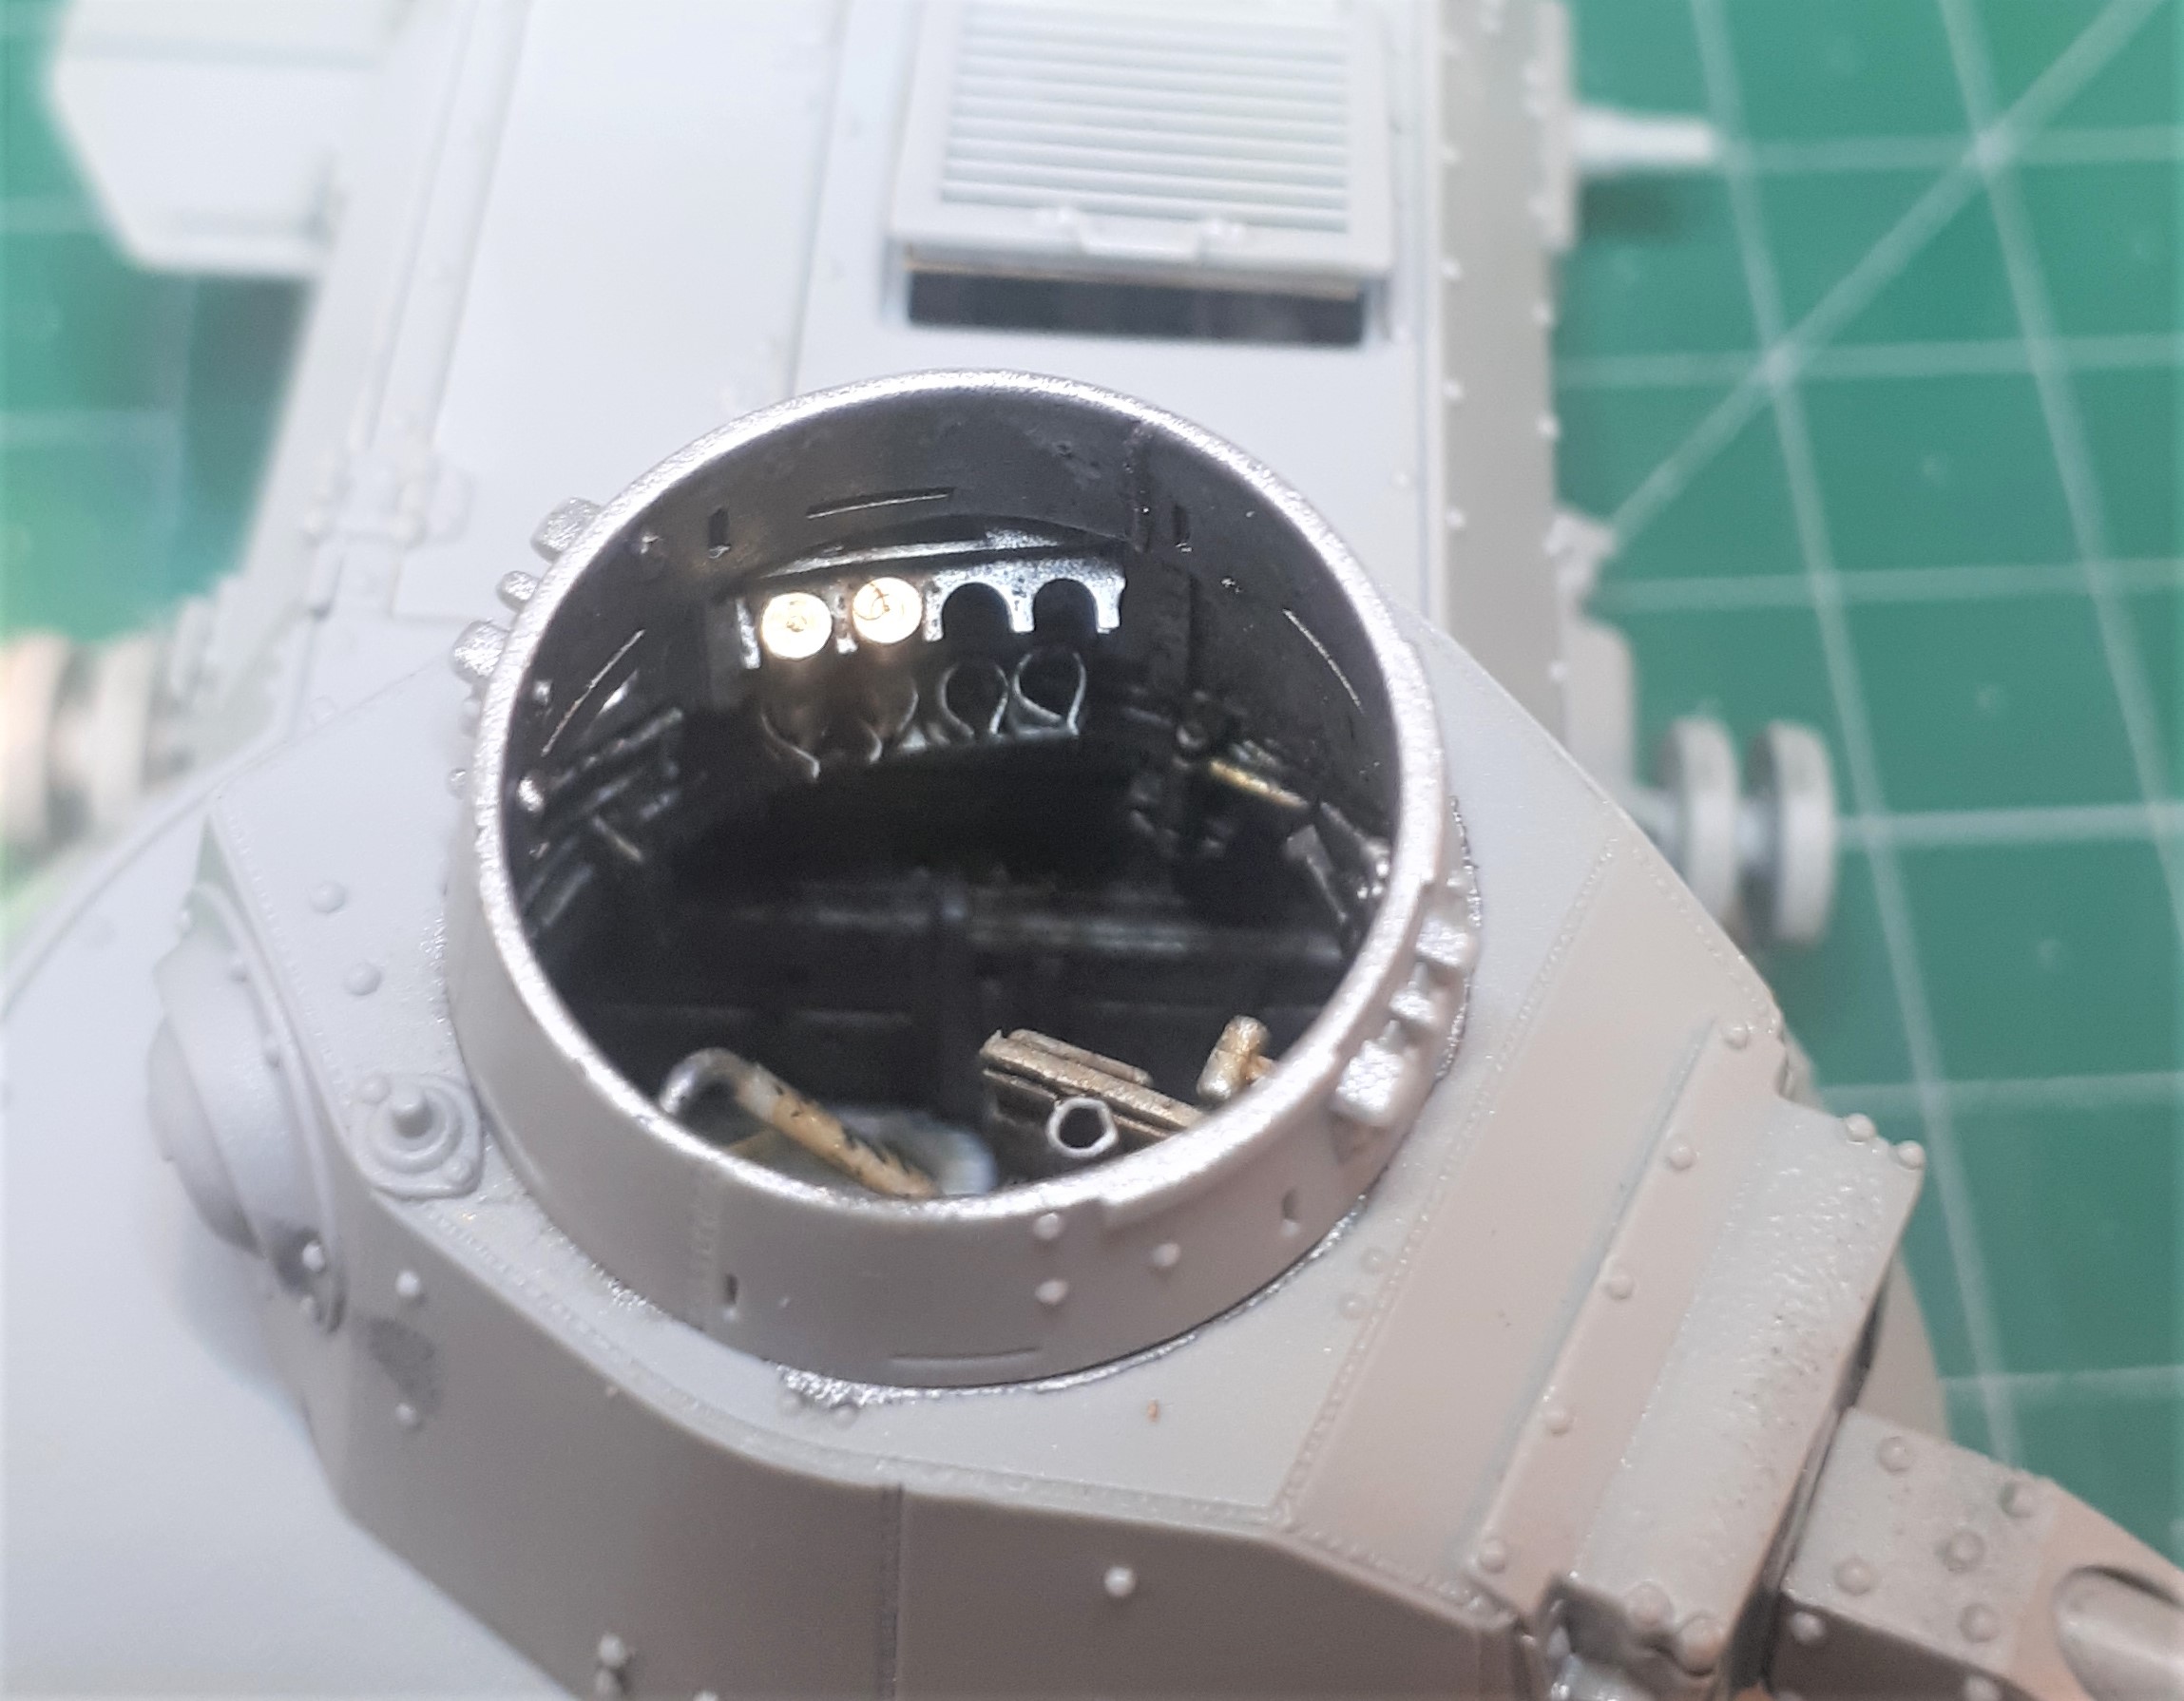
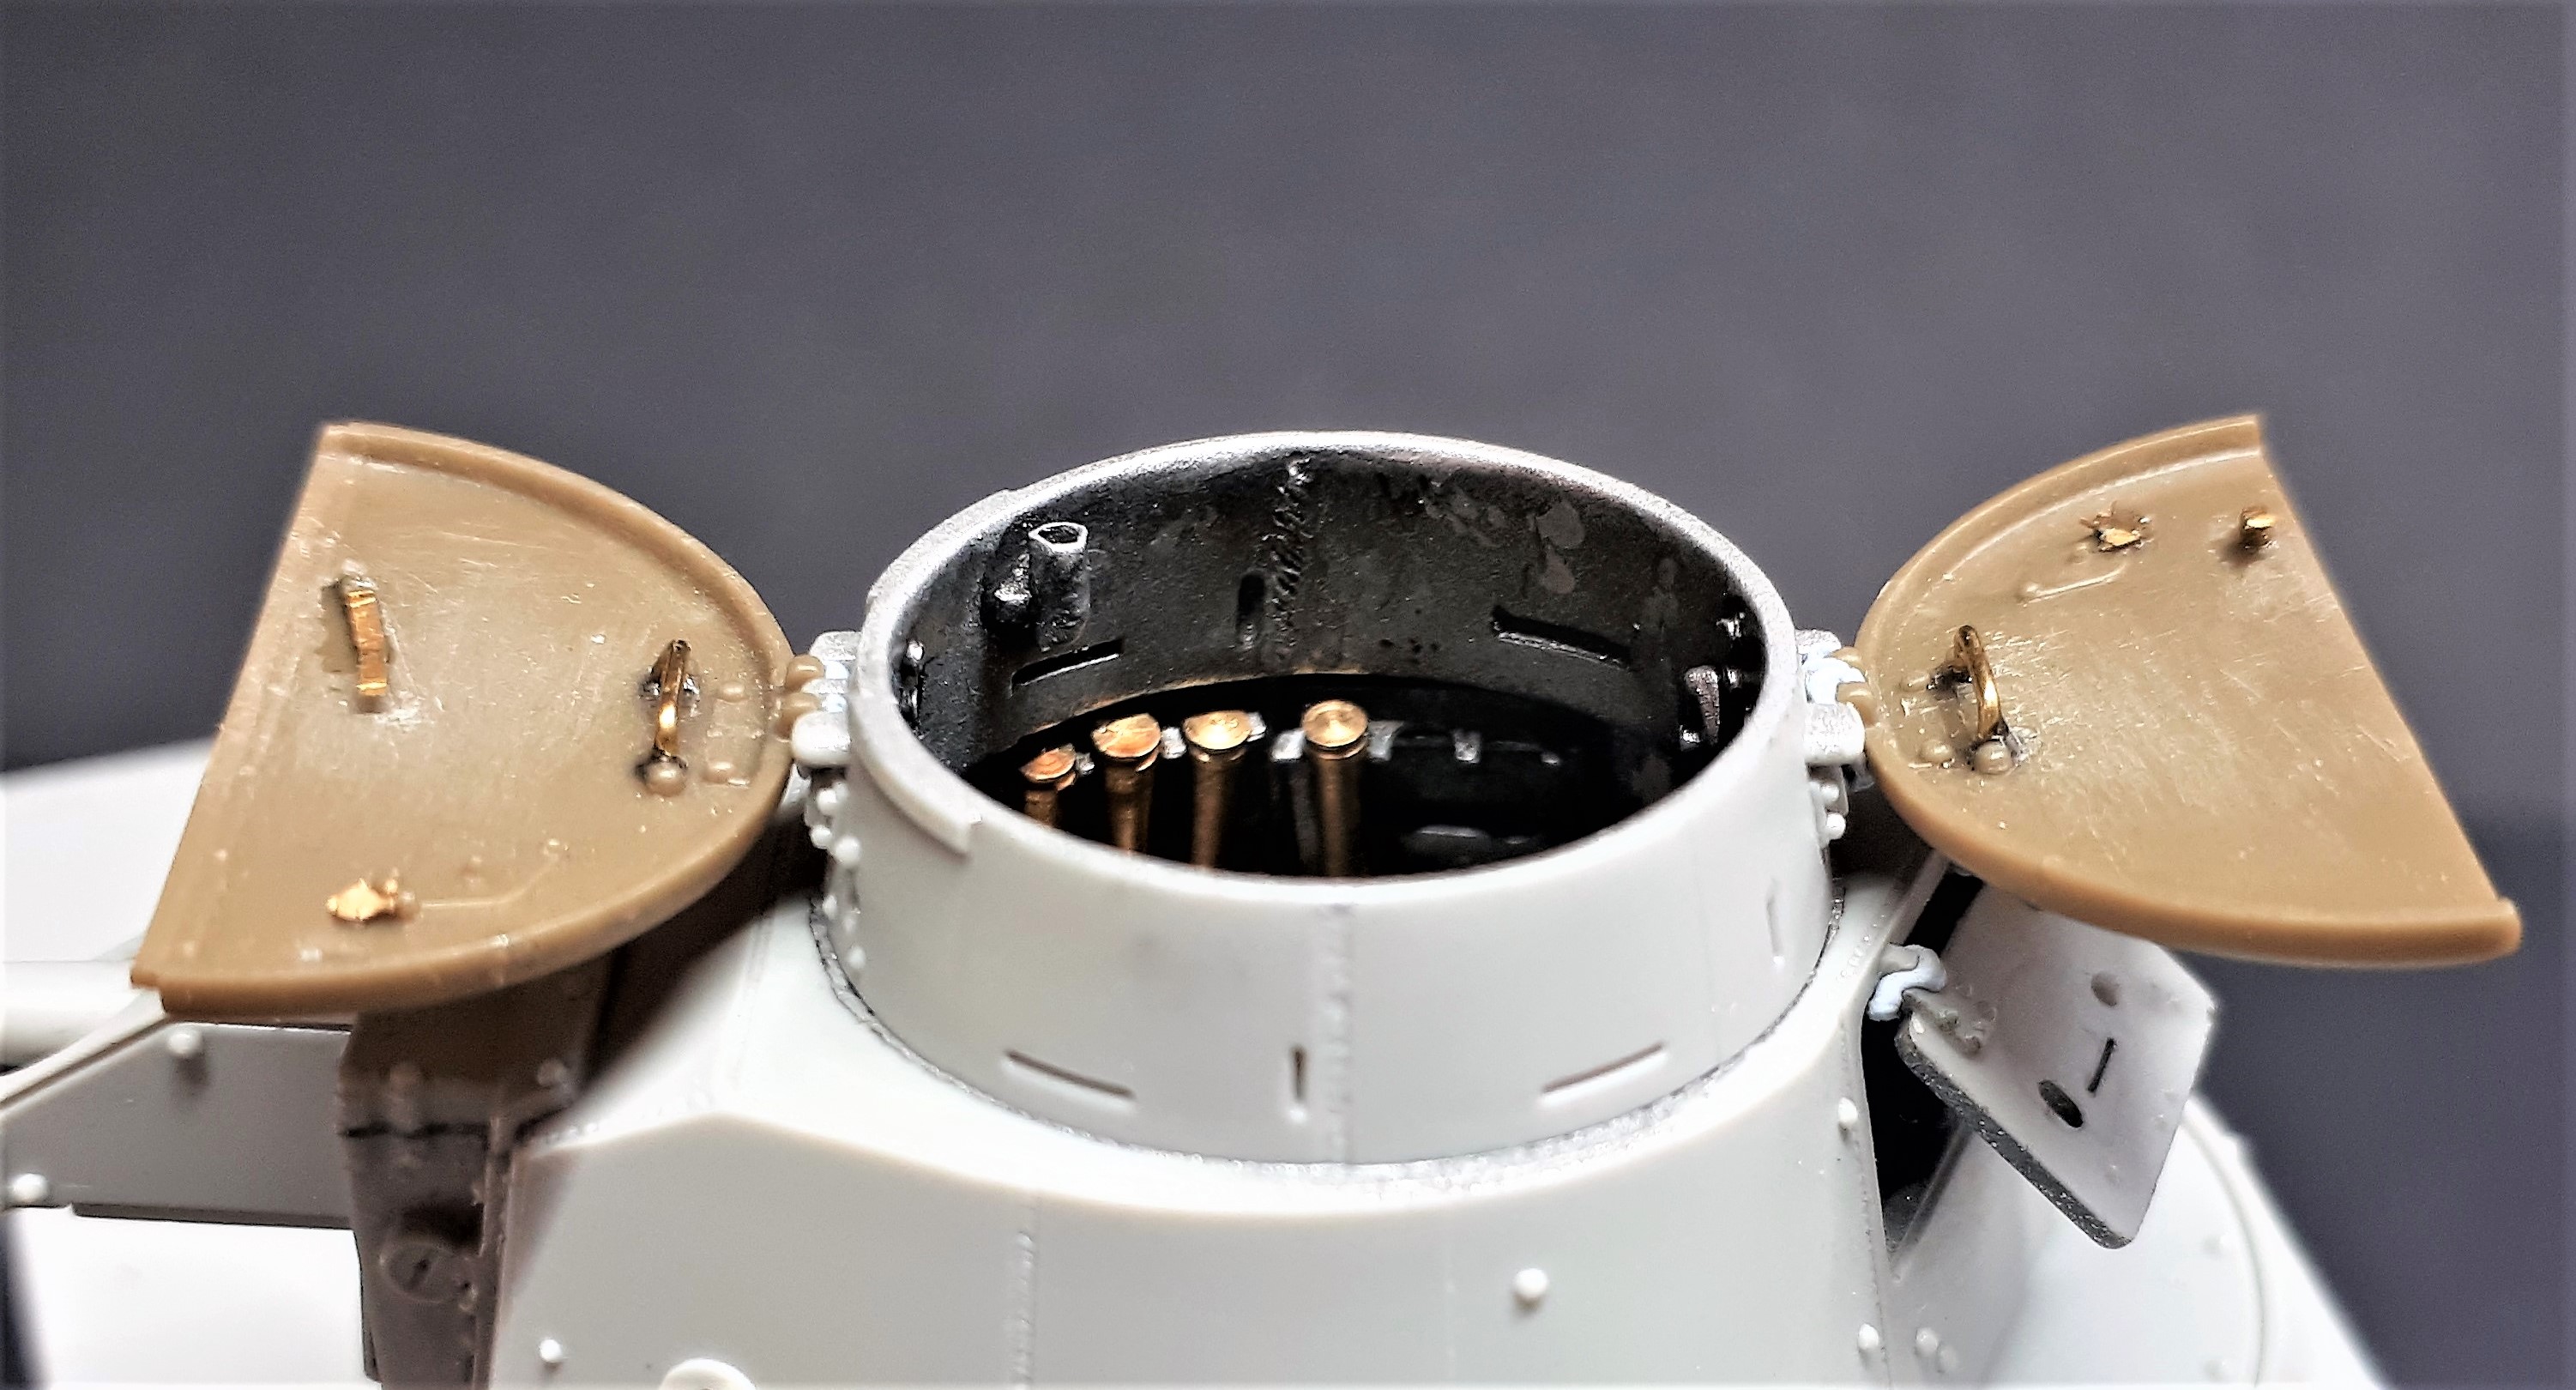
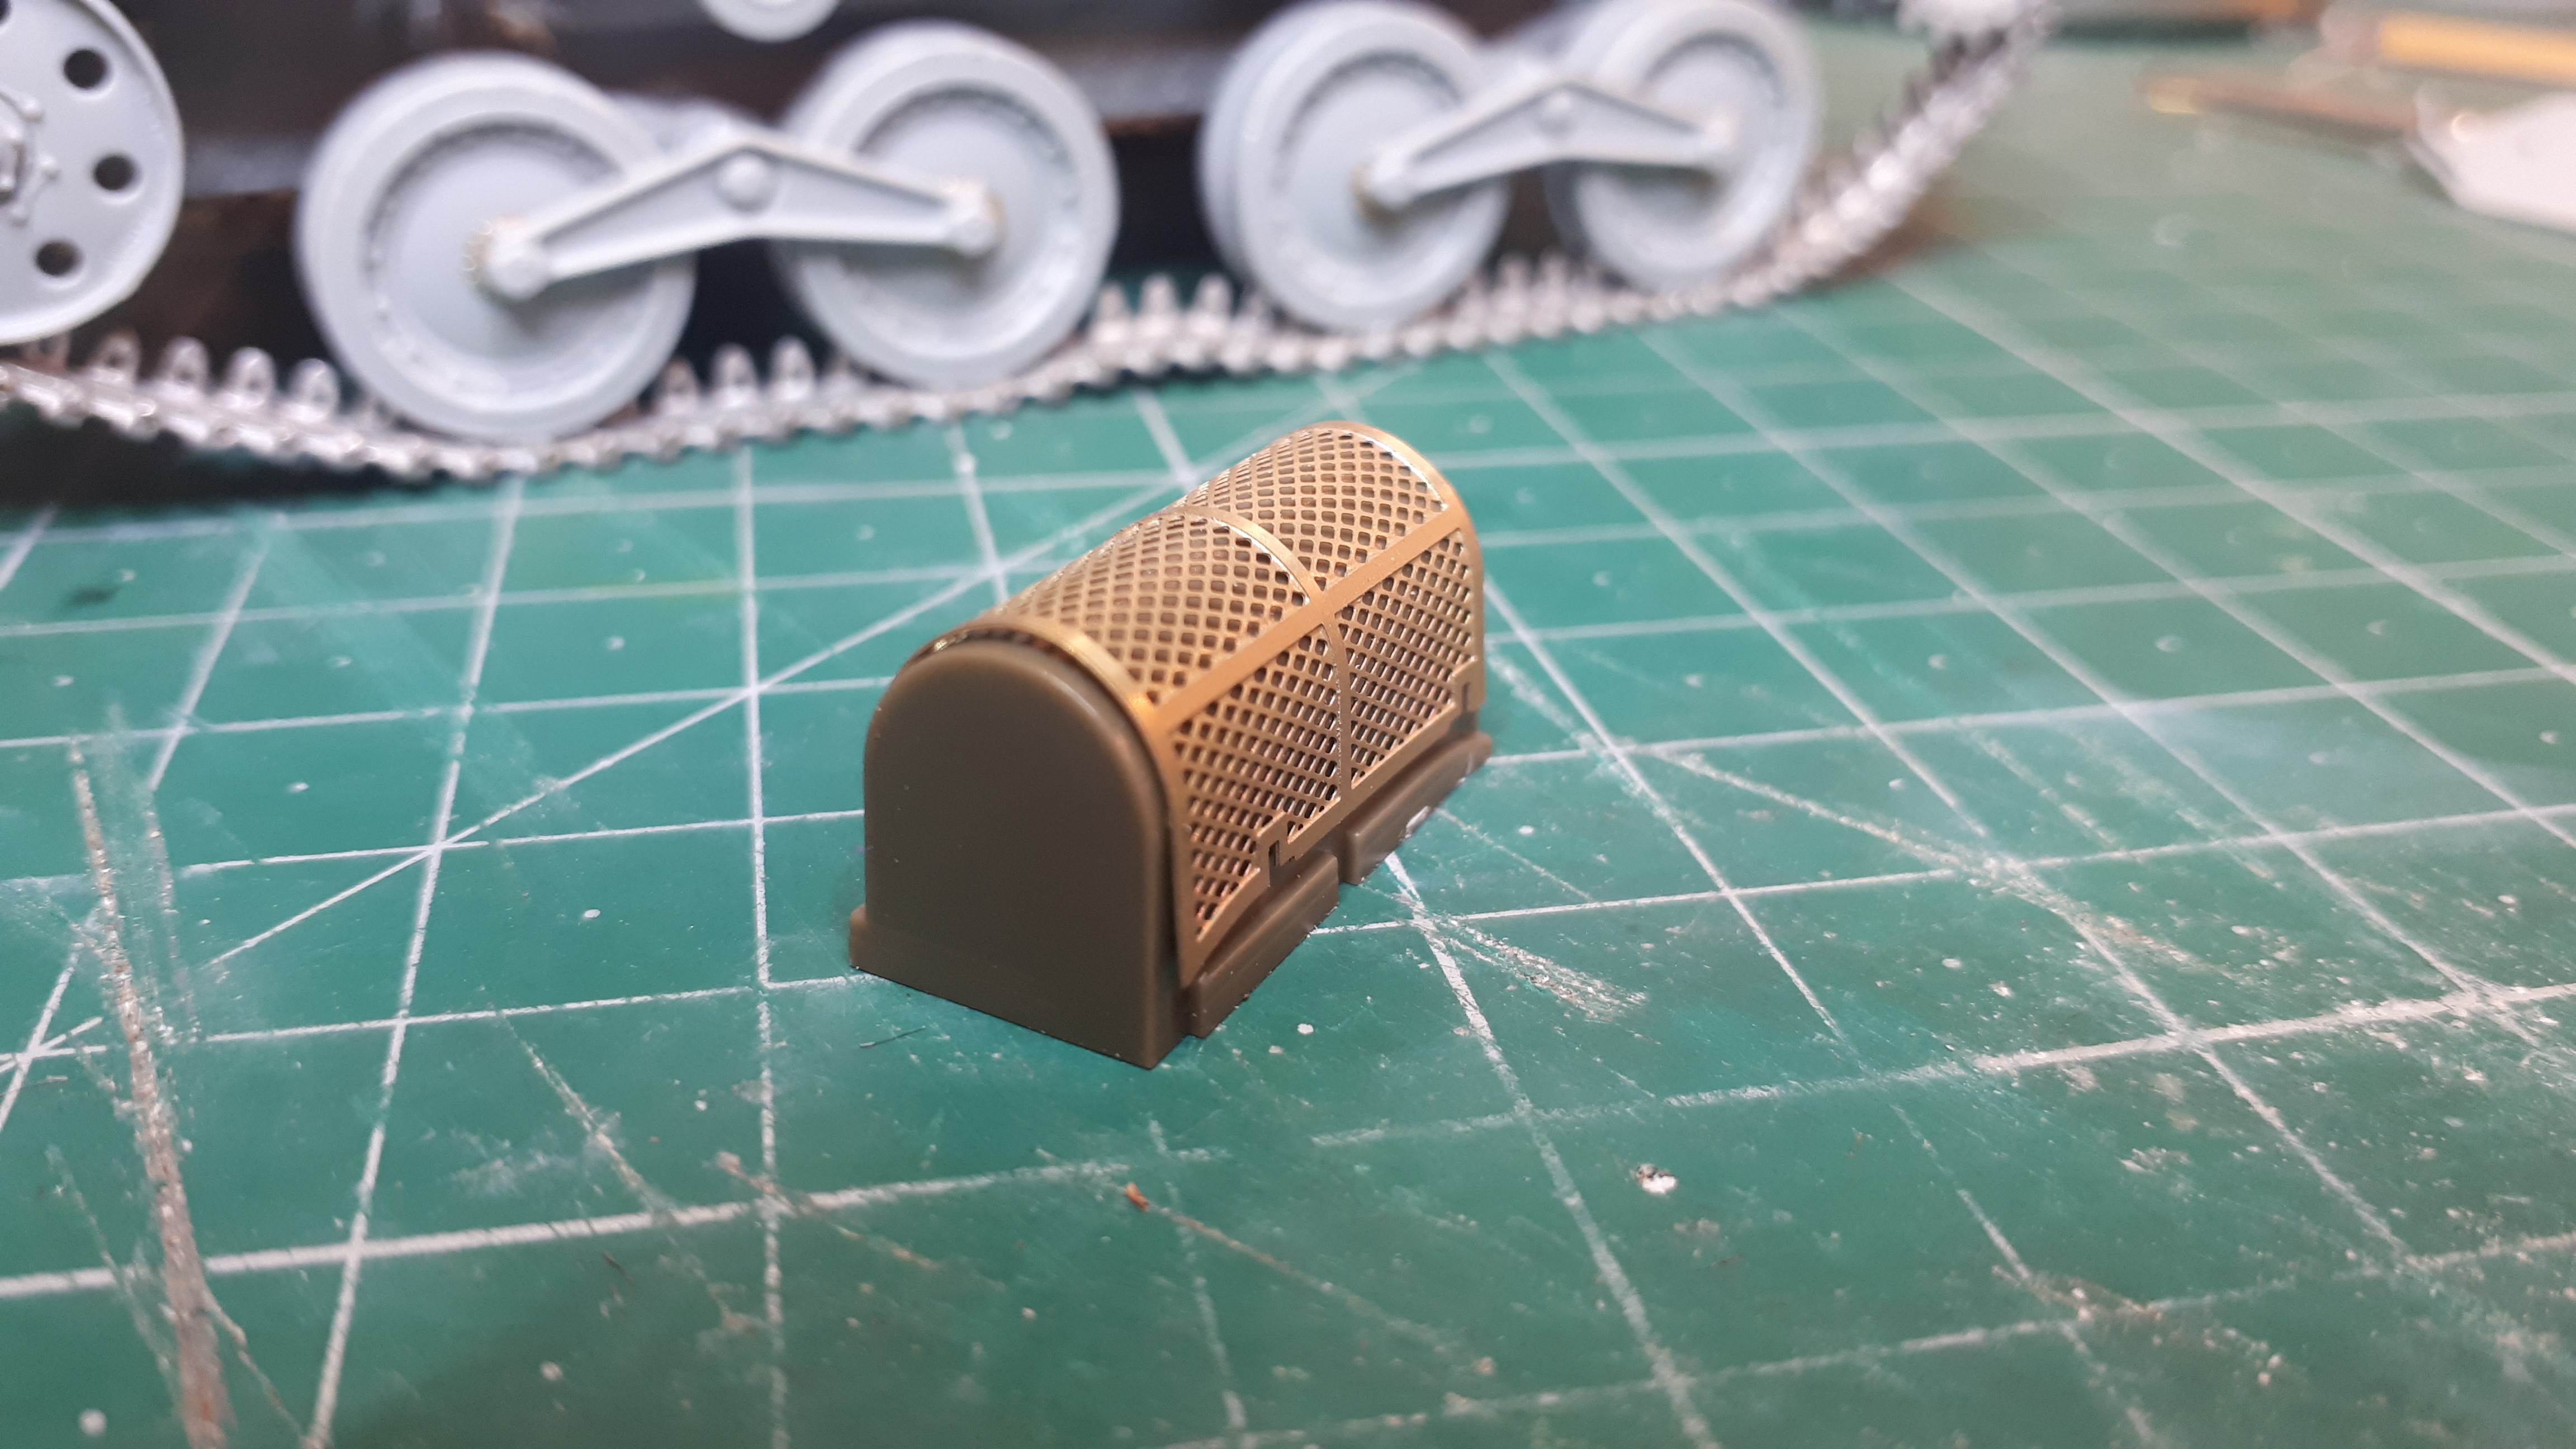
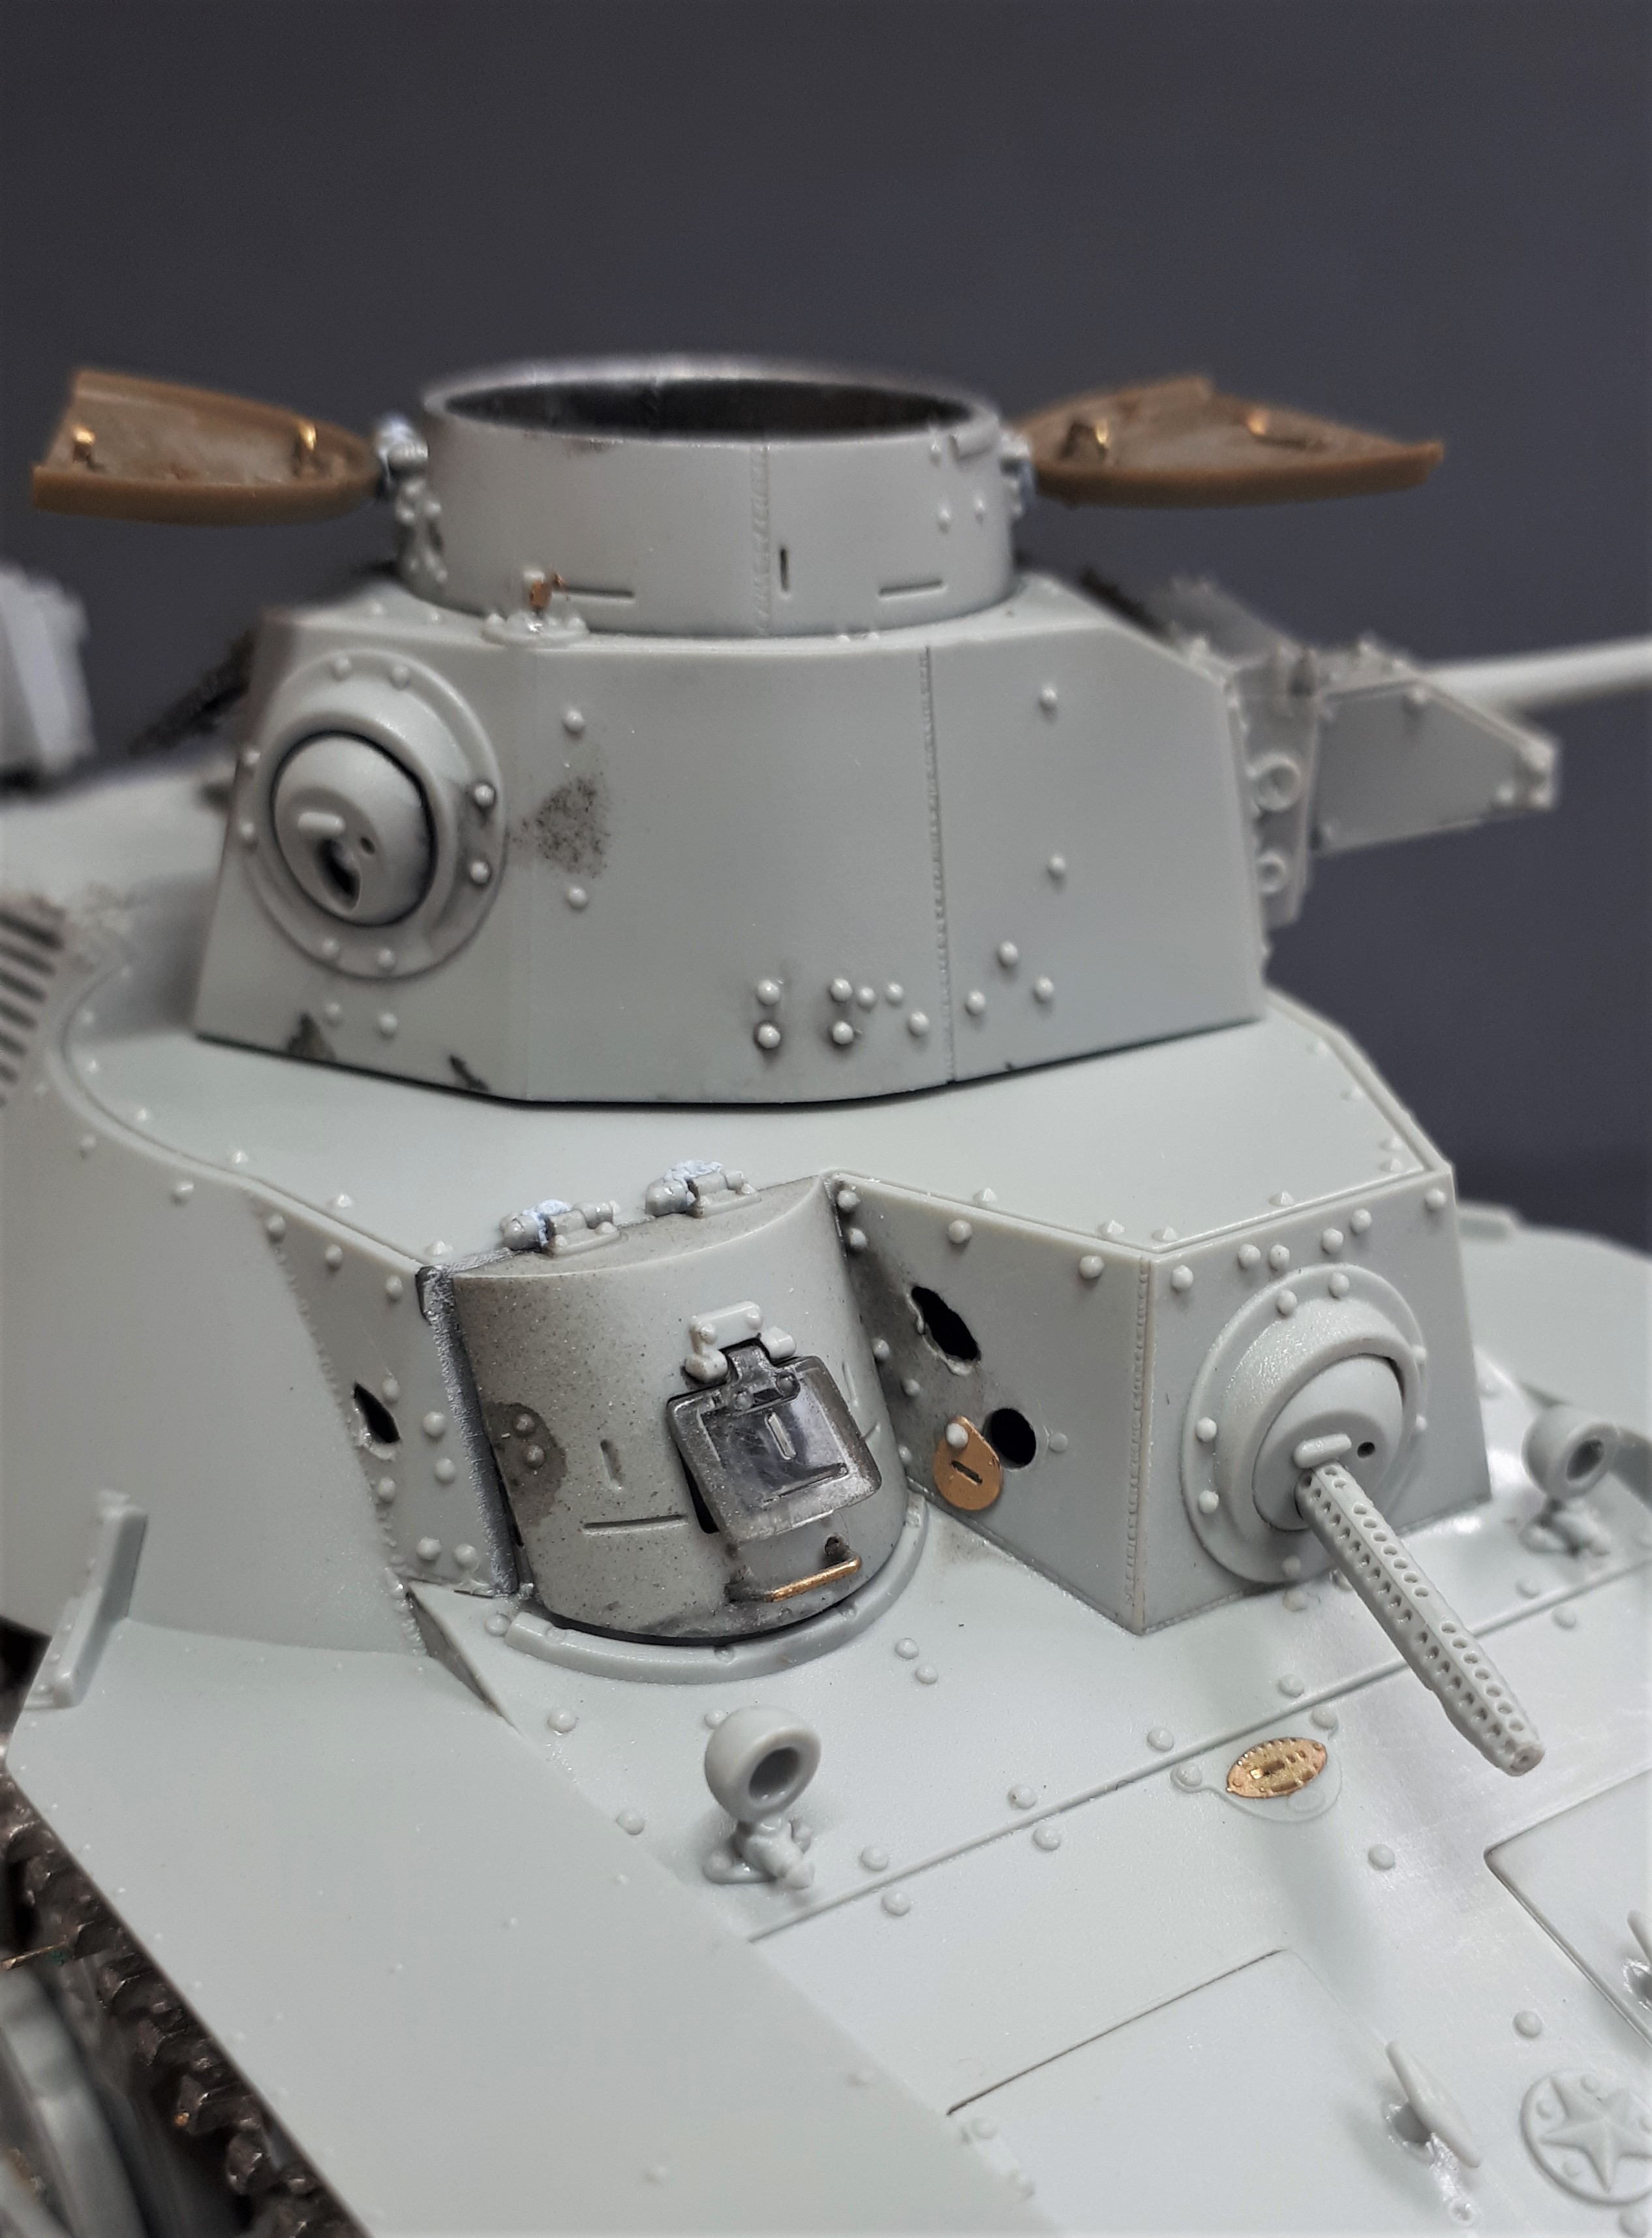
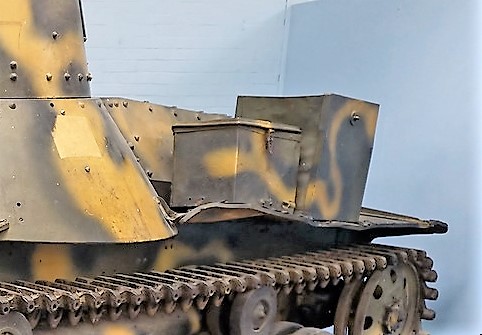
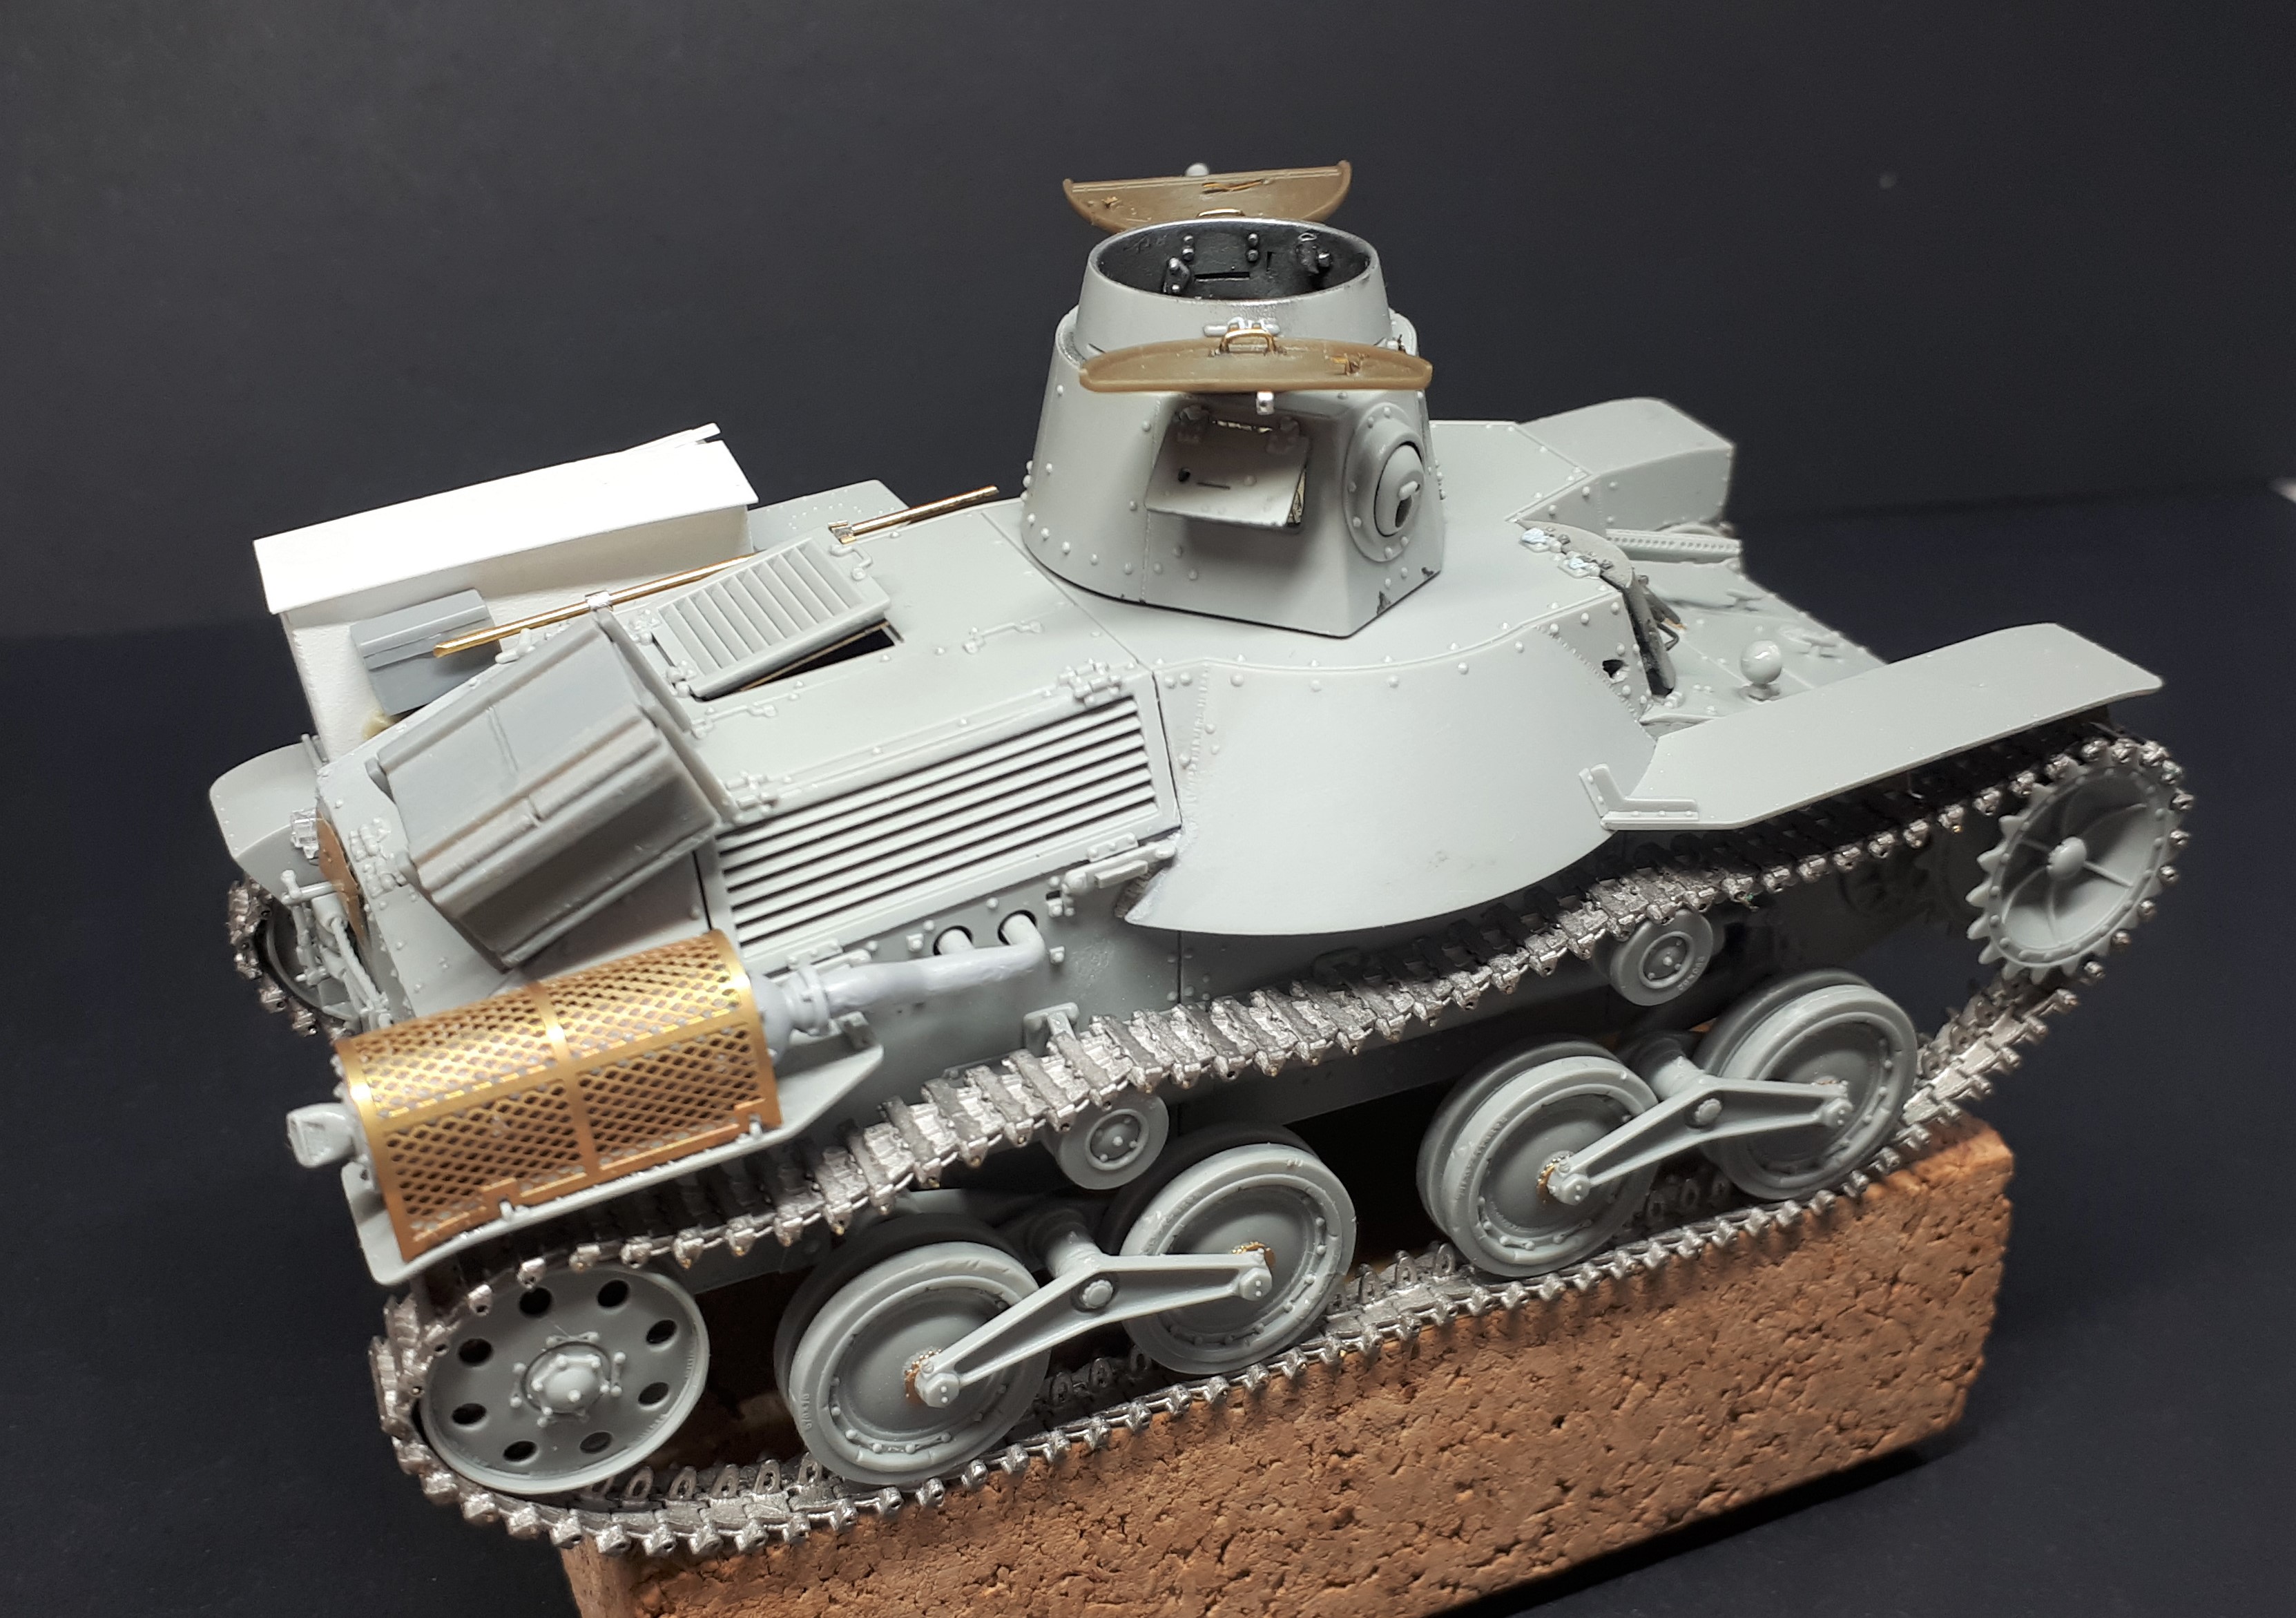
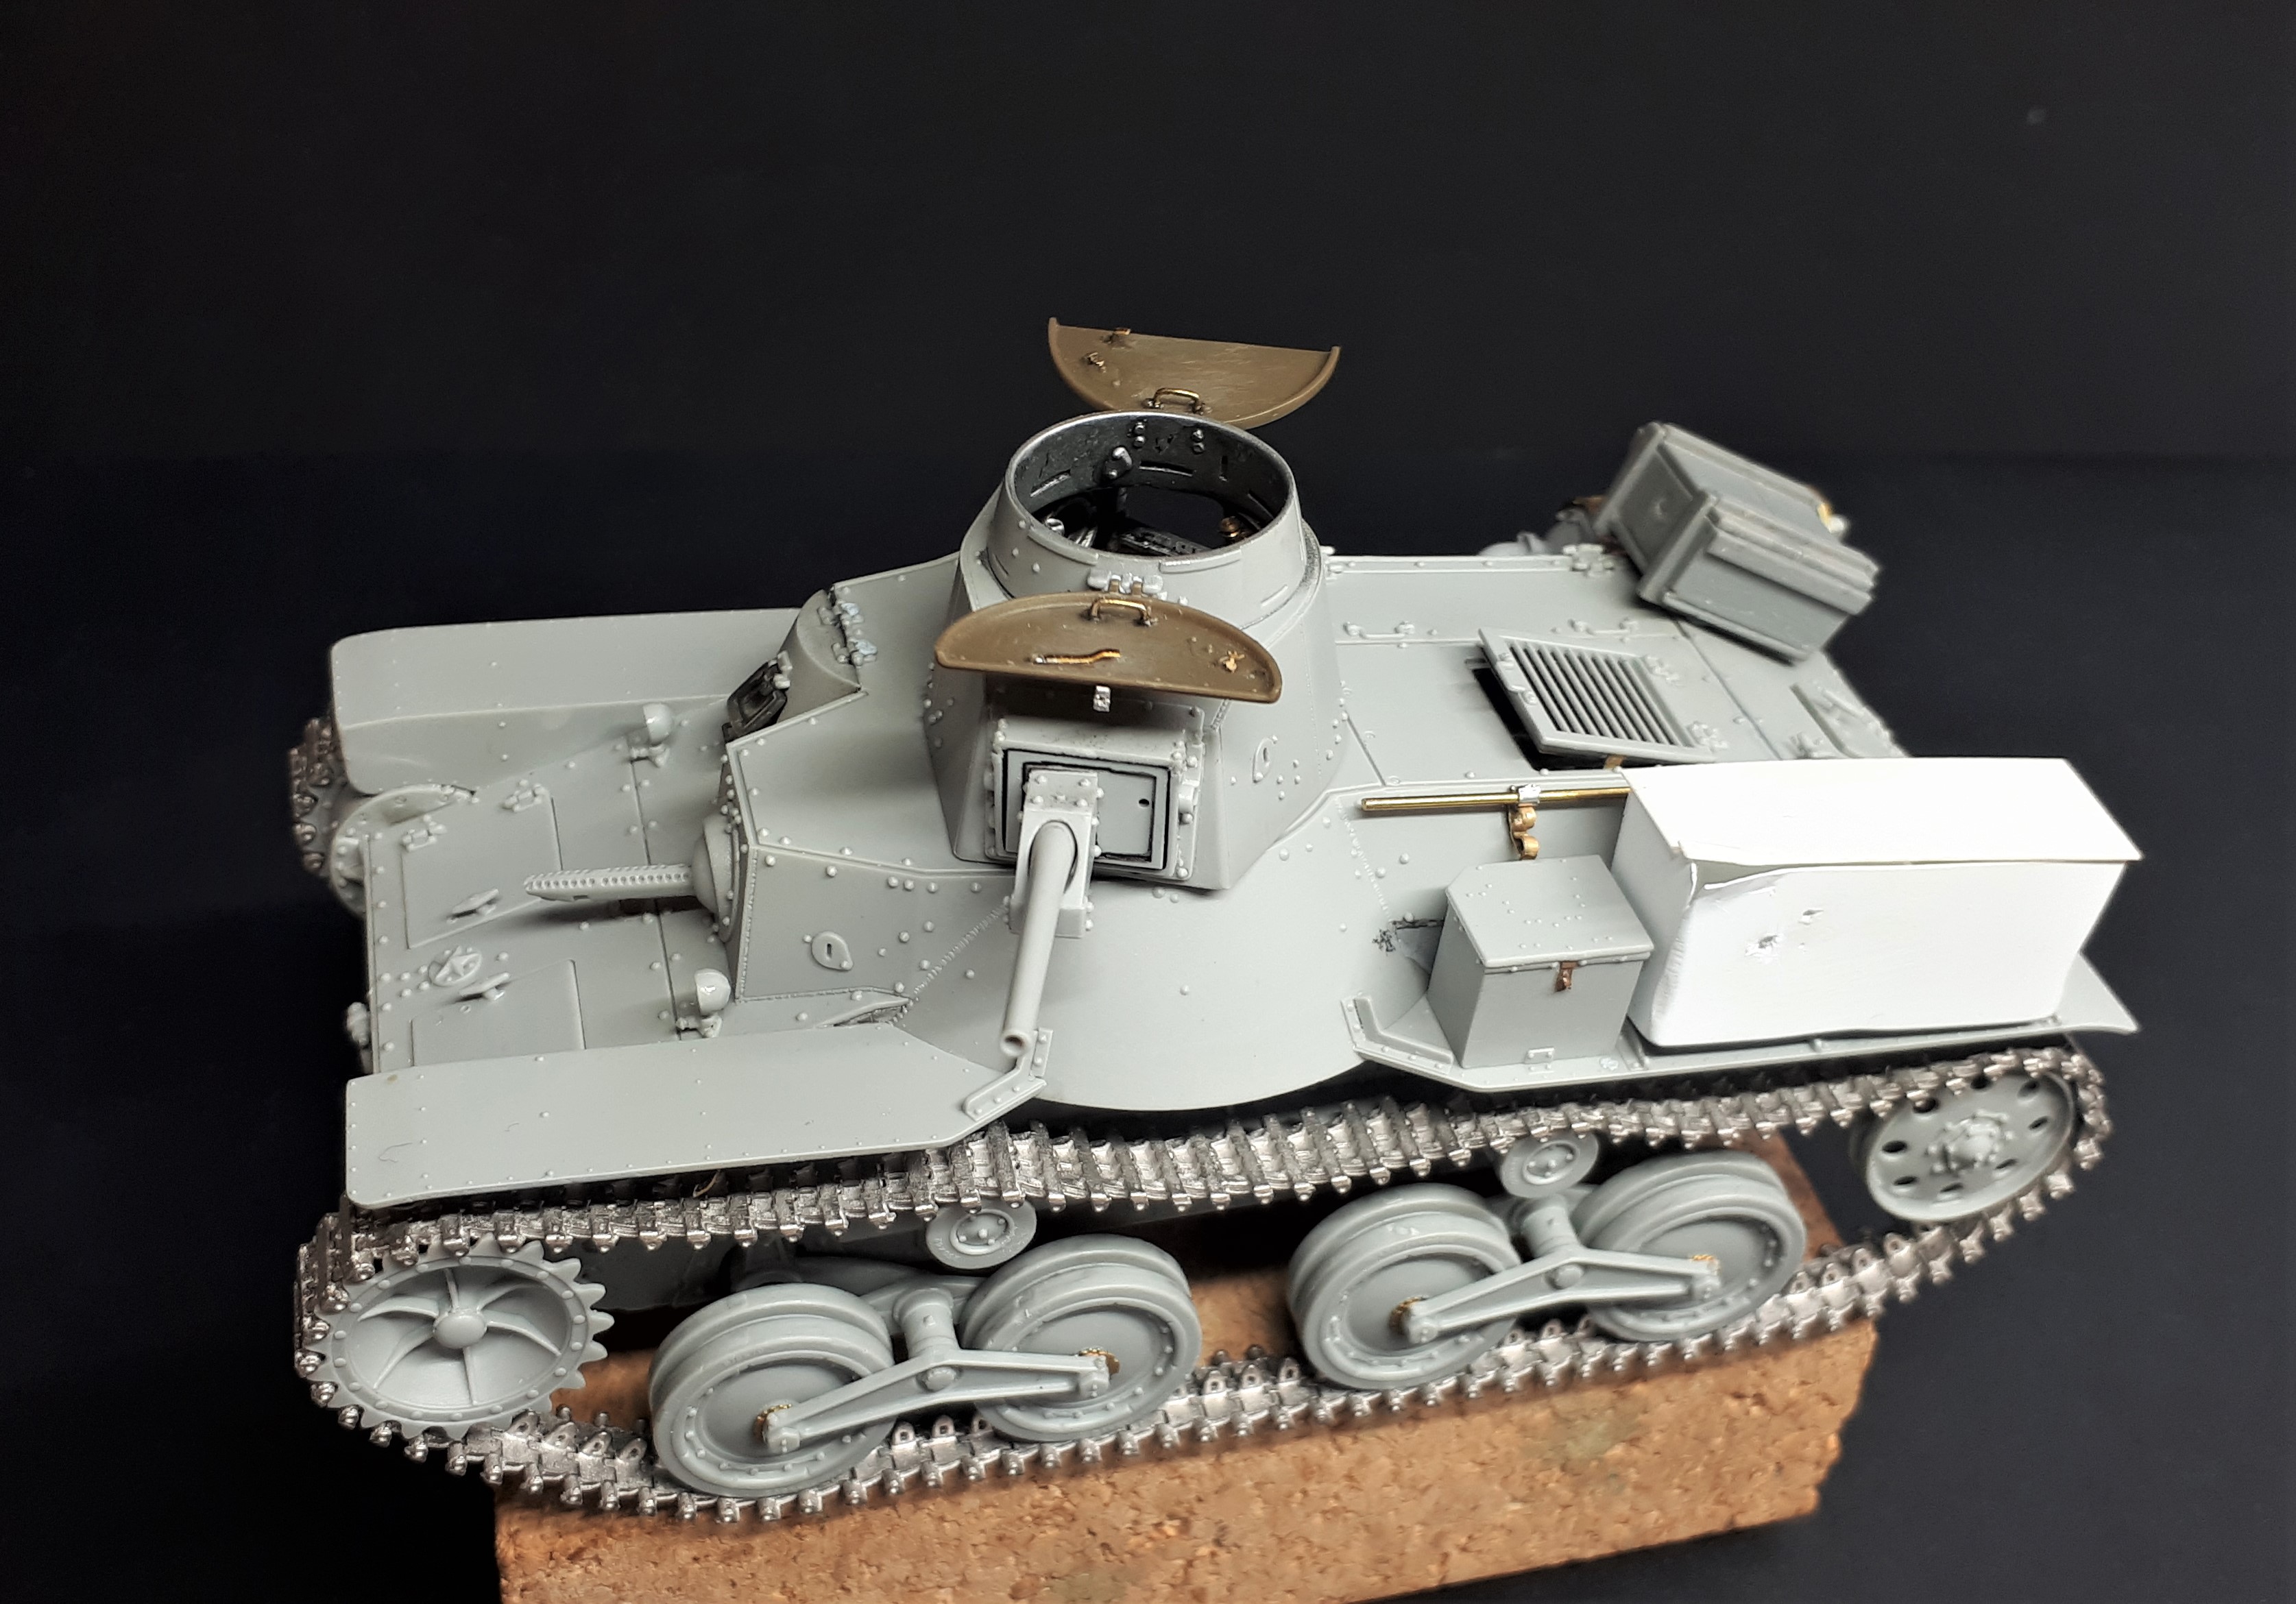
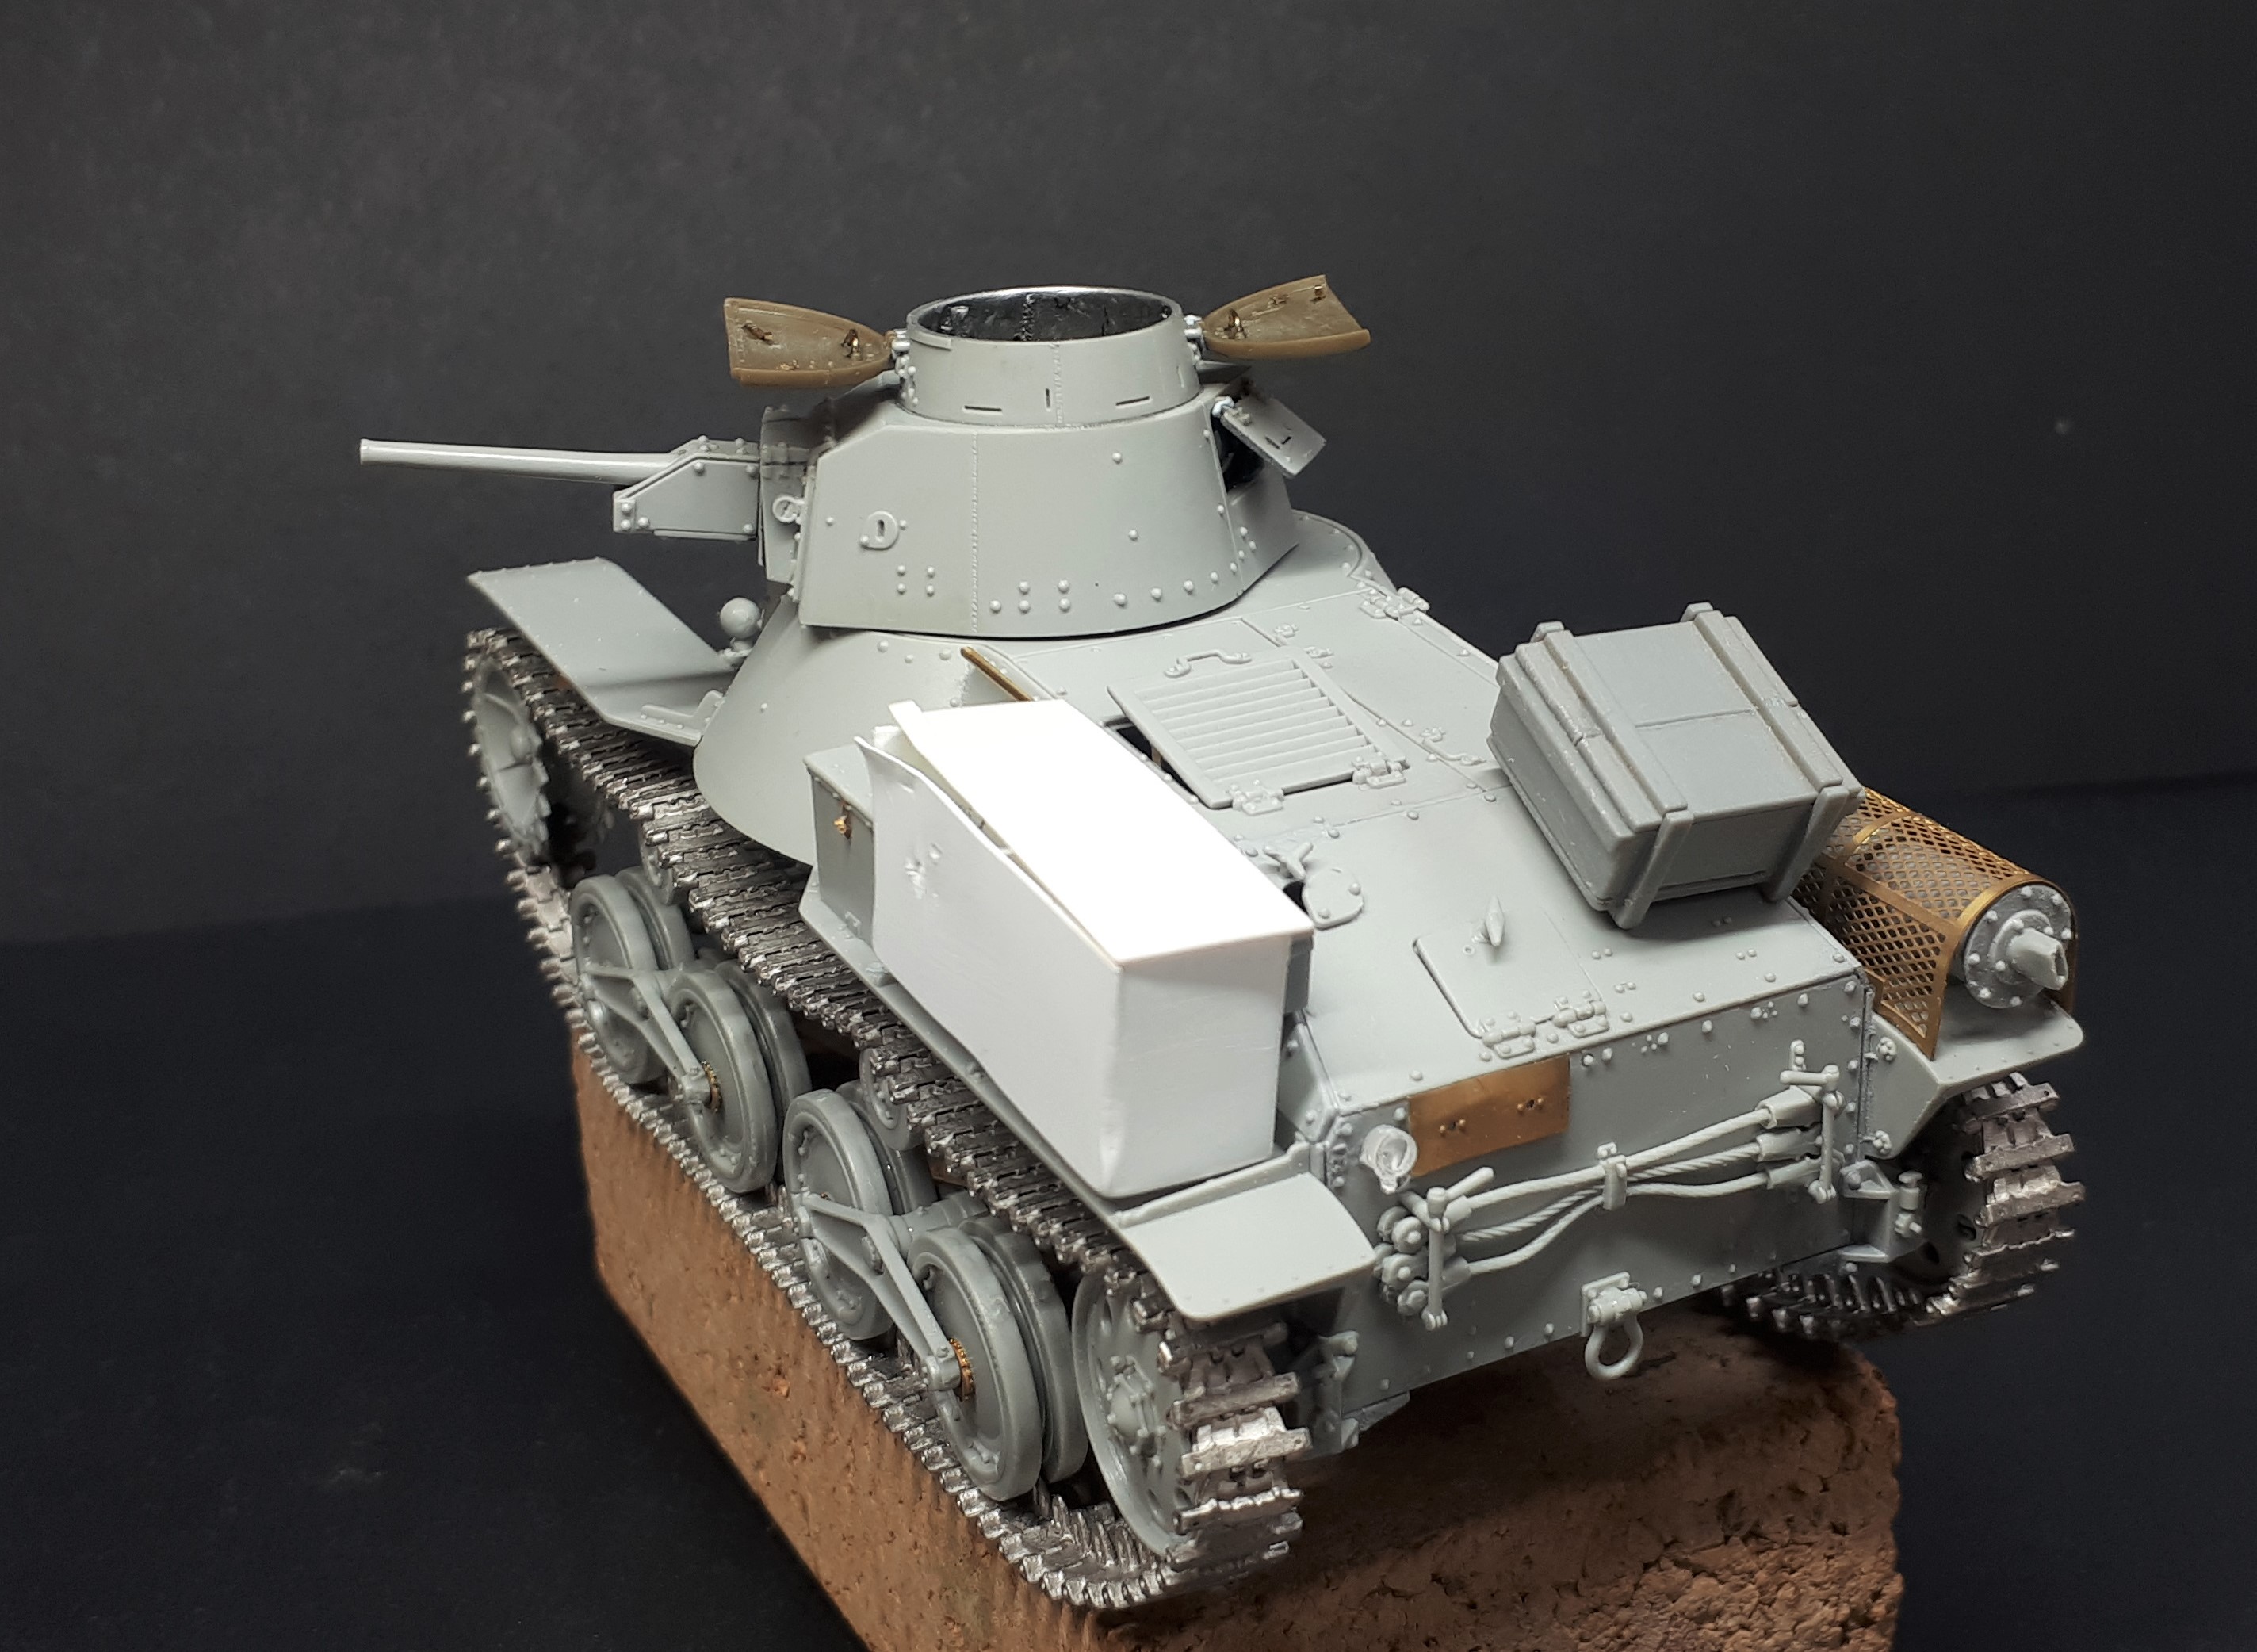
However, this post will concentrate on the Ha-Go itself and the build which involves two 1/35 kits - one from Fine Molds, the other from Dragon - together with a partially scratch-built interior, Friul tracks and some additional modifications to try and faithfully reproduce the version of the Type 95 that was involved in this fascinating moment in a conflict from the Second World War that is too often overlooked.

7 Likes

I wonder why the turret is turned when the action was to the front?
Nice job on the kit.

Because the tank has been abandoned

Good question. And at least two possible answers…

The 2-pounders that knocked out these tanks were either end of a shallow cutting and both were firing at the same time. So shells were coming from the front and behind. I go into more detail about this in my dio blog.

Also, the Ha-Go turret was designed so that the commander / gunner / loader (yep, he was the same poor guy - a lot like most French tanks if the era) could engage the enemy with either the main armament or the rear MG (actually located at about 5 o’clock). Sometimes the tanks advanced with their turrets reversed for this reason.

The lead tank was ultimately knocked out by two High Explosive rounds that penetrated either side of the driver’s position (these can be seen in one of the images above and another below, as well as on my model) so it’s quite possible that the turret remained in operation even after the tank was stopped. In fact, accounts of the battle suggest that Japanese infantry climbed into some of the tanks to use them as mobile pill boxes once they were halted.

1 Like

Turrets don’t just turn to the side when abandoned

Thanks, the commander might have been rotating the turret right before he abandoned the tank.

As I said above, this build is actually a mix of Fine Molds and Dragon kits, algthough this wasn’t the original plan. The initial inspiration came during a family holiday in Japan back in the summer of 2019 and a visit to one of Tokyo’s wonderful model shops: Hobby Shop Sunny.

The shelves were stocked from floor to ceiling and the aisles were so narrow that I had to move crab-like along them. You also need to pay cash. There I purchased the Fine Molds Type 95 Ha Go ‘Malayan Campaign’ kit. This comes with the option of additional photo-etch and a turned brass barrel, both of which I also acquired.

It is fair to say that the Fine Molds kit had its share of advantages and disadvantages, but I had managed to get a fair way through construction.

But then disaster struck. The kit was on a shelf in my modelling shed one day during the hot summer when it seems that a coincidence of strong sunlight and the angle of the window created a beam that was sufficient to melt the plastic on part of the turret!

To be honest, the damage was not that serious and, with a little bit of effort, I might have been able to repair it. However, this experience had reinforced a paranoia which I had already developed about the slightly ‘soapy’ quality of the plastic in the kit and, if truth be told, I had started to become a bit disenchanted with the kit generally.

At the same time I had started to jealously eye the Dragon equivalent: Type 95 Ha Go ‘Early Production’. So I took the plunge and bought the other kit.

Dragon Type 95 Ha Go 'Early Production' box top

As we will see, the Dragon version is not without its faults, but I have to say that it is, overall, the superior kit. Not only does it have (for the most part) crisper details (such as the embossed writing on the tyres), but it also comes with full internal details for the Type 94 37 mm main gun and the two ball-mounted Model 97 7.7 ball-mounted MGs. These are especially important for anyone (like me) who wants to build a model with an open commander’s hatch and no crew figure, because the Ha-Go has an especially large cupola hatch for such a small turret.

type 94 37 mm tank gun which was in fact a modified type 94 rapid fire infantry gun

Type 97 (1937) 7.7-mm machine gun in a ball mount taken from the left front of a Type 97 (1937) medium tank hull

In a way, switching to the Dragon kit was a shame, because I had already gone to considerable lengths to scratchbuild these guns for the Fine Molds build…

…but since this hobby is largely about the pleasure of achieving the representation of the real in miniature, I am just going to put this down to experience!

Also, although I had already taken the trouble to scratchbuild much of the rest of the tank’s interior, I decided that this could all be transplanted into the new kit. And so this:

… became this:

… and then this:

… and then this:

11 Likes

Stupid sun! Like the scratch building, etc.

Nice work and great write up. Thanks for posting. I enjoy Japanese WW2 armor subjects.

Cheers!

chuck

Thanks guys.

There are actually quite a few shots of the inside of Ha-Gos on the internet these days, including the magnificiently restored specimen that turned up at Tankfest a couple of years ago. The latter’s interior shows everything painted in a silver grey paint, a bit like British AFVs of the period.

The hull interior was based on anything I could lay my hands on in the spares box. The light brown floor and transmission came from an old Italeri Achilles kit and most of the light grey bits from an AFV T34 interior, as did the engine parts. The driver’s dash is a cut-down Tamiya German radio set and the rivets are Archer transfers - this was the first time I had used them and they certainly save a lot of time! The base colour used was Vallejo acrylics: Aluminium highlighted with Steel with some details picked out in Brass and Rubber Black. I then used Vallejo Acrylic Wash and added some spent MG shell casings from snips of brass rod. The larger shell cases are actually from the 2-pounder set, so they are technically too large (40 mm as opposed to 37), but they look fine…

It’s certainly not supposed to be anything like 100% accurate, but just to show something approximate in the gloom of the lower interior visible through the hatches…

5 Likes

Although the Dragon kit comes with a very nice reproduction of the main gun and ball-mounted MG, the ammo stowage is the most glaring omission. It also shows how cramped this turret must have been - even for one over-worked commander.

Luckily I was able to simply transplant most of my scratchbuild from the Fine Molds kit. The shell clips are simply made from left-over photoetch ‘sprues’ (it’s always worth keeping these after you have used the actual PE parts) bent to shape and the scalloped rests for the bottom of the cartidge cases (which were stored upside down in the real tank) came from a German grenade box kit. The shells are actually for German 3.7 cms guns and hence a little too long, but they will look fine through the hatches.

Another distinctive aspect of these Japanese tanks are the asbestos panels which line much of the interior. These were made from plastic strip and Archers transfer rivets.

The Fine Molds kit did yield some useful parts for the turret floor however - specifically the clamps that hold the turret in place on the ball race. You can see them here after painting and weathering.

Another part of the interior that required a lot of work was the interior of the commander’s cupola.

The hatch is very large - taking up about two-thirds of the turret roof area. With the hatches open the inside is visible even without peering down into the turret interior.

Now this is one aspect of the kits where the Fine Molds version is actually better than the Dragon equivalent. The Dragon cupola has no interior detail whatsoever, whilst the Fine Molds version does at least have the inside fittings for the hatch hinges and also the small circular vision / pistol ports. However, what neither kit offers are the impressions of the six horizontal and two vertical vision slits which surround the cupola itself. There are also two prominent vertical weld beads inside because the cupola ring itself was made from two semi-circular pieces.

You can see the inside of the vision slits and one of the weld beads in this image of a restored vehicle.

When I was sill intent on fiishing the Fine Molds kit, I tried to drill out the vision slits all the way through from the outside using a very fine drill. This was only partially successful - partly because the Fine Molds cupola is also way too thick. Once I had the Dragon cupola (which is at least thinnner) I decided a different approach.

Here you can see the two cupolas side by side with the Dragon part on the left and the FM one on the right (the reason that the FM one is grey and not dark green is because I had sprayed it with primer to see how well my work had gone - I was not impressed!).

Next I cut out two strips of thin plastic sheet which were the right size to wrap insde the Dragon cupola and cut the vision slits into them.

These were then glued inside and, once dry, sanded to make them as thin as possible. Next I transplanted all of the hinges, etc from the FM part into the Dragon cupola. I also added some bolt heads from slices of stretched sprue and the weld beads from the stretched sprue also, softened with liquid cement and then pressed gently with a knife the make the weld beads.

It looks a bit messy here, but once everything was painted I was quite pleased with my efforts.

In this last shot you can also see the replacement grab handles and hatch latches which I added to the Fine Molds hatches using brass wire and spare photo-etch strips. These were moulded solid on both the FM and Dragon kits, so you have to make them which ever kit you buy. It’s an odd feature of many of these kits that they give you 3D handles for use on the outside, but seem to think it is acceptable to mould them as simple raised details on the inside of hatches - even when you want them positioned open.

The final detail I added to the inside of the cupola was an AA mount for the MG (from a small piece of brass tube). I believe that not all Ha-Gos were equipped with these, but if you look carefully at the shot of the second tank at Bakri (with the dead crewmen alongside) you can just make this out. The FM kit also had the mounting brackets in the correct position, but not the tube.

Close up of second tank cupola

One useful part of the Fine Molds kit which did not come with the Dragon equivalent was the mould for the photo-etched muffler guard. Here is the Dragon PE wrapped around it…

The Fine Molds kits also wins the prize for the most detailed maker’s plate on the front glacis. However, you can also see other details, such as the armoured MG sleeves, which are far superior to the FM offerings.

Here you can also see the two ragged holes caused by the 2-pounder HE rounds. These were made in the usual way by thinning out the plastic from behind and then punching the holes with a craft knife. I have tried to replicate the real impacts as closely as possible…

7 Likes

My God your scratchwork on the interior is just beautiful! It’s a shame to cover it with paint!

Beautiful work there

Amazing Work!! Great attention to detail I could only dream of attempting myself!

Thanks everyone.

Now before I started this project I knew almost nothing about Japanese tanks. There’s still an awful lot that that I don’t know…

However, having looked at a lot of on-line images of the Ha-Go I noticed one aspect of the tanks used in Malaya - or at least in the Bakri action - which differs from most other Type 95s: at least some of them have a large rectangular box on the rear port trackguard which sits behind the standard metal bin. Once I started to assemble the kits (both the Fine Molds and Dragon ones are the same in this respect) this began to puzzle me, because this box is in the same position as the jack and other tools, all of which have specific mounting points which would otherwise be in the way of this box.

Rear box and stowage

The clearest view of this box is that on the second tank (shown in the lower image and in the background of the one above). Even though it is partially destroyed, it is possible to see how it overhangs the track guards thermselves and was held on the vehicle by a length of wire or rope. As for what the box contains I have no idea. It also appears to be of fairly flimsy construction - so perhaps made of thin wood or even cardboard.

Also visible in the same image is the wrecking bar (with a length of chain wrapped around it) and mounts for the other tools which were mounted on the side of the engine compartment - and not the track guards - which would explain how the box was able to be placed in this position. What happened to the jack, I have no idea.

The only other Ha-Go I have come across which has a tool layout which is in any way similar to the Bakri tanks is the one in Bovington Tank Museum. According to the website, this Type 95 was captured in Malaya and was examined in Calcutta before being sent to Britain.

Bovington close-up of rear nearside stowage

This Ha-Go, which appears to be in good condition, still has one smaller box behind the official stowage bin, although on capture it clearly had yet another as well. It also has no mounting point for the jack and you can see the clamps for the other tools (crowbar, spade and pick) on the front port trackguard - so a third variant.

By the way, there is a great walkaround of this tank from the museum’s curator David Willey at: Tank Chats #50 Ha-Go | The Tank Museum - YouTube

The tank is sealed, by the way, because of the asbestos which is still inside it and, as he helpfully explains, the camouflage scheme is completely spurious.

So I replicated the tool clamps from spare photo etch and made a crowbar from a piece of metal rod with the ends sanded to a suitable profile. You can see my attempt at scratch-building the box from thin plastic card in the images of the model below, in its finished state state prior to painting.

Oh yes, one last word on the tracks. The Fine Molds kit comes with the link and length variety, which are OK, but lacking in detail. The Dragon kit comes with the ‘rubber’ full-length type, which some people love and others loath. I have so say, they look very nice detail-wise and the only issue would be getting the right sag.

So I went for the Friul model option. Now I have heard from a few people that the quaility at Friul may be slipping and I have to say these ones bear that out. Not only was there quite heavy metal flash on many of the links, my box also came with two port sided pairs.

2 Likes

I’ve been eagerly following this thread. I’ve got the same tank in my stash. Great video link too!
BTW, I have a photo of the Bovington type 95 from 1977. The paint is identical to your photo.

The level of detail that you have been doing is impressive, I assembled them without detailing the interiors and I see that I missed, those details add a lot to the tank, a luxury your advances, Omar

Exceptional modeling skills! You are doing a fantastic job on this vehicle, hats off to you! The scratch made interior is something to marvel at considering the subject matter. Love your attention to detail.

I have a single photograph of my father sitting on the engine deck of one of these tanks on Iwo Jima. The turret is missing and his buddy is standing inside the open hull. When I was young I remember seeing so many pictures of Marines camping around a grave yard of Japanese tanks by a huge bunker with steel rods sticking out from it and broken off cement and torn apart trees in his diary. I don’t know what became of all of those pictures? But I’m happy I have at least the one.

It wasn’t until I started modeling that I noticed the tank was a type 97 like your modeling. My father had told me that the Japanese had attempted a tank Banzai charge at night and they got stopped by some Sherman tanks, one being a flame thrower tank and Marines dug into foxholes with a 50 caliber machine gun and a small mortar shooting up flares to help light up the night.

I’m following this build, keep it coming!
~ Eddy :tophat:

1 Like

Thanks Barnslayer. It’s a great little kit of a great little tank - so get building!

And yes, the camo on the Bovington Ha-Go is cool - just not accurate…

Thanks Omar.

For the interior I have tried not to go too far - if you can’t see it once the build is finished, then what’s the point?