An object in motion will remain in motion.
Unless of course acted upon by an external force.
“After The Battle”… Yet another failed attempt by “Charlie” to probe our perimeter… Somewhere in the Highlands - 1967.
Looking incredible so far. ![]()
NICE! i’ll take two to go.
Keeping the momentum going…
Today’s progress consisted of painting and placing the claymore clacker onto a sandbag at the bunker’s opening.
Weathering and making the PSP holding up the bunker’s roof a bit rusty.
And then painting weapons and empty M16 magazines and placing them in their appropriate locations. I also made some pools of blood that accumulated under the dead VC/NVA and some blood splatter where the guy manning the top of the bunker when the attack occured got hit.
It may seem a bit gory without the figures in place, but once they are, it isn’t as bad and looks rather appropriate for the wounds sustained.
I still need to add shell casings, the satchel charge, and vegetation to the base. I will start painting figures tomorrow.
Although I had planned on working on my vignette today, Household 6 had other plans and a list of stuff that had to get done. Because of that, I wasn’t able to go to Hobby Lobby to get some brass rod to cut into representations of shell casings, so I wasn’t able to do that. However, I did get a few things done to the vignette. I painted the satchel charge and attached a strap before installing it on the base. I then added a bit of vegetation to the right of it to provide a bit of color and to hide the gap the terrain caused on that side. I slso placed a bit of grass growing in between some rocks. After the photos were taken, I added a small leafy plant to the clump of vegetation.
Down to the last touches before getting some green on, used a soldering iron to ding up the fenders and sponsons . . .
It really hurts your feelings to put so much work into something only to turn around and destroy it, the dents and dings look excessive but all the pics of Pattons in Nam look as bad or either the fenders are just gone, I’m still a little unsure of it even though it’s supposed to be a tank that’s been in country for awhile.
Any way I got antsy and decided to squirt some paint on the body to draw out any fixers . . .
Well that’s gonna be it until some am part’s deliver from F C MODELTREND, not sure how long that’ll take but still got road wheels and track to do, thanks for looking in, any thoughts on the jungle damage speak up I’d be intresred in knowing your opinion ![]()
Cajun ![]()
I think your fender damage looks excellent. Trees are resilient things and don’t just fall down like in the movies. I’ve seen trees scrape the paint off right down to the armor on M113’s before. Your damage is consistent and well done - looks like this tank has been jungle busting for a while. You took a big chance and it turned out fine. This will look outstanding when done.
The last few days were busy with things ither than modeling, but I was able to do a bit here and there on those evenings. I had bought some gold colored copper wire from Hobby Lobby in two gauges to make 5.56 and 7.62 shell casings. I prepared and primed the figures so I can start painting them. These things took a few minutes in the evenings.
Today after I received the package containing the grass tufts I was waiting for, I toned down some bright green alien gamers grass using AK interactive dark vegetation and light vegetation colors. I then placed groupings of tufts here and there. After the figures are painted and placed, I will add some smaller and shorter tufts at the edge of some of these tufts for some height variation. I will also add some other plants. After I placed the grass tufts today, I brushed on some AK Interactive’s Ultra Matte Varnish in several placed and strewn shell casings about. The varnish seems to be holding the shell casings in place without glue marks. I think it is starting to take shape.
Really fantastic work, James ![]()
![]()
Thank you. Can you believe FB covered up one of those photos because some people may find it too graphic? The figures aren’t even fully painted yet and I think it was pretty obvious that it was a model and not real, but oh well.
This morning right before noon I finished up the first VC figure and attached him to the base. I tried to give the skin tones a pale, bloodless look the best I could. The black pajamas were a bit challenging and did not turn out quite like I had envisioned despite using inks to enhance the color of the paint. Luckily he is not the main focus of the vignette.
I have already started the other two VC. They will not be wearing black pajamas. ![]()
well have been moving along tore road wheels off of right side trying to put rubber band tracks on had to reglue them sooo tracks may be next week
It was rainy today, so I was able to spend quite a bit of time working on the vignette. I finished painting the second VC figure. Although I had said that I wasn’t going to paint anymore black pajamas, I went ahead and did so for the trousers using a different brush and not using inks. I attached the figure to the base and added vegetation.
Side view where you can see the entry wound to the head.
.
And this would be the view from the top of the bunker.
Tomorrow I will work on the third VC.
this is my own personal opinion, as much as i love this diorama i still think the APC rear end was a better choice than the bunker but i do appreciate all the work you have put into this project.
As I’ve said earlier, this has the makings of a powerful piece of art/modeling. The workmanship is excellent (as always), and it probably will make the viewer stop and think. That will evoke reactions, and that’s a good thing. Our hobby is the historical depiction of warfare, pretty serious business, and your work showing (pretty mildly, in my opinion) the aftermath of a small unit action is appropriate and thought provoking. Maybe my reaction is colored by the fact the subject is my war, but it does strike a chord. Others may disagree, and that’s OK, that’s why we have discussion forums.
@Klaus-Adler, I am still going to make the vignette with the beehived M113. I still have the VC that fell casualty to the flechettes. I will just use perhaps only one GI in that revised vignette.
@SFCJJC, thanks. I think it will be effective. I could have made it more realistic with more gruesome wounds, but this should get the point across. I worked on the third VC today, but it is not turning out all that great. We had storms last night and the power went out meaningcthat my CPAP couldn’t be used so I didn’t sleep andcit is stormy today. I probably just need to stop and set it aside until I get some sleep. However, I am motivated right now and don’t want to lose momentum.
Today’s progress consisted of completing the third VC figure and pretty much finishing the vegetation. I would have liked to have done a better job on the VC. I originally was trying to paint a green shirt similar to the second VC, but it did not look quite right (we had storms and I didn’t sleep, so being tired could have been a factor), so I painted the shirt black.
The third VC bled out from an abdominal wound, and from this view you might be able to see it.
View from the defender’s viewpoint.
From this view you should be able to see the Ho Chi Minh sandal that was knocked off the second VC’s foot when he got shot.
Now on to the two GIs. I will be taking my time painting these guys as they are the focal point of the vignette.
@ James (ReconTL6). As always, your ability to capture a moment in time is astounding. I hope the storms have calmed and you’re feeling more rested.
—mike ![]()
Thanks, Mike.
The storms were Saturday through this morning, but I did manage to get some sleep last night which enabled me to be able to complete the third VC this morning. I will wait until tomorrow or Wednesday to start painting the GIs.
I thought I was going to jump right into painting the first of the two GIs, but I had to take care of some other things, so last night I painted the eyes and applied a flat black basecoat to much of the figure. Today I painted his face minus the hair, laid in the base color of the uniform, and began to paint arms, etc. I think the face turned out fairly well.
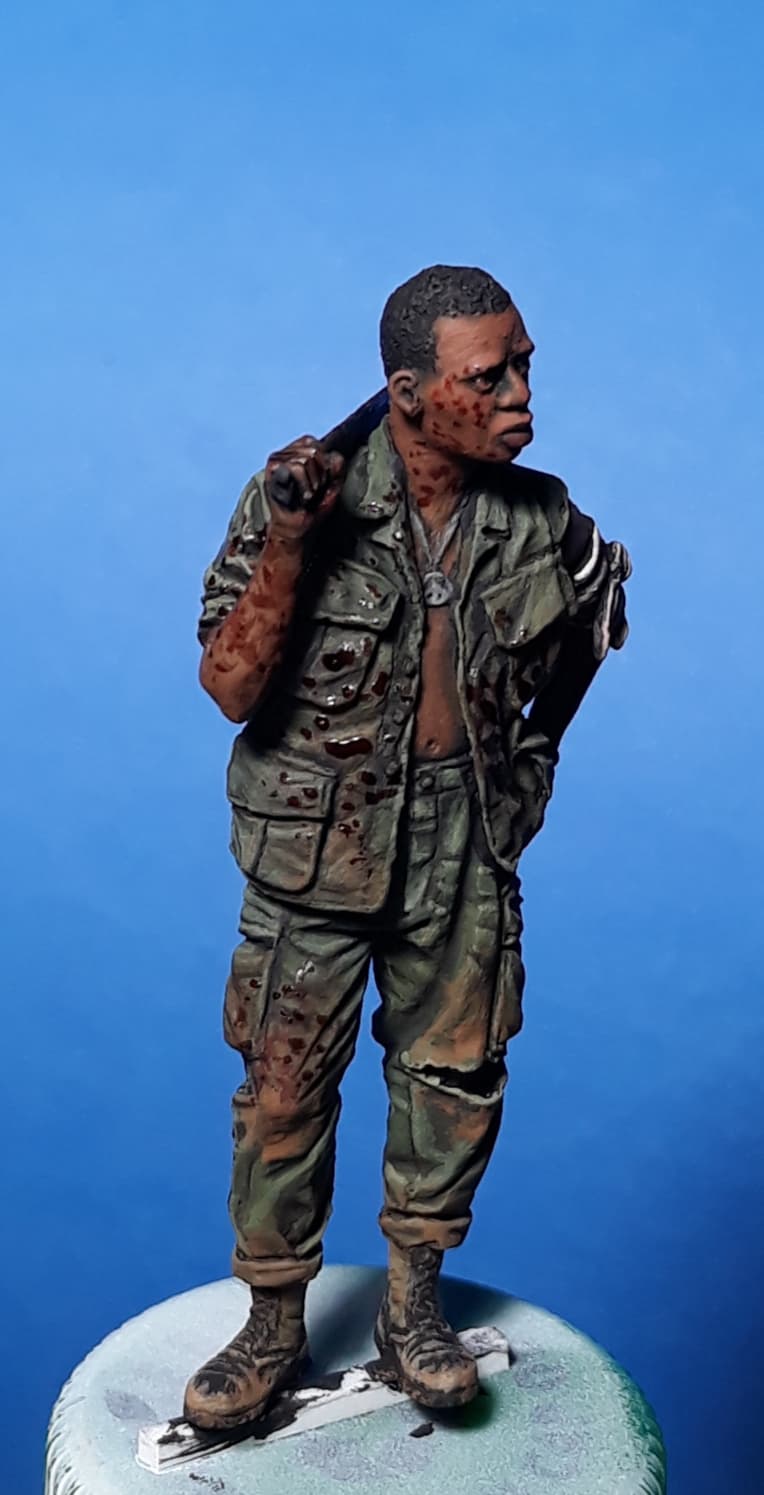
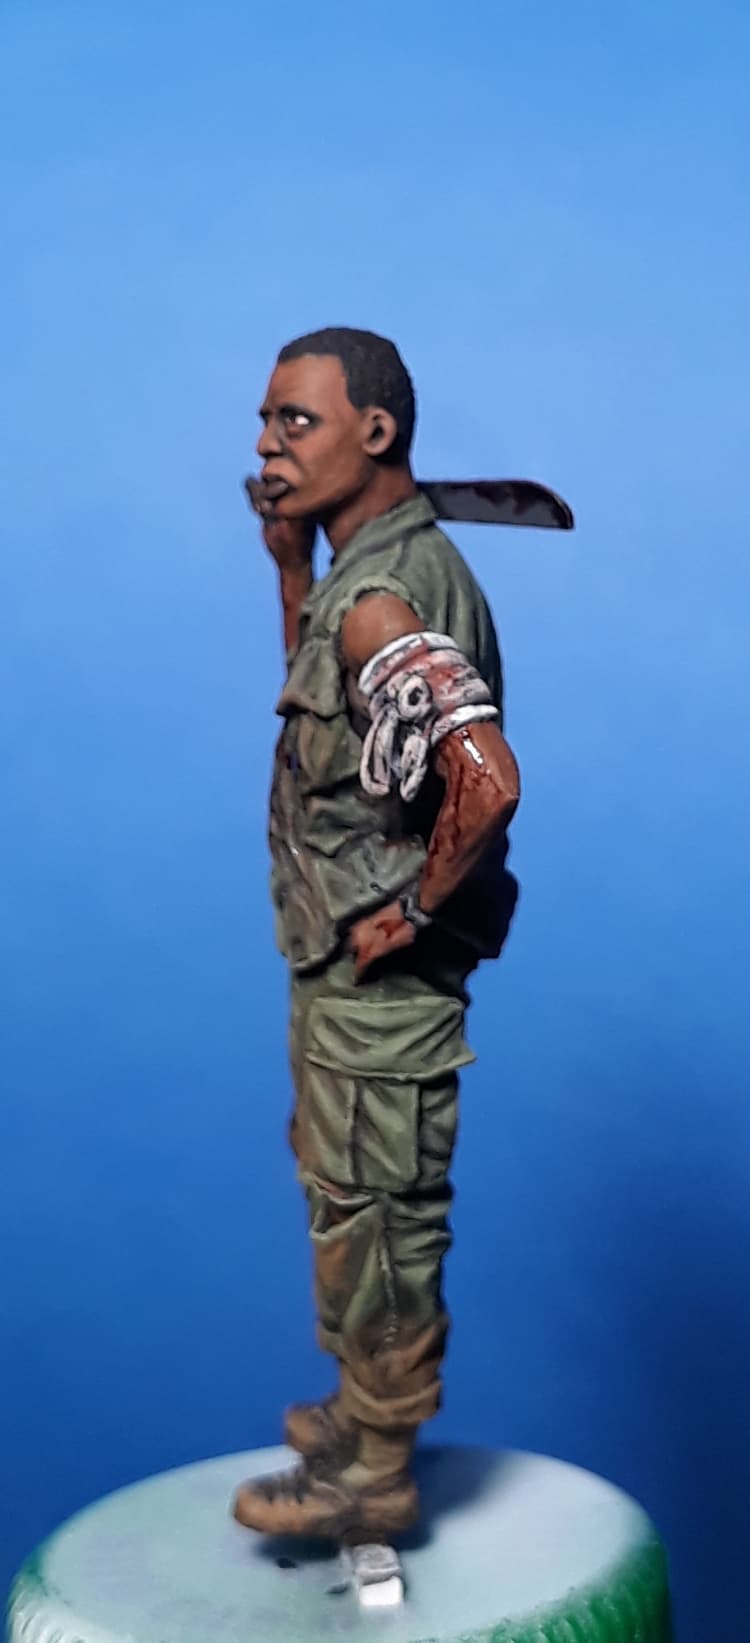
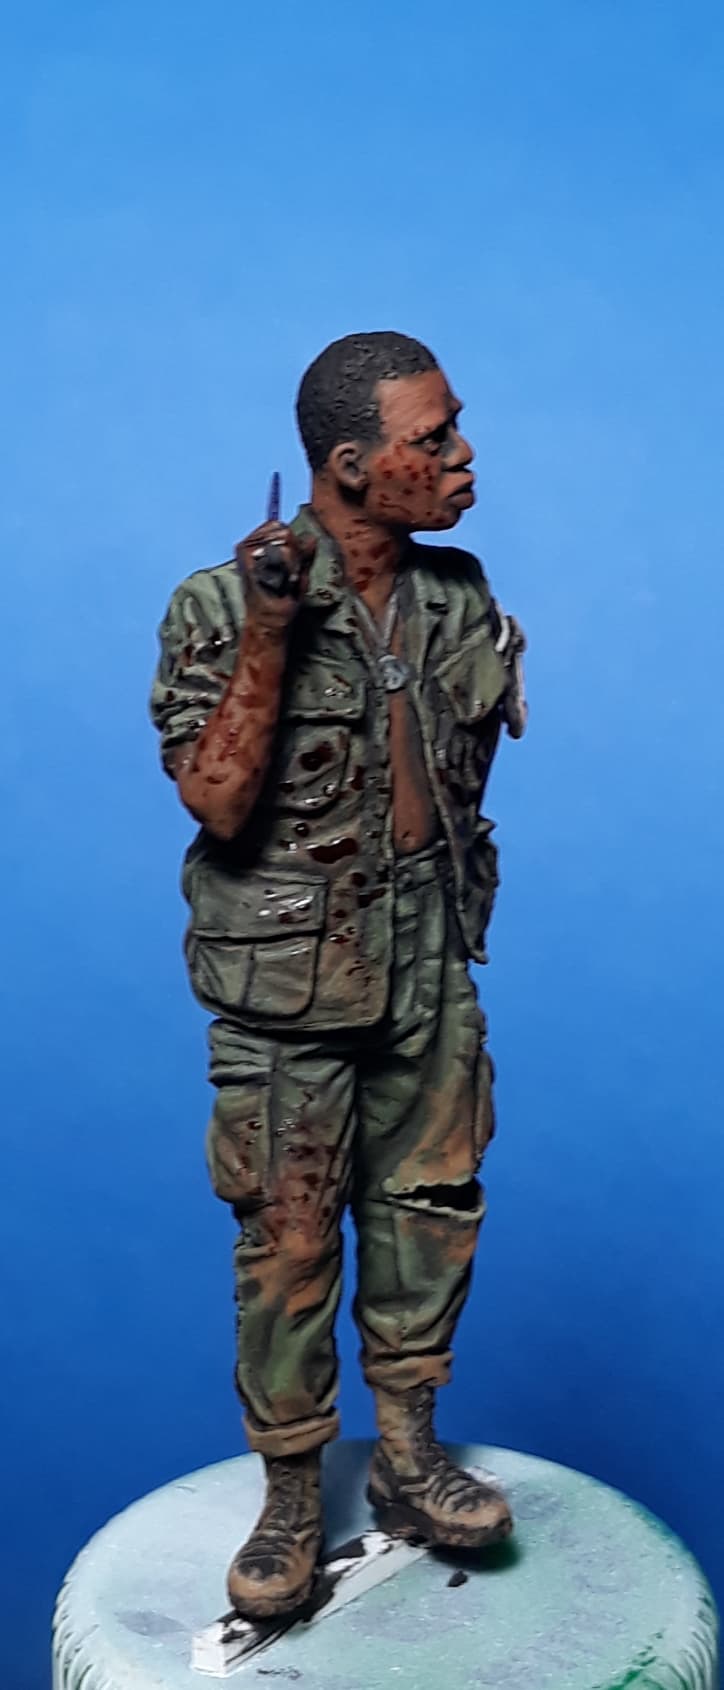
I think I just about got this guy done. I did touch up a few things after these photos were taken like adding a few more spots of splatter to his face and the inside of his arm that I had originally missed. The look I am going for is that the fight was a long and hard one. This guy fought hard, was wounded, and when his weapon became inoperable, grabbed a machete and continued fighting until daybreak when the remnants of the enemy withdrew leaving behind most of their dead. He emerged from his position and joined his Platoon Sergeant in surveying the carnage and developing a thousand yard stare.