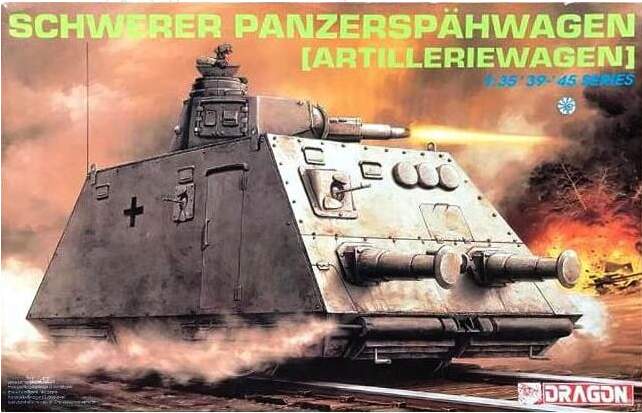
My entry (for additional fire support - may even throw on a Pz. IV turret):

| Dragon | Schwerer Panzerspahwagen (Artilleriewagen) |
|---|---|
| JB Model | 1.4m Antenna |
| Aber | PE |
| RB Model | Flat Bumpers |
| RB Model | Rounded Bumpers |
Mike
My entry (for additional fire support - may even throw on a Pz. IV turret):

| Dragon | Schwerer Panzerspahwagen (Artilleriewagen) |
|---|---|
| JB Model | 1.4m Antenna |
| Aber | PE |
| RB Model | Flat Bumpers |
| RB Model | Rounded Bumpers |
Mike
Someone needs to build the Kommandowagen now.
Ha ha, I am actually planning to do all three types in one train. I believe they could be linked. For this campaign only one infanteriewagen. ![]()
Plastic has been cut and glued. So far a nice kit ![]()
![]()
Base is mostly done. Secondhand kits. Missing one of the little doodads by the right end vents.
Cutting out the openings for the MGs and vision ports and drilling out the pin-holes for the corresponding bits. I also removed the “steps” beside the doors for PE replacements.
Maybe later today, after work, I can put those parts to the base.
Mike
Jesper, I just found these! Oh, I wish I knew beforehand!!
From Scalemates:
Def getting the Pz. IV and Wirbelwindturm sets. Building the IV now and have all the bells and whistles for the Wirbel.
Mike
Amazing paint job in the wood!!!
I loved it
Nice selection…
I`ll go with the same kit
@TacFireGuru , That looks fantastic! Do we know the color scheme of the panzer draisine markings? I do not think peddinghaus decals actually include the color plate of the vehicle?
I’ve got two sets coming, but I think you’re correct about the lack of color plates. Everything I’ve seen has appeared to be Panzer Gray or Dark Yellow. The one I’m building will be Panzer Gray (because all my others are Dark Yellow?) T-Model has one out (I have it) and it calls for Panzer Gray too and it’s decal set is much more complete than Dragon’s simple two Balkenkreuz decals.
Mike
All those little “tie downs” that are molded in will come off and the replacement PE parts will be installed. Tedious, but simple - remove the molded in pieces, sand smooth, drill small hole, install PE part (while leaving its attachment point on to go into the hole). I run wire/thread through the PE parts to simulate what they used to put branches in, etc.
I put a piece of tubing in the upper body for support while I’m removing the molded in tie downs and replacing them with the PE parts.
The turret hull has spots for visors to be added, but the instructions don’t call for those nor does the box art. I filled them in along with a few other seams. Once dry, they’ll get sanded.
I’m adding the turret basket only because it’s different from others I’ve seen, and I figured “Why not?”
Mike
Turret basket is mounted. Some “Perfect Plastic Putty” to add a smooth coat to cover the slots where the visors would have gone. For the turret, all I need to do now is add the grab handles (I’ll use the appropriately sized wire to make those), the barrel (I have a turned aluminum one coming), and the turret machine gun (turned brass ones are also on the way).
I removed the “tie downs” from the hull and gave a quick sanding to level things out. There are little spots left behind that will make it easy to see where I’ll need to drill the small holes for the PE versions.
I’ll have to look in my box of “spare” turned barrels/PE/etc to see if I have some MG barrels for the hull. If I do, I’ll replace the plastic with the brass (if not, I’ll see about ordering some - one can never have too many small turned barrels of various calibers/styles for builds like this).
So far, the instructions have been very easy to follow (typical older Dragon-type instructions), and the assembly has gone well with very little to watch out for (pretty much caution and taking one’s time when putting the hull together). Enjoyable and it’s bringing back some of my modeling MoJo.
![]()
Mike
A little bit of work before my VA appointment in Denver. Have I mentioned I HATE driving to Denver. No, well, I do! An hour and 20 minutes + of dealing with non-driving idiots. Oh well. ![]()
If I still have my sanity when I get back and after I’ve popped a pain pill, I might see about adding some of the hatches and drilling out the holes for the tie-downs.
Mike ![]()
This morning before work; hatches and doors on.
I have the little MG barrel for the turret coming today and a turned barrel coming soon. Once those are here, I can at least prime and paint the turret - make it seem like there’s a sense of accomplishment.
Mike
I start with this kit
 IMG_20240527_115843642 by Shaky962, en Flickr
This might be a little out of the ordinary since it’s not an armored train, but I’m bringing out the Big Boy!
Jim
Can’t argue with the Big Boy!
Wow. I’m glad to see that. I was in the FLHS which is actually really a train shop and they had this kit out. I thought it looked cool.