Thanks everybody, will use the standard dirt pigment I have, after a nice metal drybrush of the raised parts
It’s been a while, had some very bad days at work and was too exhausted to keep going with the Sherman.
Hopefully tomorrow morning I’ll be able to start again.
I have a question:
This model has several clear plastic parts to simulate viewports and periscopes. I haven’t glued them yet because I needed to spray the green paint.
Now that the paint coat is done, I just need to spray the varnishes, the gloss and then the matte at the end. Can I spray it over the clear parts or will they get ruined?
Careful using matte varnish on the clear parts it will make them look frosted. Clear varnish can actually make them pop
Thanks, I will completely avoid varnish on those parts then.
I have a question:
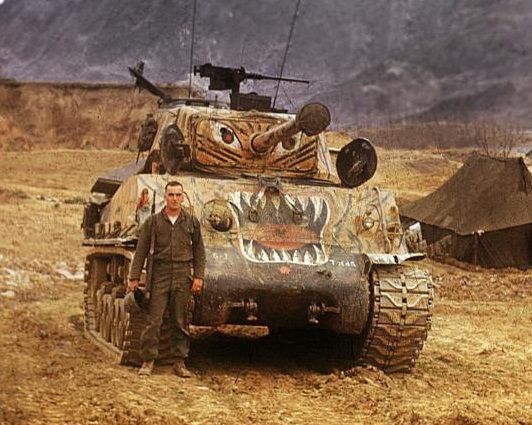
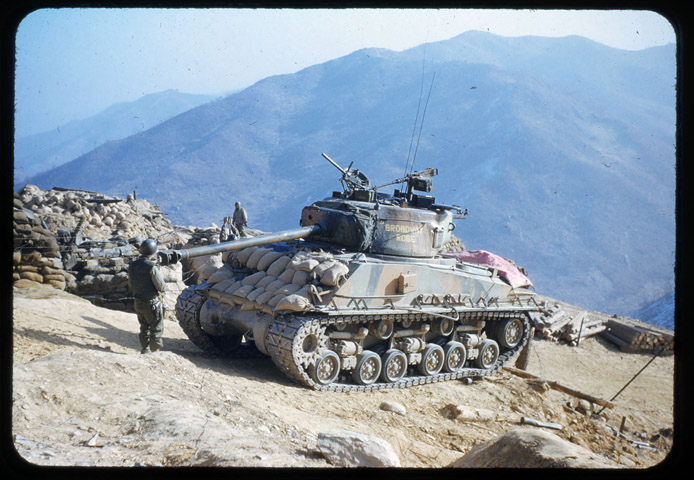
In this picture from the Zvezda box I can see shiny metal ring around the base of the gun next to the mantlet.
Is that accurate or could it be left green?

I’ll leave it green then, if not I’d have to draw it by hand and I know I’d make a mess.
1 Like
That area you mentioned is where the paint wore off from firing the gun, the recoil action of the gun stripped the paint off of the barrel as it went back into mantlet. And it would never be rusty if the tank was in active use, but it was shiny because it was bare metal, HTH…
1 Like
Interesting, thanks for the info.
I was also wondering, do you guys spray a coat of clear/matte varnish on the tracks?
I need to spread some pigments on them, so the matte could help, but they don’t need to be drybrushed, so the clear coat seem pointless…unless it could be useful to protect the color from scratching/handling.
@Nightgaunt
Your very welcome, no worries ![]()
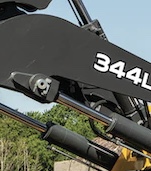
Think of that small area at the base of the barrel like if it was the exposed metal on a on lift cylinder you find on construction machinery…like in this photo…
Yes, it makes sense.
As soon as I am home, I’ll see if the model has some “grooves” to make the painting easier, otherwise I’ll just leave it green.
Some tricks for doing this very easily…
On a metal barrel just use thin Tamiya masking tape to mask the base of the barrel, then just paint like normal, assemble, do your weathering and then remove the tape at the end…
On a plastic barrel, I like to paint a small section of the base of the barrel with metalic silver first, then use the Tamiya tape and repeat the same steps above…only removing the tape after all the weathering, it has to look shiny and new there…
Since you didn’t do it before it’ll be harder to do it now, a lot of masking of the area for very small amount of painting…
I would just leave the way it is…and the silver paint might not look right over the olive drab any way…it’s a small detail that a lot of people forget and most people will never notice it…rather than risk ruining your finish I would just leave alone, but if you’re not happy with it like that I guess you can change it…
1 Like
That has good detail. Ill be following this for sure
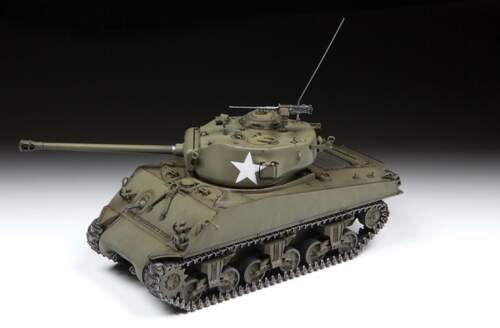
Yes, it’s a very nice kit and also very cheap.
It’s unlikely that I will do justice to it, I am still way too green and clumsy!
Dont doubt yourself. You do good work
About the varnish on the tracks, what do you think?
I’ve done the gloss coat and now I have reached another empasse on this model:
The decals look to be set upon different pieces that need to be glued together:
Precisely:
The circled star on the front needs to be set upon the lower wheeled “bathtub” and the higher hull glued together, something I would like to avoid doing now because that would make the track mounting and lower hull weathering a huge hassle.
Also, as you can see from the model’s cover, this decal’s higher outer circle intercepts that detailed stripe with bolts. In the picture it has a painted on effect, but if I apply the decal like that it will just cover the details.
Even harder is one of the side turret stars: one of the sides has a small port with a significant gap from the hull. Again, applying the decal on that will just cover the port and the gap, instead of looking “painted on”.
So basically, the 2 problems are:
-
To correctly apply the front decal I need to glue the hull to the “bathtub”, which I’d hate doing because it would make the track mounting and the weathering very hard to do. Weathering, as far as I know, is done after a matte coat which doesn’t really like the decals.
-
Some of those decals cover important and detailed bits of the model like they were painted on them, and I fear that I will just end up getting them covered by the decal.
I suppose the answer to this is to use some of those decal softeners, but I got zero experience with this and need some guidance.
The hull and the ‘bathtub’ are one and the same. The lower hull is mated to the upper superstructure.
Never had this problem not sure what you mean.
Yes that is the answer, and lo, YouTube is your guidance.
I can’t help thinking you’re making this way more complicated than it actually is in reality. Just build the thing up, paint it, decal it, matt cote it and weather it - why would you paint and weather the hull and superstructure seperately?
I thought the decals were supposed to be applied on a gloss surface to facilitate the sliding.
Yeah, you’re probably right, I’ve dragging this kit for way too long. I’ll just glue it and get on with it.
I suppose that the best decal products are those “microsol” and “microset”, at least I remember many people suggesting them here.
Ah, I see waht you mean - yes, the decals should be applied over a gloss surface first then coated with matte (actually, for a truly accurate finish, a satin coat is best - a matte model is a dead model).
“microsol” and “microset” are the ones I use. There isn’t any mystery to this, you simply apply it on the model, slide your decal over it, position your decal and press it down, then apply the softner afterwards. Let it soak in for a bit and keep gently pressing it down with kitchen towell, Q-tip or clean brush until it has taken on the contours of its background. Where you decal has to cross distinct grooves or hatches/doors, just use a sharp blade to cut the decal along the line once it has been applied for a while and use microsol to soften it into the groove, or cut it before you apply it.