Iowa Class Engine Room #3 Model for BB62 Permanent Display

For all of those followers that had the patience to spend almost a year each for the two models that I created for the Battleship New Jersey Museum & Memorial (16" and 5" gun systems), my next (and final) major project for the ship has now begun. Here’s Ryan Syzmanski talking about those models.

I noted in my last posts on the 5" project, that the engine room was on the docket, but it needed dimensioned engineering drawings to proceed. I spend several hours in the engine rooms taking lots of pictures, but without the dimensioned drawings, I would be shooting in the dark. Due to the complexity of the space, dead reckoning like I was able to pull off on the other two wouldn’t work on this one.

My search of the National Archives produced a very promising set of original drawings for all the New Jersey’s engineering, and I had even planned a trip to College Park, MD to view them. That was until I realized that I was looking at the drawing index of the Battleship New Jersey BB16, built in 1905, not BB62 built in 1943. Who knew there were two of them?

They did find microfiche drawings, but their computer system wasn’t working correctly and I couldn’t get details on what drawings were in the set. Then John Miano came through.

John wrote a terrifc photo study touring the Big J with terrific pictures of the engineering spaces.

“A Visual Tour of the Battleship USS New Jersey” Copyright 2021 John Miano, Collesseum Builders, Inc. ISBN 978-0-9099804-3-2

I wrote to him asking if he could assist in the project. Ryan Syzmanski, the Big J Museum curator introduced him to me. John did have some drawings that will work, but the were large files. I finally realized that my DropBox installation could be used to capture John’s files even if he didn’t have the app on his system.

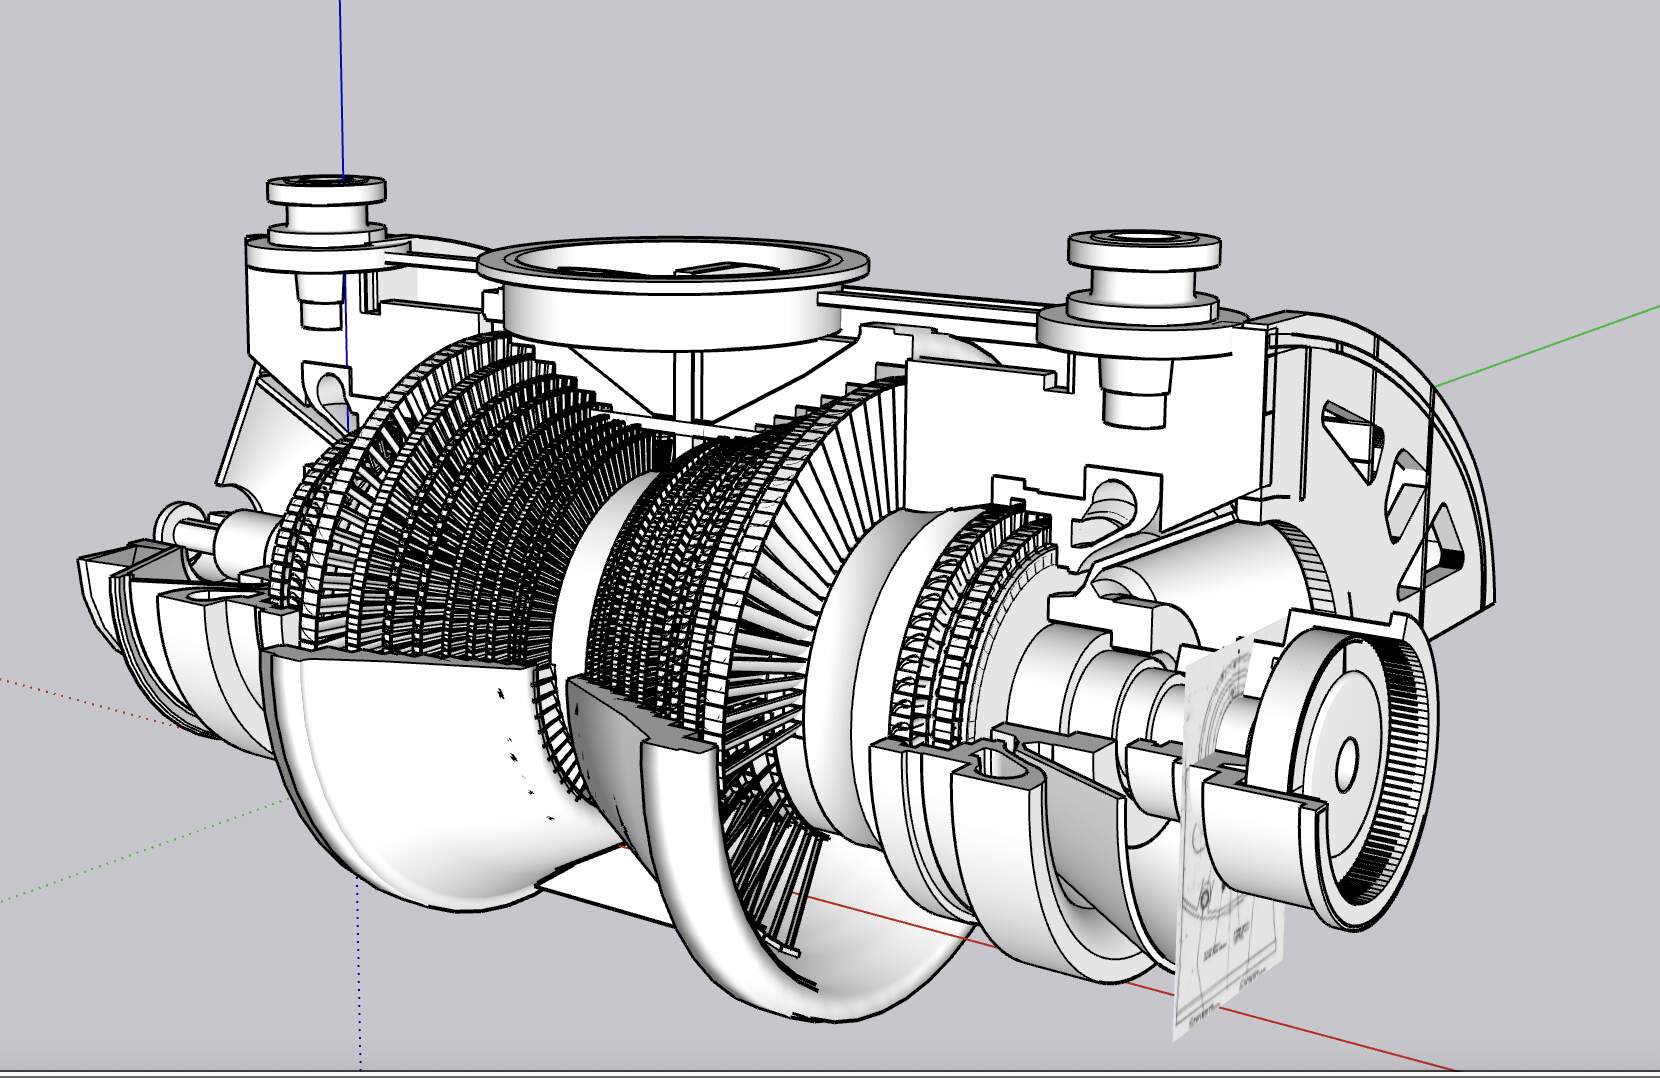
The files arrived yesterday and this morning. They are terrific! I still need more specific drawings of critical machinery mainly the HP and LP turbines and the Main Reduction Gear, but their outlines plus pictures may be enough to do something. I also have specific details about every latdder and grate in the entire space, down to the specific bolting details of how they’re fastened to the structure.

I need more info on the structural girders, but I can probably ferret that out. I finally have imagery of the massive foundation steel that supports the equipment. You can’t see that on a visit unless you want to crawl around in the bilge and that ain’t gonna happen.

This project is more complex that the previous two… I know, I know, that’s hard to believe, but believe me. I’m planning on doing milld cutaways of main propulsion plants and the reduction gear. There are over a dozen different sized ladders that need to be produced. I’m planning on 3D printing the floor grating so it will look pretty good especially with lighting showing through it. The #2 deck above will not be there so the main equipment floor will be fully visible. The model won’t be overly large at 1:48, but it will be complex and interesting. It may also get an AV program to highlight aspects that won’t be evident once it’s all put together. This is the same approach taken with the 5". Ryan’s communication person is helping to produce that for me to put up on the Internet.

Here’s a taste of one of the drawings.

So… fasten your seatbelts. If this is anything like the previous two, there will plenty of successes, near misses and out-and-out castrophes to deal with. Only the strong of heart should proceed. I will start drawing as soon as I finish editing my book on 21st Century Model Making. Stay tuned to this space.

12 Likes

Sounds like a VERY interesting project! Definitely staying tuned.

The 2 turret projects were amazing… So definitely jumping on for this one :+1:

2 Likes

Can’t wait Myles …

Marvelous models! What wonderful work I look forward to your next project!

Looking forward to this project.

Did Mr Syzmanski send you the booklet of general plans?

If yes, this is a part of it, that shows the structural girder setup

The oval/round shapes in this one are the hull openings (pump suctions, overboard discharges etc)

The forward bulkhead of the Engine Room No3 is frame 127 whilst the aft bulkhead is frame 135

This is the crossection of the armor at frame 123

3 Likes

John Miano has come through with even more detailed engineering drawings including those of the HP and LP turnbines, the massive steam cross-over pipe between them, and the main condensor. I’m hoping he can come through with drawing of the Main Reduction Gear and Auxiliary Turbo-generators. Unlike the last project, this one is going to be built from actual, dimensioned plans. John even provided me with drawings of the boiler room equipment, but I’m not going to do the fire rooms. They’re not as interesting to me as the engine rooms. It will also double the model’s width which will make it harder to display. Right now the model in 1:48 will be about 18" X 8", which could fit nicely on the credenza next to the 16" turret model.

I scaled the overview prints and used the HP/LP output shafts and propeller shafts from engine rooms 1 & 2 that pass through this space to align the various section drawings. Still not sure where that ladder diagram on the far right goes.

NJ ERP Planning 1.png

NJ ERP Planning 2.png

4 Likes

John Miano’s help getting the drawings to me. To date he’s sent me 35 of them. Yesterday, in addition to getting me the construction drawings of the induction and discharge piping for the main condenser, he also sent a large set that has the full construction drawings of the main resduction gear housing. Thsee are original and explicitly dimensioned drawings of the finest details. The overall structure of the room may not be perfect, but the equipment within will be almost perfectly scaled.

I’ve got the main condenser well underway. I’m working on the induction and discharge of this very large structure. The lines feeding cooling water into it are about 3’ (1m) in diameter. the amount of water passed through is vast. The angled induction pipe, once the ship is doing about 10 knots, pushes water into the condesers under a ram effect of the ship’s forward velocity and the static pressure of about 150 psi, which is the pressure on the hull at the 36 foot draft depth. The discharge pipe is canted facing the aft so there’s a scavenging effect from the ship’s motion to help extract the cooling water from the condenser. The condenser empty weighs a svelte 39,000 lbs. (17,700 kg.) and that’s not counting the 15,000 pounds of water contained within.

As you can see, I’m going to show a taste of the tubes inside. They are overscale. At 1:48, the myriad of very narrow tubes would not be printable. The cutaway part is already designed into the parts and will print that way.

I had to reload a SketchUp extension “Curviloft” to create the cicular to oval discharge pipe. Without extensions like these it’s very difficult to create organic shapes in SketchUp. The part is hollowed out mainly to reduce the resin use. Viewers won’t be able to look up into it.

There’s a large shutoff valve at the junction of the pipe and the straight portion at the condenser end. There’s also another support structure on that end. The top of condenser is the low pressure turbine. It dumps directly into condenser. The condenser is maintained with at a vacuum to capture the last bit of energy in the steam as it leaves the LP turbine.

Even without the rest of the engine room, just having a detailed model of the main propulsion system would be interesting and cool in its own right. I was concerned about the main reduction gear. I didn’t realize that John Miano had such a repository of the orginal drawings. And there’s still more to be had. If I had to go to the National Archives to retrieve and copy this many, I couldn’t have done it in the one day I was orgianlly scheduled to do it.

5 Likes

Oh yes! It’s very complicated. The main condenser is just about done. I need to add the steam turbine driver on the top of the auxiliary cooling pump. I don’t enough imagery of that piece to draw it yet. I’ve asked Ryan to take some pictures of it when he gets the chance. This large construct will be printed in pieces and with new, large Elegoo Saturn 4 Ultra, I can fit a number of them on the machine at the same time. The only components that I worry about are all those nuts and bolts. When you position the part in the printer, you try to have all the fine details facing away from the build plate so they don’t get any supports attached to them. Support removal can obliterate fine details. However, the fasteners have details on both sides meaning one side is probably going to get supports or risk not forming. I can adjust the light supports they just capture the nut edge without doing too much damage. Being about to draw this massive thing over the print has really reduced the anxiety.

Looking at the reverse view shows the metallic finish very well. This was renedered with V-Ray which has excellent metallic materials in its data base. In real life, that metal is either bronze or Monel. Monel is one of the chlorine/saltwater resistent alloys. And the photos show the condenser to not be painted.

The large Low Pressure Powder Turbine sits directly on top of the condenser. There’s more foundation framing that goes on the condenser top to support it. The amount of steam moving through the machine is vast, coming from two large Babcock and Wilcox boilers. I have most of the drawings needed for the LP turbine. I’m missing some and hoping that John Miano has them. I have much better documentation for the HP turbine. Each turbine contributes 26,500 hp, that’s combined in the main reduction gear.

5 Likes

Just because I have an emense amount of drawing still left to do doesn’t mean I can’t start producing parts as I go along. The first of those parts are done. The condenser will be produced out of 4 printed parts. This print was about 98% perfect. Some small supports failed and were in a place that actually needed more. The failure created a small discontinuity that can be fixed if I choose. Resin isn’t cheap @ $40/kg (USD), so if i can salvage the part I will.

Here’s the parts suspended by an aftermarket holder that lets you position the build plate to let all the excess resin drain off back into the vat. Saves mess and resin. The holder was a free download file from Cults3d made for the Saturn 4 Ultra printer. I haven’t purchased a spring build plate yet having heard that it could mess with the printer’s auto-leveling feature. I don’t mind taking the entire plate off the machine, but’s a chance to drop it and damage it. It’s happened before with my simpler machines.

The parts are really nice. The nuts and bolts resolved perfectly. The job took about 3.5 hours comparing to over 6 on its predecessor.

Here’s a closer look at the discontinuity. The broken supports nearby give the clues to why the build sagged in that location. Bondic filler should correct the part.

Now for some real fun! I’ve drawn the low pressure turbine spool. I will not be displaying he model with the turbine completely open. I will be opening a segment of it. My difficulty lies in only having that longitudinal section. I don’t have radial cross-sections. I could draw the spool without them because all I need is their diameters. But with the housing, the other cross-sections would be very helpful. The LP turbine is large and HP exhaust steam enters the center and flows both ways. If it didn’t do this the blades would have to be twice as large. The reverse turbine wheels receive steam directly from the boilers at 600psi. They produce about 15% of the power of the main turbines. The LP turbine sits directly on top of the condenser.

​An example of the ambiguity of just have this view is the mass of piping at the ends. Seeing only on view doesn’t help that much.

8 Likes

Once again you’re working miracles! Again I will follow this build with awe and admiration…

1 Like

Yup! That’s me… the miracle worker, until I’m not. But I am pleased with the rapid progress I’m making on this one.

I’m going with the simpler-spooled turbine based on the header on the drawing and the photos of the real machine. This time I wised up and formed the complex shaft contours using SU’s Follow-Me tool instead of drawing a series of connected cylinders. Follow-Me works by drawing the outer contour as a filled, ungrouped, surface, setting up the path the shape’s to follow, clicking the Follow-Me icon and then selecting the profile. It instantly forms a lathed object (in the case of a circular path). I used the same technique for the casing contours the bearing housings on the two ends and the steam inlet fittings.

The turbine blades are SU Components which has the abillity to change every one of the same components if a change is made to any one of them. Blade dimensions were taken from the profile section drawing. Notice that I’m not displaying 360º of the shapes, but am truncating them to just show a cutaway portion. A lot of the casing appears to be welded sheet steel to support the forged/turned/cast components. The drawing looks pretty good. Not sure how well this mass of fine details are going to print. Won’t know until I try…

There are stator blades protruding from the lands on the shell cylinder. I’m not sure They will work. I may draw a small test set with rotor and stator blades and see what prints before attempting to print the whole deal.

I’ve decided to scrap the bad condenser end cap. It’s not only warped, but mishapen to a degree that it won’t assemble correctly. I’ve already got the new one loaded into the printer. I’ll run it tomorrow.

I did get one good one. It too has a slight sag in one edge, but I’ll get it to work. This ones only partially cleaned up.

And I’m happy to report that I got a beautiful print of the Condenser Shell and the Tube Assembly. It’s on the printer in the drip fixture and I’ll clean it up tomorrow. Noticed some delamination of the base layers, but they held together and the entire job printed perfectly. The hole is on purpose for additional cutaway viewing.

The new printer is quite astounding, I was able to watch the print job on it’s included video system, while sitting upstairs in the great room. I also made a stop action movie of the whole job and will post when I retireve it.

The condenser and LP turbine are among the most complicated systems in the room. if they come out well, the rest of the project should be splendid.

8 Likes

The condenser is coming together… literally…. The new printing of the other end cap will be done in less than a half hour. The tube bundle needed more trimming to wiggle over the added tabs I put on the housing to provide more alignment for the end cap. But it looks as I thought it should.

Assembled… it works.

Taken with the flash on shows the tube better.

The insides will have to be painted before I can glue it together. There is a holding tank on the bottom not shown in this view. That will be almost invisible since the major foundation members cover most of it up. You’ll see the condensate return pipe passing through a hole in the foundation’s side, but that’s about it. Drawing the cutaways and printing them is much less stressful than cutting them afterwards.

7 Likes

The second try to create a good condenser end cap wasn’t successful either. The thin walls are prone to warping, and as shown below, the distortion was too great to compensate using clamps and glue.

A redesign was called for. I added cross-bracing to add structural integrity to the part. The odd placement is to account for the tabs on the condenser housing. It’s on the machine now.

I just pulled off a very successful print of the remaining induction and discharge piping including the centrifugal pump, and the upper foundation that will support the low pressure turbine. In addition to the 3rd try for a successful cap, are the remaining lower condenser oundation pieces. With those being done in a little over four hours, all the major condenser pieces will be created.

I should have the LP turbine drawings finalized in a couple of days and then we’ll see if it’s possible to print any kind of turbine blading in resin printer. I’ve even added the stator blades. What I drew may be so fine that they won’t survive very long. I may have to make solid discs with blade impressions on them. But I won’t know the answer to this question until I run a small, quickly printing test piece. If you stare at this drawing, you’ll come to the conclusion that, if the rotor is going to be a separate piece (and it will)), you won’t be able to asseble it. The answer will be to split the cases just like the real thing. That will require making three copies of the drawing. One will be the master drawing, another will have the lower case half removed leaving the upper, and the last will have the inverse leaving just the lower. Assembly will be like building the real deal. Happy Saturday!

7 Likes

The 3rd reprint of the condenser cap worked. I hadn’t done the final finishing but as you can see, its geometry is clean and it fits as it should. I need to add this to my book (still being edited) that deals with design vis a vis 3D printing success.

The LP tubine foundation printed beautifully. It just slips over the condenser housing without any trouble and that was without any final finishing. The lower frames are done too, successfully and are in the post-cure box. With them, all the major parts of the condenser are printed. I’m designing the LP turbine almost like the prototype, partially because I drawing it from prototype drawings. That many change when I find out whether it prints or not.

Here’s the upper foundation as it printed.

And tried on for fit on the condenser. Clearly it’s not final sanded, but notice that the upper surface is completely covered by the LP turbine’s base. And the nubs on the vertical pieces are very easily sanded smooth. Notice also that I matched the cutaway to the that on the housing. It would have been more touchy to cut that after the part was formed. When possible put the cutaways into the drawings. I’m very happy with the ability of this printer to create small cross-section parts that have enough strength to hold together. I’m going out on a limnb and assuming that it may have to do with two factors; the intensity and eveness of the UV exposure light and the 12k horizontal resolution created more finely rendered parts.

I’m getting pretty close to doing some trial prints on the turbine parts. Depending on their outcomes will determine more of my build strategy.

I’m drawing the steel plate structure that forms the backbone of the LP turbine. It’s difficult to determine what’s welded plate and what’s a forging/casting. I’m doing some snagging here to get it right.

6 Likes

What a marvelous project you are doing! I am sure we will all enjoy the ride.

I sure hope so…

As I’ve said too many times to count, the ying and yang of custom designing and 3D printing models is there are very few excuses for not getting it right. Case in point… the foundation that surrounds the Main Condenser. I chose to print it as three parts with the upper foundation, the flanges and lower foundation as separate. When I attempted to test assemble the flanges to the upper works, the fit was terrible. I had to cut and chop, force and otherwise mess around with it and the results looked it. I’ve recast the print to integrate these two parts. I’m going to print that this morning.

It’s not easy to seein the photo, but it’s not very good.

Here’s the modified integrated part on the slicer before adding supports. In this orientation the supports will all be on the bottom and not foul any of the details. Previously, I printed it in the reverse and was not happy with the support removal.

The LP turbine drawing continues to grow. It’s 90% complete. All that’s left is the shroud and details on both ends.

Drawing it is one thing… getting it to print is an entirely different problem. I will be printing the back upper cutaway as one part, the entire rotor as another, and the entire lower section as the last. I’m not sure how the end details will be printed… maybe integrated, maybe separate. We’ll see. This is uncharted territory.

6 Likes

The revised condenser foundation print was successful. Here is the entire condenser assembly held together with tape. The main is a true 1:48 figure to give some scale to this device. I will paint the insides and then assembly can begin. Meanwhile work continues on the LP turbine. The geometry is NOT simple and intersecting angled pieces, while doable in SketchUp, take a lot of time.

Here’s the integrated foundation on the housing.

And the entire unit. Two handwheels broke, requiring reprinting a bunch more and fastening them with 1/32" brass. The condenser is a really big piece of apparatus. BTW: all of the propulsion equipment was installed in the hull and the ship build around it all. It was not meant to ever be removed.

The non-shaft end of the turbine is finally almost finished. Shown behind is an image of the LP turbine in #1 engine room. You can see that the facing is not vertical. It would all be much simpler if I wasn’t insisting on doing the cutaway. But then it wouldn’t be as much of a challenge. Printing this is going to be an exercise in insanity, i’m predicting.

8 Likes

While 3rd Gen 3D Printers can reproduce almost anything, it doesn’t mean it’s successful. I have reached the ultimate limit of what they can do. I violated one of my own rules: Don’t make parts their scale size if it’s below the threshold of structural integrity when printed in 1:48 (or smaller). I made those turbine blades scale size. The resulting test print proved my rule. Everything but the two largest sets were so frail that the just flopped over and stuck to one another. Saying that, if you looked at them with a microscope, you’d actually see each blade retains the airfoil shape I drew. Just because you can draw it doesn’t me it will print well.

This will require a bit of experimentationa, which I anticipated. I’ve done some redesign already, thickening all the blades and making the edge seals all connected so they act as a continuous band. I’m also rethinking the entire printing process of the turbine body. I built the model as the prototype is constructed, which is a fun exercise, but it won’t work. I’m gong to make most of the unseen body out of a solid object. Only the visible, open front lower portion will follow the prototype. I’m also rethinking the inclusion of the stator blades. They will suffer the same fate in the printer and will complicate assembly. I don’t think they’ll be see and folks won’t miss them. Again… it was a fun drawing exercise.

5 Likes

So these are the ‘after’ pictures showing what happens when you get a slug of cold water into hot spinning turbines?