I’m falling behind here, so many Shermans in the stash and so many already on the bench. Been super busy with work the past few weeks but itching to get started on something new. Nice work all around guys! I hope to get started on something soon…
1 Like
Quite aware of that. Which is why I don’t have that kit.
1 Like
LOL yeah but at least you’ve got an M4, I started with an M3 variant! Which I’m getting towards the end of now. I’ve ordered the Italeri Priest which should be here in a couple of days. Dragon Sherman kits have a lot of spare parts and I’ve ordered a Dragon kit so at the very least I could build that, this should help me convert the Italeri kit into a M7B1, with perhaps a little scratch building along the way. I’ve got a book on the Priest by Hilary Doyle, which is basically a series of war time photos of the Priest, but hopefully an aide to completing the conversion. The Tankograd publication is just out of my price range as shipping is usually more than the damn book.
Chris
2 Likes
Whilst searching the web for info to support the conversion of the Italeri Priest into a M7B1 I found this dandy web page with lot’s of pics to help me with markings, stowage, and field conversions of M7’s and M7B1’s while in service in both WW2 and the Korean war.
Cheers
Chris
5 Likes
Cheers this is a site dedicated to the Sherman tank and some of the derivatives, like the Priest and M10 tank destroyer. A very elaborate site
3 Likes
The American Fighting Vehicle Database page on the M7 will probably also help.
4 Likes
The Italeri Priest has arrived and construction can begin. I’m still waiting on the Dragon Sherman to arrive so I can rob some of it’s unused parts to modify the Priest rear end to make it into the M7B1, my question is this, do I start it’s own build thread??
Cheers
Chris
 P3260002 by Chris Wilson, on Flickr
.
 P3260003 by Chris Wilson, on Flickr
 P3260005 by Chris Wilson, on Flickr
 P3260006 by Chris Wilson, on Flickr
3 Likes
I’ve been slowly working away on the Priest conversion focusing on the rear firewall of the fighting compartment. As I’m still waiting on the donor Dragon M4A3 kit to arrive. So this is where I’m at, I’ve got the bogies assembled and attached, the howitzer mostly assembled I need to add the breech block and shields, the rear firewall mostly modified I just need to add the air-filter doors and a little more wiring to make it look a little busier. I do have to say I am enjoying myself so that’s the main thing.
 P3270001_01 by Chris Wilson, on Flickr
 P3280001 by Chris Wilson, on Flickr
 P3280003 by Chris Wilson, on Flickr
 P3290001 by Chris Wilson, on Flickr
 P3290002 by Chris Wilson, on Flickr
 P3290001_01 by Chris Wilson, on Flickr
Cheers
Chris
7 Likes
Progress continues to be made, though I do like making things harder for myself lol. Got the interior assembled and painted though I’ll need to tidy it up a little. I’m using the 50 cal and mount from the Academy M12 kit as it’s way better detailed. I’ve also discovered that the Academy M36 has the correct engine deck and rear end I need to finish the conversion and have purchased a copy as my Dragon M4 is currently in limbo awaiting dispatch from the suppliers warehouse! As I erroneously thought I was buying shop stock. So while I wait for it to come in there may be a slight halt in progress, though I still have to attach the drive sprockets. The idlers will have to wait till I’ve received the Academy kit. I’m also looking to buy a set of metal track links to avoid the tight rubber band track issue. I’ll show you what I’ve got once I get them, I’m going for a set that has the duckbill built in (hopefully). Any who here’s where I’m at right now.
 P3310001 by Chris Wilson, on Flickr
 P3310005 by Chris Wilson, on Flickr
 P3310007 by Chris Wilson, on Flickr
 P3310008 by Chris Wilson, on Flickr
 P3310009 by Chris Wilson, on Flickr
 P3310002_01 by Chris Wilson, on Flickr
Cheers
Chris
7 Likes
So after a number of hours spent at the bench both the rear engine bulkhead and the engine deck have been attached. I’ll leave it all to dry/cure before I continue to build the rest of the rear structure. My book has arrived, Images of war M7 Priest. It has quite a number of pics of the early prototypes and the various M7’s built by various manufacturers, with the Lee/Grant early suspension through to the M4 type bogies. I’ll use it to add the various filler caps, stowage etc. Here are some construction pics to show you what has been accomplished thus far.
 P4030004_01 by Chris Wilson, on Flickr
 P4030005_01 by Chris Wilson, on Flickr
 P4030006_01 by Chris Wilson, on Flickr
 P4030002_01 by Chris Wilson, on Flickr
 P4030001_02 by Chris Wilson, on Flickr
 P4030003_01 by Chris Wilson, on Flickr
 P4030004_02 by Chris Wilson, on Flickr
Cheers
Chris
3 Likes
One question: why did you saw the sponson roofs to match the Italeri kit’s hull rear? The M7B1’s sponson roofs continued all the way back to the full-width rear plate — unlike on the M7, which had a “stepped” rear like the M3 medium tank.
1 Like
The Italeri kit is an M7 Priest so it’s sponson roof doesn’t go all the way to the rear and I’m using the kit supplied parts. The mudguards and where the rear lights mount are a single piece. The extension of the sponsons is something I will have to scartch build once the current work is dry enough to handle being worked on. Or am I misunderstanding your question Jakko?
 Screenshot 2026-04-03 230839 by Chris Wilson, on Flickr
1 Like
Made a start on my entry for this year. I’ll be working on “Hurricane”, a 2nd Armored Division M4 that was photographed on 2 separate moments, looking very different in both. First she was seen backing onto an LST, getting ready to cross the channel. At that time she had the large markings on her turret side which were typical for the division, and was painted full OD. She was also fitted with wading stacks, being expected to land on an open beach, because no harbors were yet available just a few days after the start of the invasion of Normandy.

Fast forward two months, and she is seen getting a new engine and looking very different. The typical black camo bands have been added and the turret markings have been painted over. Also visible in this picture (which I didn’t realise until the kind folks at Missing Lynx mentioned it), is that Hurricane had a small triangular shield added to the cupola. The shield had a small vision slit, giving the tank commander some cover when operating with his head out of the hatch. It may well also have been used in some way to keep the hatched semi opened, to provide some overhead protection.
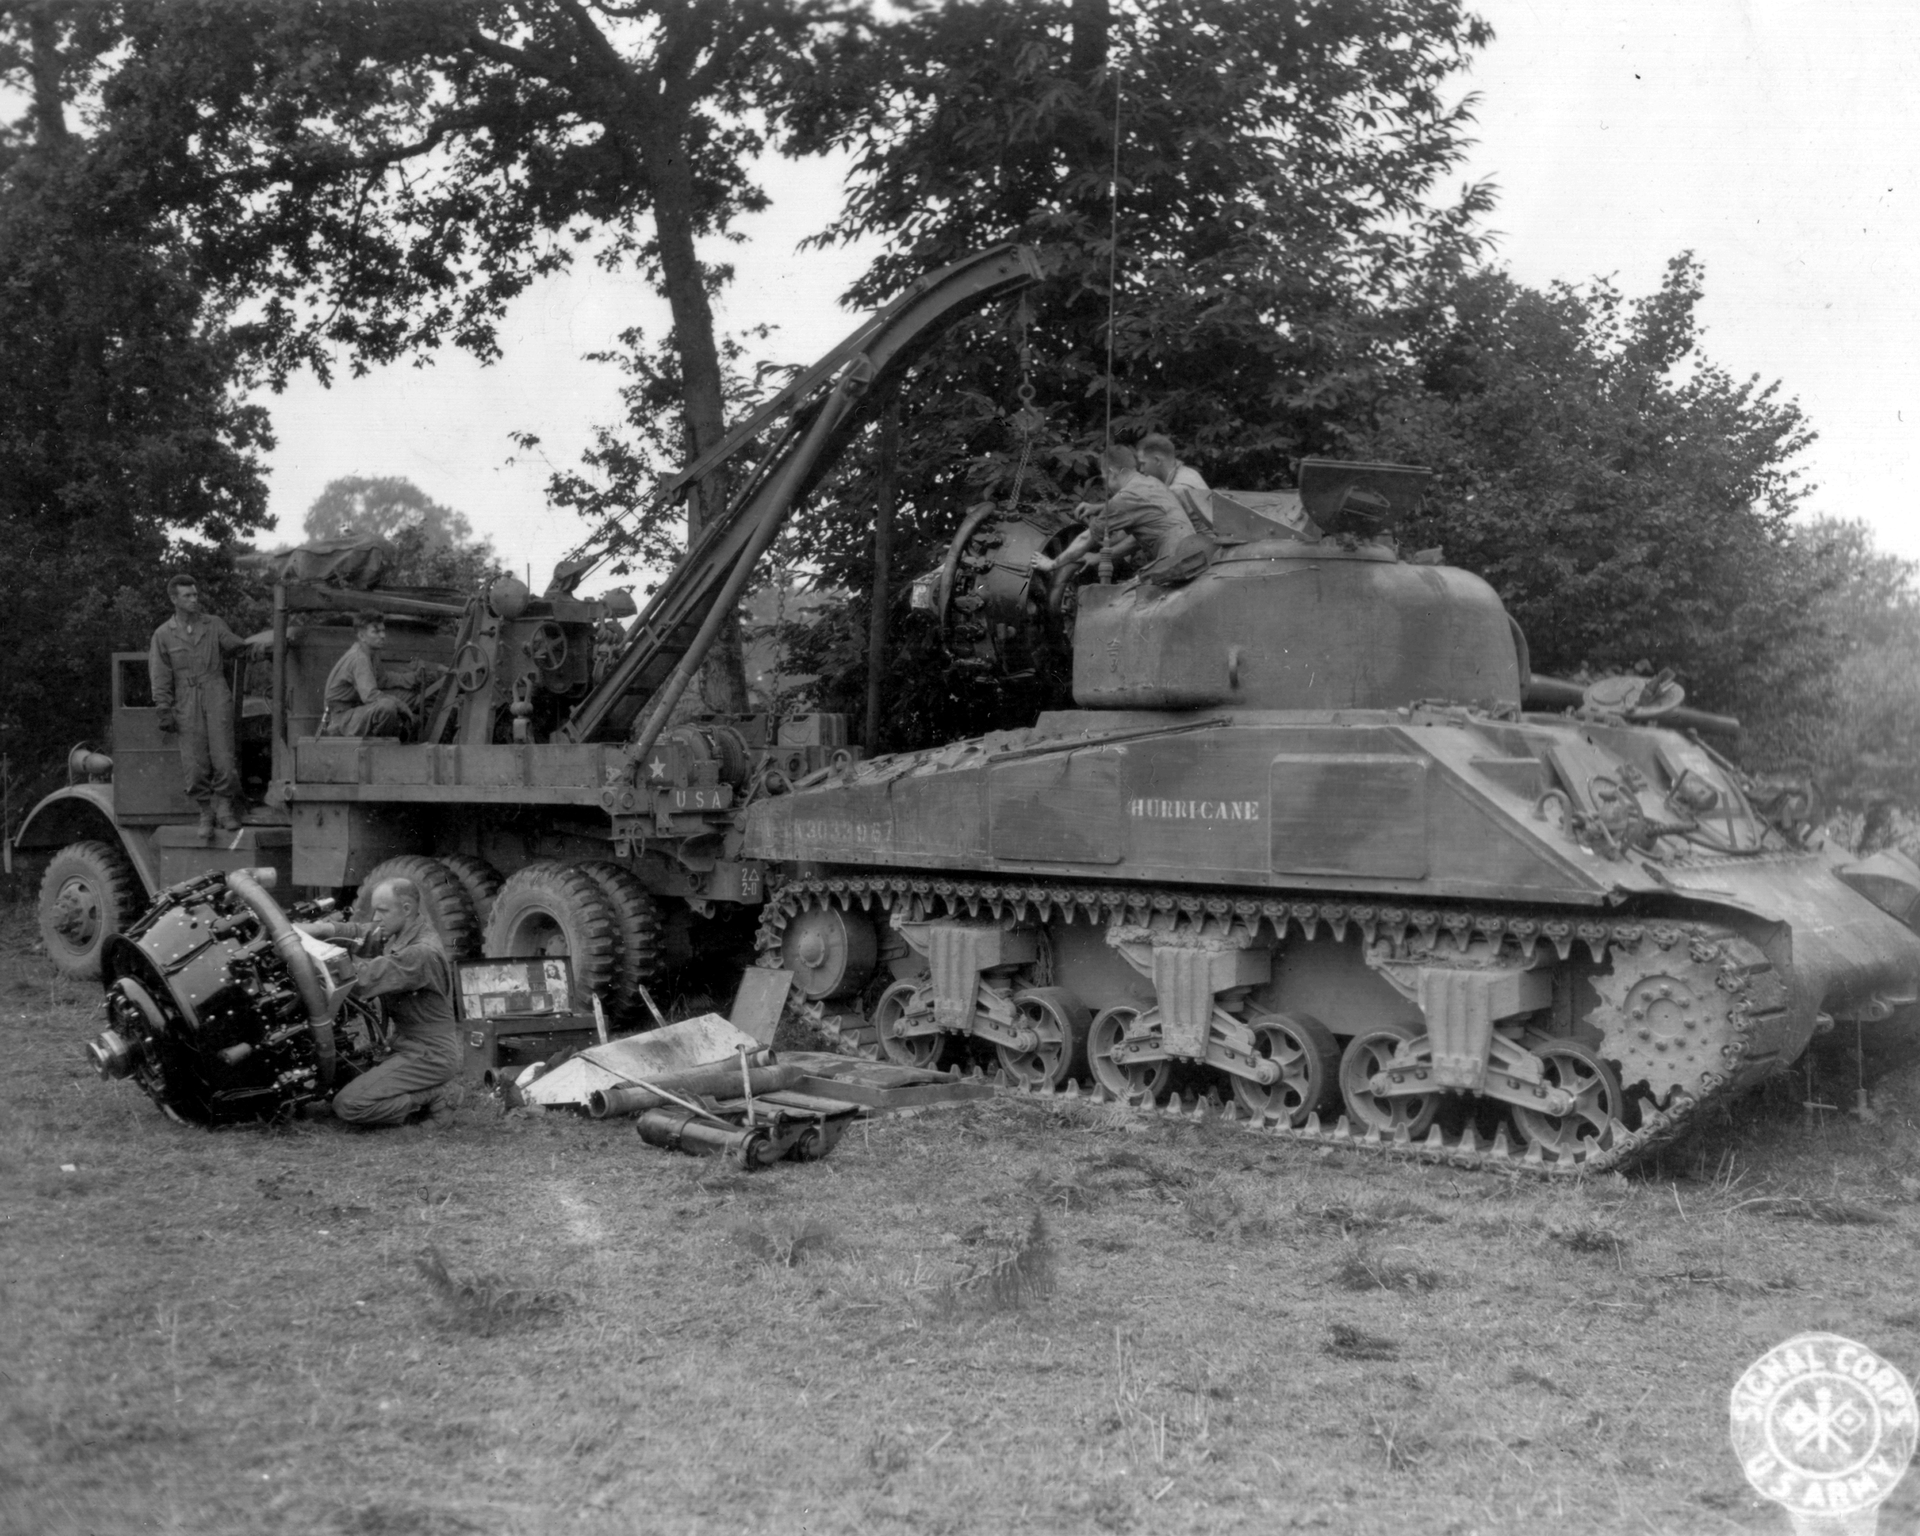
I’ve begun building the cupola.


7 Likes
Not sure, but what I meant is: if you hadn’t sawed the sponson roofs short, but left off the mudguards (108B and 109B) and just put the whole rear upper of the M4A3 kit onto the Priest hull, you would have made things much easier for yourself. Because the M7B1 had the same upper rear plate as the M4A3, which is full-width, so the sponson roof plates will extend all the way to that — meaning you’ll have to recreate the bits you sawed off once the rear plate is on.
1 Like
Ahhhh I see! My intention was that I was not going to leave a kit unbuildable by cutting it up or it needing to be converted into something else, I was going to use whatever spares I could from the donor kit to help me convert the M7. Most likely my Scots heritage but I’ve never “enjoyed” the idea of sacrificing two kits to build one model. But yes you’re correct it would likely have been much easier.
Cheers
Chris
2 Likes
You may recall that I initially suggested scratchbuilding the whole upper rear hull from plastic card ![]()
2 Likes
I do and my scratch building skills are weak at best lol. So I’ll take what I can to make it “easier” for myself lol.
![]()
2 Likes
I am going to join the group build with the 1/16 I Love Kit M4A1(76)…..with Israeli markings from the Sinai War of 1956.


5 Likes
1/16th!!!??? That’s a whole lotta Sherman!! ![]()
1 Like
Yes a big boy…..I just finished a 1/16 Panzer III ( I will post a link below)….I love the bigger size and sold off my 1/35 stash……my eyes and fingers are happier also. I now have about 8 1/16 models in my stash.
2 Likes